Reprinted with permission from Custom Woodworking Business.
This often-overlooked material, used by artisans centuries ago, is still useful in today’s finishing processes.
By Mac Simmons
In the late 1500s, Old World artisans were using gesso as a primer sealer for filling open-grained woods. These artisans needed to achieve a smooth, flat base for their faux paintings and fancy gilding, and the gesso was a very important part of the process. They also used gesso for creating decorative striated stuccos and other attractive relief finishes and as a wood putty to correct natural faults, imperfections and defects in the various substrates they worked on.
At that time, gesso was a do-it-yourself material. It was made by combining plaster of Paris, or gypsum, with liquid hide glues. The same type of Old World gesso is still used today in some of the finest finishing shops, in applications such as making up casts and molds for reproductions of carvings, rosettes and other detailed work. After these pieces are molded, they are usually faux painted to look like different woods.
Today, there are suppliers that sell a plaster of Paris/gypsum and hide glue gesso in a dry powder package, where the user adds the water. However, most of the gesso sold today is made from acrylic polymers and it is a ready-for-use, white, paste-like product. Color can be added by using a little of artist’s acrylic or water colorants. Colors can be mixed and matched to woods or to a final finish.
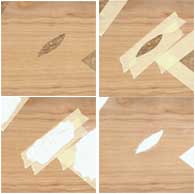
Repairing wamages with gesso putty
Gesso makes an excellent wood putty for filling dents, chips, scratches and other flaws in wood or other substrates. When using it for a repair, you should slightly over-fill the area so you can sand it level. There is very little shrinkage when the gesso dries.
Gesso hardens fairly quickly, but if you are in a rush to complete a project, the process can be accelerated with a heat gun or hair dryer. Once it hardens, gesso sands very well. It can be sanded by hand, but power sanding is really the best way to go (remembering to wear a dust mask, of course).
You can color gesso before you fill damages or you can do color touchups after repairs are completed. Gesso filler can be coated over with any of the conventional coatings.
Filling open-grained woods
It can be applied in either thin or heavy coats, with a trowel or a float to level it out. On smaller work, a spatula or putty knife can be used to spread it. If you want to apply thinner coats, you can thin gesso with a little water. In most cases, thinner coats are a good choice, because the thinner the applications of gesso, the faster it will dry. It also is easier to sand out dry gesso when the coats are thinner.
One note: While gesso has its place in filling the grains for painted finishing, it is not intended to replace the paste wood filler used on transparent finishes.
Another word of caution: When using gesso, try not to allow it to harden on your tools and hands. It can be cleaned up with a liquid detergent and water, but if it has hardened, you should use a good grade of lacquer thinner for cleaning.
A base for fancy finishes
Gesso makes an excellent base for applying gold and silver leafing and some attractive looks can be achieved.
For example, I have colored gesso with a colorant and after I gilded the piece, I scratched the leaf to allow the base colors to show through. This gives the gilding an added aged look. I also have used gesso under gilding to create a gold nugget-like effect. I drizzled the gesso into hills and valleys and, once it dried, I applied sizing and then the leafing. This left an effect of ridges in the gilding.
Gesso also can be used for doing striated finishes, using striated trowels, combs, graining tools or the teeth of various saw blades (or you can cut out your own designs). You create the striated finishes by pulling any of these tools through wet gesso, producing various effects by the way you manipulate the tool.
To start the striated finishing process, the surface of the substrate must be clean and dry in order to get good adhesion. Spread out the gesso with the flat side of the trowel to produce a uniform thickness. Then, using the serrated edge of your tool, create striated patterns in the gesso and allow it to harden.
After that, spray or brush on the color of your choice, and dry. Drying times will depend on the thickness of the gesso you apply, which depends on the patterns and designs you want to create.
Another gesso finishing technique is to use various types of cloth, such as linen, ribbed or other textured fabric, pressing it into set-up gesso to emboss a pattern. This will leave attractive designs that can be finished in many different finishing procedures.
You also can create various stucco effects with a trowel, brush or assorted cloth with different patterns. You can stipple gesso by dabbing it with a cloth and pulling it up.
Color gesso with an artist's colorants or spray it on. You can brush paint over gesso, once it is cured. You can use most conventional stains, glazes or coatings, as long as all the products you use are compatible and the gesso has fully cured.
A versatile product
Today, gesso is a much-overlooked material that has a place in most woodworking and finishing shops. Besides being a multi-purpose product for doing repairs, filling open-grained woods and creating decorative finish, it is excellent for finishing MDF that will have an opaque finish. And it can be used to make castings and molds to duplicate intricate carvings.
Among its advantages, it is fast-drying, has very little shrinkage and sands smooth. It also can be colored and finished with most conventional mediums and coatings. If you have never used it, it is definitely worth a try.
Reprinted with permission from Custom Woodworking Business.