by Ed Ferri
Ed Ferri is the founder of Quality VAKuum Products, Inc. and has more than fifteen years experience working with vacuum applications. QVP specializes in vacuum pressing and clamping equipment for the woodworking and plastics industries. For more information visit the QVP website at www.qualityvak.com or call 800-547-5484.
VAKuum Klamping is an application that can be used in the shop every day. If you have a vacuum pump, more than likely it can be used for vacuum clamping. Comments like "It's like having a third hand" and "I don't know how I would have held the pieces without the vacuum clamp that I built" signify the importance to those that use vacuum clamping in their shops.
Vacuum can apply up to 1800 lbs./sq.ft. of pressure and has several advantages over mechanical clamps: does not mar the surface, does not get in the way of cutting tools (improves safety), fast setup, even and uniform pressure (unlike a mechanical clamp that provides a point source of force). When used in template routing, the templates can be lighter in weight and reproduces more accurate pieces.
There are many vacuum jigs that can be made or purchased and all will improve the productivity or safety in the shop. Picture 1 shows examples of basic vacuum jigs; straight edge (SE), right angle clamp (RTA), baseplate (BP), template and toggle clamp jig (TG). The (SS) is a solid surface jig that is used to butt glue two pieces. It's two simple jigs sucked to each side and pulled together with spring clamps. These are just the tip of the iceberg of what can be made or purchased.
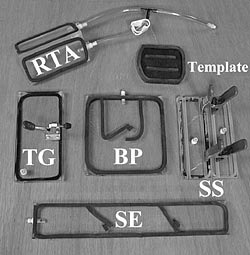
Picture 1
Picture 2
For example, some have made 60 clamps to hold hexagons together while assembling. The SE has the advantage of being able to place it anywhere on the work piece and does not have to be at the edge in order to mechanically clamp it in place. The BP can be placed on any flat surface (preferably nonporous), bench, floor or wall to hold a piece of stock or door, etc. The BP can also be used together with the SE (Picture 8). The BP is under the stock and holds it 3/4" above the table top, making routing or cutting a simple task.
Making a curved form for bent laminations (see Building a Curved Forum for Inside the Bag) is fast and accurate. Make one rib, then turn it into a quick jig and reproduce as many as you need. They will all be the same as in Picture 2.
Making a vacuum jig. In general, jigs should be made from flat, nonporous material and should be 3/4" thick when the vacuum connector comes in from the side. If the jig is going to be used over and over, like a SE, then it should be made from plastic that is nonporous, flat and dimensionally stable. Using plywood, hardwood or MDF may work for a one time or quick jig, however, they are porous or will not stay flat or both. Plastic 3/4" thick is available in 1' x 4' slabs and can be machined like a hardwood.
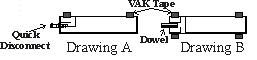
Cut the jig to size, then drill two intersecting holes as in Drawing A. Attach a quick disconnect to the side hole and apply VAK tape to define the vacuum area on one or both sides of the jig. If you use air line quick disconnects, your jig will have to be 1 to 1 1/2" thick to provide sufficient clearance. Also check to make sure they hold vacuum. Some need internal pressure to give a seal. For a quick jig, a dowel with a diameter that's just larger than the I.D. of your vacuum line can be used. Drill a hole down the center of the dowel and glue it in the side hole, then slip the vacuum hose over the dowel (Drawing B).
The vacuum gasket tape is important, as it must be made from closed cell foam, the right density, thickness and width for the job. Normally, weather seal gasket material does not work because it is not closed cell and has too light of a density. If the foam density is too light, then it will have a high compression set and not spring back to its original height after a dozen or so uses. If it�s too dense, then it may not give enough when the stock has a slight curve, thus you will not get a seal. If it�s too high, then you can get a rocking motion when template routing because it does not compress and become rigid enough when under vacuum.
Testing your jig for leakage is simple. Hook it up to the pump and block the vacuum hole(s) with your fingers. Read the vacuum gauge on your pump. If your pump normally gets 27"Hg and you read 20"Hg on the gauge, your jig has leaks. If it's made from plastic, this means you have a leak somewhere in the connections, assuming your pump is working correctly.
If you made a quick jig from wood, you should not expect to get maximum vacuum. When used with a work piece, always check your gauge for the vacuum level and calculate the force to make sure you have enough holding force.
Calculating the vacuum force. It's important to know the force being applied with vacuum and it is easily calculated. You need to know the surface area under vacuum, which is defined by the vacuum tape used to make the jig and the vacuum level ("Hg = inches of mercury) as read on the gauge when the piece is under vacuum. Just divide the vacuum gauge reading by 2 and multiply this by the area of your jig. For example, a vacuum straight edge 30" long and 3 1/4" wide would have about 90 sq.in. of vacuum area. If the gauge reads 20"Hg, then the vacuum generates 20�2 x 90 = 900 lbs. of holding force.
One jig can be designed to hold several sizes. Look at the SE and BP in Picture 5. They both have "gates". The lines going across the SE are VAK tape where the top one is closed and bottom one open. Thus, it could be used for 3 different lengths. In this case, a gate is made by removing only 1/2" of the paper that covers the adhesive on the bottom of the tape. This is butted against one side and stuck in place. A small piece of tape is placed where it will hold the gate open. This same piece keeps the tape in place when it's closed, as in the top gate.

Picture 3
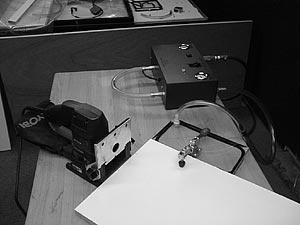
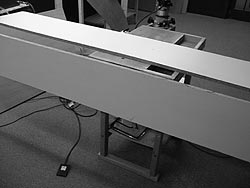
Picture 3 is a small vacuum table used for assembly and has a 6-jig manifold. This allows several jigs to be used at the same time. It has a vacuum plate on the side for holding doors or stock on edge. It allows the user to set the work at the best height for him and makes cutting hinge slots or filing/planing a door easy and quick. This same set-up allows for one person to easily put large pieces together by themselves.
Types of vacuum pumps. Both electric and air-powered (venturi) pumps work with vacuum jigs. The air-powered are better suited because they run cool and do not have any moving parts to wear out. The Q.V.P. VAK Pump is guaranteed for life. Pumps are measured by vacuum level ("Hg) which relates to the force generated and vacuum flow, which is how much vacuum air it can pull in. Higher vacuum flow is important when working with porous material like MDF, particle board, etc.
Electric pumps should be used with a pneumatic foot pedal. This allows the pump to run continuously and make and break vacuum to the jig with the pedal. If you start and stop the motor every time you use the jig, this can cause an excessive amount of heat and the thermal overload protection, built into the pump, will shut the pump off and prevent the pump from burning itself out.
Pictures 4 and 5
The foot pedal has two major advantages versus using a hand valve. It leaves your hands free to hold the work piece or cutting tool. For example, when using the side plate to hold a heavy piece, as in the pictures on the back page, both hands will be needed to lift and set it properly in place. The foot pedal is then stepped on to create vacuum. It is also faster and less fatiguing when template routing many pieces in a day. Some users claim 20% more productivity from this feature.
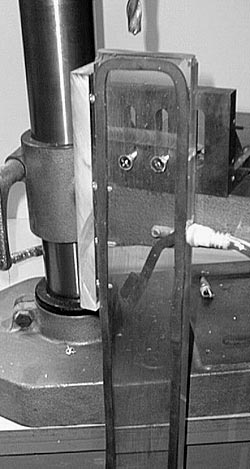
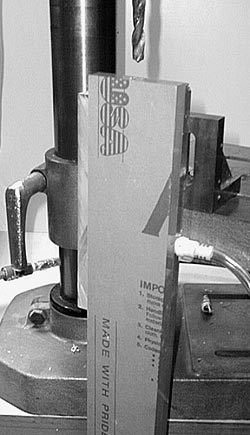
The above vacuum jig holds a piece of stock on end to drill a hole perpendicular to its length. The jig is bolted to the drill table and the stock is pushed into the jig, which keeps it centered and perpendicular to the drill.
Applications: There are many uses for vacuum clamping. It�s a matter of need and creativity. One user had a job to rout and sand 1500 plaques. The first time it took him 17 days to complete the job using mechanical clamping methods. He received a repeat order and did it in 3 1/2 days with a simple vacuum clamping set-up.
Using vacuum to set glass in doors and windows is a unique application. We have made special units for this application because they require low vacuum level with high vacuum flow. The normal way to set panes for one mid-size shop was to apply the glaze, set the pane in place, then push the pane down with one hand and staple the frame in place. This was slow and dangerous, as the pane would break on occasion. The solution was a vacuum table covered with gasket material where any size window could be assembled. When all the panes were in place, a low vacuum (2 to 3"Hg) was pulled. This pulled the panes down and the operator could use two hands to set and staple the frames in place without the need to press on the panes.
Another variation on this was assembling large panes in entry doors. Here the door had a rubber gasket placed in the opening. A large pane (up to 2' x 6') was set in and vacuum pulled. Here spacing was critical. They controlled the vacuum to center the pane to within .005 to .010" and then fix it in place with molding. Because vacuum provides even and uniform pressure, it could be used to easily, accurately and quickly position the glass. They went from assembling 5 doors in 4 hours to 14 in 4 hours.
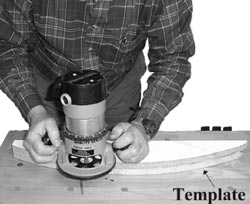
A large shop used two men to put a bullnose on 3 and 4 diameter table tops using a template held in place with mechanical clamps. They went to a vacuum template that was much lighter and now the job is handled by one man.
Right angle clamps can be the biggest time saver when assembling cabinets. By using 3 or 4 RTA�s, you can set the sides in place. Now it is very easy to go back and set the mechanical clamps in place while the glue dries. This is especially true when assembling large cabinets. Again, one man can do it efficiently and quickly. One user noted that he saved, on average, 2 hours in the assembly time of a set of cabinets by using the right angle jigs.
Picture 6
Picture 7
Using the table top as a reference point for cutting biscuit slots for both pieces will give exact alinement. The toggle clamp holds one piece securely to the table. The RTA acts as a single-sided vise and holds the other piece upright and at a 90-degree angle to the table top.
Sometimes a vacuum clamp is so simple, it doesn�t seem possible. The key is to think and understand how it works and it can be a tool that you will use every day in the shop. You�re limited only by your creativity and imagination.

Picture 8
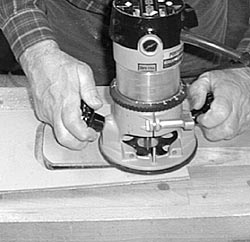
VAKuum Straight Edge, no mechanical clamps to interfere with router. Fast accurate placement. A baseplate is under the plywood piece, holding it 3/4" above the table top.
Picture 9
Picture 10
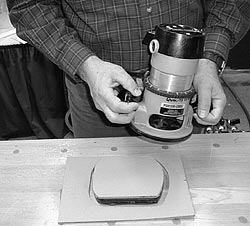
Template rout in one pass, with no mechanical clamps to interfere. Fast, accurate and safe.
Picture 11
Picture 12
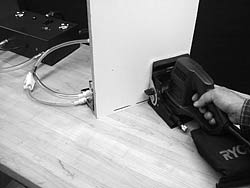
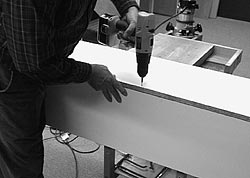
One person can assemble two large pieces without help. Hold one piece to the side of the table with vacuum. Align the top edge even with the table top. Note the foot pedal to start/stop the vacuum. This leaves both hands free to handle the heavy workpiece.
Slide the other piece over the edge and screw together. VAKuum Klamping makes the job easier, faster and it�s simple to do.
Ed Ferri is the founder of Quality VAKuum Products, Inc. and has more than fifteen years experience working with vacuum applications. QVP specializes in vacuum pressing and clamping equipment for the woodworking and plastics industries. For more information visit the QVP website at www.qualityvak.com or call 800-547-5484.