An Edge Band around a Solid Wood Table
It's impossible. However, here are some ideas to play with. August 3, 2009
Question
Has anyone combined these techniques in a table? I say it's stable, but I'd like to quiet the doubters. It's a solid 5/4 cherry round table with 1/8" x 2" laminates glued as a border 1" thick. We can router a race track edge, and have a Maloof rocker look which would be awesome. The finish will be tung oil, and matching coats of poly top and bottom.
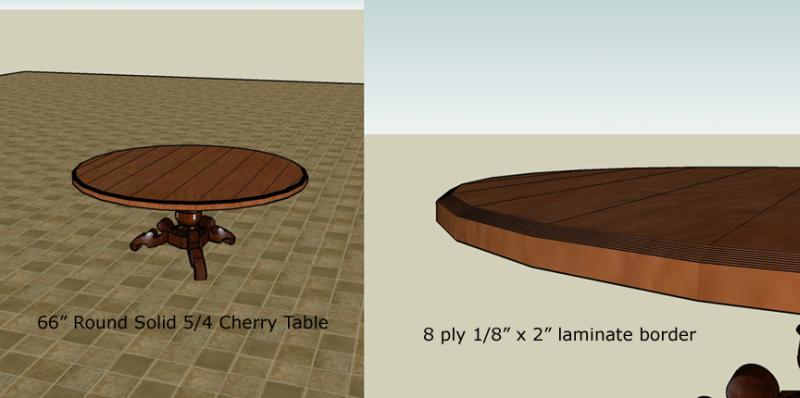
Click here for higher quality, full size image
Forum Responses
(Furniture Making Forum)
From contributor J:
Not sure what about this says "Maloof rocker," but it's a very bad idea with a solid wood center. If were veneered top then it could work, but not with solid.
From contributor B:
It�s guaranteed to blow apart one day. When the top shrinks it will crack somewhere and when it expands something else will crack. Veneer would be the way to go. The Maloof look is hard to see in this design, especially with the base as drawn.
From the original questioner:
I guess I didn't phrase my question correctly. I'm looking for suggestions on how to build this table so it stays together, or real life stories of failure. I am aware that wood moves. Would a hidden layer of 1/8" cork allow enough movement? Also, I don't agree that the wood would crack, as per the first two responses. I suspect the laminate edge would be so strong the solid cherry center would buckle up as it's locked in by the strapping of the laminate edge. It�s similar to ice movement on a lake.
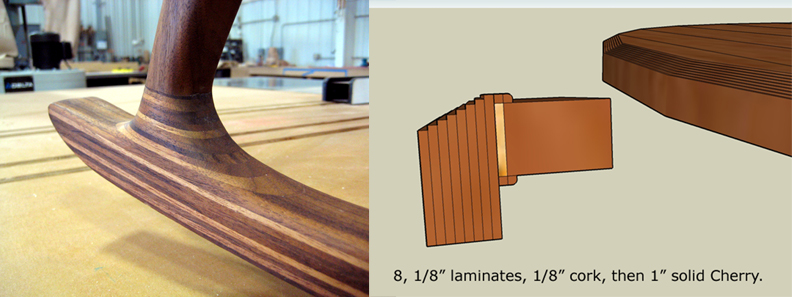
Click here for higher quality, full size image
From contributor J:
You got your solution: the center of the table should be veneered, not solid. Regardless of whether you're tired of it, 'no' is the correct answer to some questions. This is one of them.
From the original questioner:
Thank you. You're right. I own a custom shop, and I would never sell this table. I would build it with a veneer top. I also teach. A student built this cherry top, and now wants a thicker edge. He is going to do something. If it cracks he can fix it. He likes the look of the striped laminated edge. The best solution doesn't exist anymore. So I guess I'm looking for a solid second place.
From contributor J:
I see. There's no way you can do a continuous laminated edge all the way around because seasonal movement on a (guessing) 3' diameter table could change the circumference by nearly an inch. But, you could do something that accommodates movement. What if you made the edge in a half-dozen segments with small, intentional gaps between them, located on the edge with a tongue and groove or a spline, not glued but held there with some mechanical fasteners that would allow a bit of give and take? Something like that could work.
From contributor G:
You can use a piece of anything. The cork is good to make the table bigger while you are making the ring, (except for the parts the over and underlap the table), but at assembly time leave the cork out. Also better increase the cork spacing thickness to a space of 1/4 to 3/8th�s. (Remember the cork strip is not going to be assembled into the final table). The overlap and the underlap strips need to be wider, they do not get glued to the top. Only the rim ring and then you have a floating panel like in a door.
A hand full of "space balls" spaced around and secured to the table top with dots of glue would help center the hoop. Secure the hoop with one fastener at the 12 and 6 o'clock positions (the grain running that same way). It would be nice to have a few floating spines, unglued biscuits perhaps, around the circumference (but I don't see how you can get them in). The center will float like the panel of a cabinet door.
If you do not allow enough expanding room with seasonal movement the whole thing will blow up. Remember to finish the top before adding the rim (or you will see unfinished spaces when the top is seasonally dry), and when finishing the rim don't let the finish glue the rim to the top.
Also have your student glue a run of thin one inch tall blocks together. Make a yardstick in effect, with the grain running the wrong way. Put it someplace warm and dry for a few days and measure it, then put it someplace damp and measure how fast it gets longer. The amount will surprise him and is the point everyone here has been talking about.
From contributor D:
Ditto to all the remarks about the solid center expanding and contracting vs. the relatively stable rim. However, this can be pulled off as first stated if and only if the table is kept in the exact same environment that it is built in. No changes in RH over the years - period. At least not very likely.
There are two other, more doable solutions with the parameters given:
1. Envision a rim of laminations with a 3-4" width of stable MDF or ply rabbeted under it. This could be attached to the table with expansion/contraction slots to allow movement, and a 1/4" reveal all around the perimeter between the solid top and the rim, both parts flush to each other. Of course, since wood is going to expand only in width and not length, the 1/4" reveal will preserve at the "ends" of the table and come an go at the "sides".
2. You can make the rim proud of the surface (as in the cork drawing), or rabbet the top to receive the rim much like a frame and panel. There is no need for the cork (or spaceballs). Just build it to tight fit and let it the top move within the rim. The best solution may be a hybrid of both the above, with the table surface rabbeted down to receive a flush rim. This still leaves a crumbcatcher, but is better than a raised rim (glass tipper).
It is wise to picture the entire project all the way through and then execute as planned. Adding or changing major elements en route not only compromises your design and the final product, but encourages you to sidestep the discipline needed to produce what is planned. Once you have all the basics down as rote, then, and only then, can improvisation enter the shop. I used to say this at the end of classes when I taught - hoping the one guy that couldn't stay with the program would get it.
From contributor T:
5/4 solid cherry table top. Why do you think you need an edge at all? When properly mounted to the base to allow for movement, then it should stay flat, or relatively so, through the years.
From contributor S:
I teach also. I might use this as a discussion topic during class. That way, the various levels of understanding regarding what wood does can verify what you are trying to teach the class; which is a nice way of saying "don't do it."
That said, take the above examples of work-around�s and see what the class has to say. Make it a math project to see what the current MC is, predict how much the table will grow and shrink and why. Use the end blocks someone suggested to demonstrate the principal. Make up end blocks as wide as the table, and then see how much it grows and shrinks. I don't know about you, but my students are very accomplished and advanced woodworkers; often woodworking professionals with advanced degrees. In my experience even these people have a difficult time with this simple concept; that wood responds to changes in moisture the same way metal does with temperature.
From contributor M:
Tell your student to sell the table and make a new one the right size. Learning to sell a piece is probably a more valuable lesson to learn anyway.