Applying Painted End Panels with a Seamless Look
Cabinetmakers work on a way to add a painted end panel to a cabinet without showing a seam where the panel meets the face frame. February 1, 2011
Question
I have questions about applying painted end panels. I plan on applying the 3/4" end panel flush with the edge of the face frame. The box is constructed with the interior box panels flush with the inside edge of 1-1/2" face frame, so I will have 3/4" inset that the end panel can recess into.
The problem is I want it to look as if there is no seam between the face frame and end panel. I will be pre-finishing and then applying the face frame, so there will obviously be a seam. How do you do it? Is it possible to pre-finish the face frame connected to the end panel without buckling it? Or how about 45ing the face frame and 45ing the end panel and touching up the corner seam?
Forum Responses
(Cabinetmaking Forum)
From contributor M:
I've done it like you suggested - attach the end panel to the face frame, finish, then attach the finished assembly to the case. Works fine. Just keep everything square. Otherwise, it doesn't take that much to mask off the cabinet interior and finish after assembly. I think either is better than trying to make a good seam after finishing.
From contributor B:
"The problem is I want it to look as if there is no seam between the face frame and end panel."
Not gonna happen! The paint would crack in any case, because there are two pieces of material.
From contributor J:
A lock miter is what I would do.
From the original questioner:
I like the lock mitre idea. This is a 6ft long stretch of face frame with a 30" end panel. Thanks for the info. Now the question is, assemble the two on site pre-finished, or...?
From contributor O:
Just make it as one piece and spray it as an assembled unit, attached to the box. I do it all the time. I've mitered the end panel to the face frame, or just glued it on square and clamped it. Flush it up, bondo the seam if necessary, and spray away. Seamless.
From contributor S:
Clamp on your face frame with a miter. Use a mitered guide block to get your face frame where you need it left to right for your end panel. Miter your end panel. If your cab is 12" deep, make your panel 12 1/4. Mitered stile 1 1/2, wall stile 1 3/4. 1/4 for scribe. Put glue on both miters and then on ply side only where stile and rail touch and clamp. Clamp miter first, then the rest. Make sure to wipe glue off miter right away. If you have enough room, while the glue is hardening, lightly round the miter with a smooth round object. This will take the sharp edges of both miters and push them into the glue and seal the edge perfect. Sounds like a lot, but it's easy.
From the original questioner:
Thank you all. The main issue I'm having is that this island is too big to move as one. So I will have to assemble on site - 3 boxes as well as the face frame, since it's 6ft and seamless.
I'm thinking I will miter the edges of the face frame stiles and then flush fit the end panel (note: end panel goes all the way to floor, no kick space) and glue and screw on site. Or not miter the end panel and work with the edge of the face frame. Not liking that idea, but seems that big custom cabinet place likes doing that crown point. I'm still sort of lost due to this island having to be assembled in sections on site.
I wish I could just butt the 1.5" thick panel end up to the rails and have an integral box end as well, which would show minimal seams, and be done with it. Is this a doable alternative? Could I pre-attach the end panel to the last box that makes up the island and then attach the face frame from there? Basically the reverse of everything I've ever done...
From contributor S:
Is the island 30" deep? Why does it have to be 3 pieces?
From the original questioner:
30" x 72" - sorry I wasn't more clear. 3 boxes, 1 face frame. I hate doubled face frames when there isn't a need.
From contributor O:
30 x 72? Why can't you move it as one piece? Put it on some dollies and roll it. That should fit through any door. Get help on moving day if you need to, but don't make your life difficult trying to do something on site when it's not necessary.
From contributor S:
I've even had homeowners help me bring cabs in the house. It would be too bad to piece together a mitered cab. It defeats the purpose.
From the original questioner:
Thanks. I'm pretty sure it will fit through doors (multiple), since kicks are separate.
From contributor G:
I vote you go with the 1 1/2" end panel idea - I like your thinking.
From contributor C:
I would assemble the end panel with a miter to a mating face frame member and sand and finish it. I would leave the rest unattached and assemble it on site using a dowel joint or a domino (if you're so inclined). I have never done this but after thinking about your query, this is how I would attempt it.
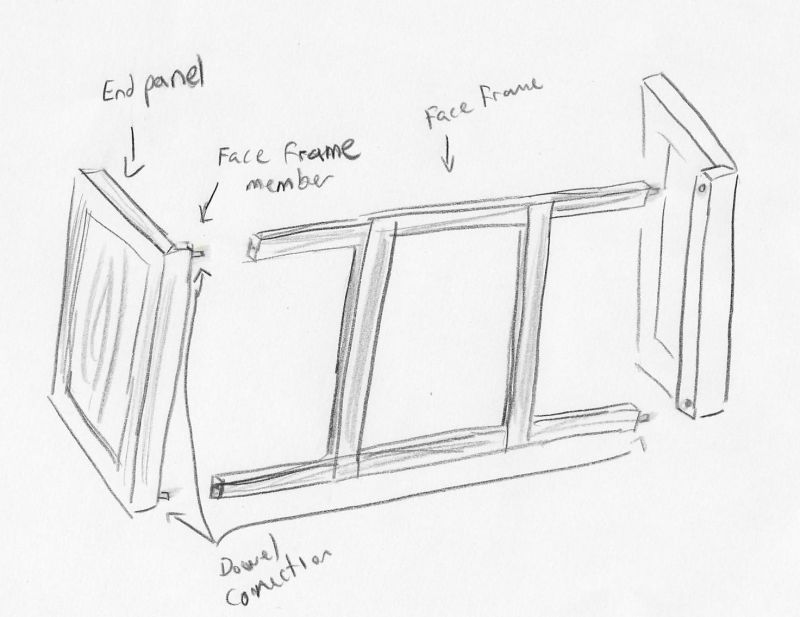
Click here for higher quality, full size image
From contributor R:
I've used contributor C's method. Works fine - just use dowels like he's drawn, assemble with dry fit, sand, paint in shop, pull apart, put together on site. I used to biscuit frames on; now I use PL Premium and toe nail with the Omer hiding nails behind drawers, etc.