Arched Crown Moulding
You may never have to do it, but just in case you do, this thread with expert analysis, practical tips, and great pictures will help you wrap your head around the problem of fitting crown moulding to a barrel-vault wall-to-ceiling joint. November 2, 2010
Question
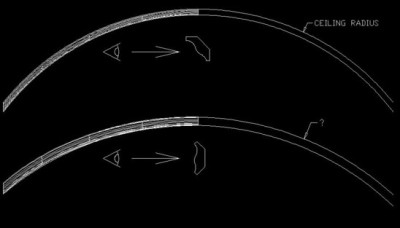
Here's a question for you math guru's: how do I calculate the arc for crown molding for a barrel ceiling?
Forum Responses
(Architectural Woodworking Forum)
From contributor D:
The radius is simple to figure - no math guru needed. If you are talking about the difference in width from the horizontal crown to the radius crown, that is called a developed molding. If you visualize the arched crown on a short radius arch intersecting the horizontal, you can easily see that the horizontal crown will be substantially narrower than the arched crown.
This is why you see cyma recta or cyma reversa curves on the bonnets of highboys, etc. The molding levels at horizontal before it miters around the corner. At any rate, draw a full size section of the horizontal crown and the curve coming in at the chosen radius. Either the curve or the straight is adjusted in width along its full length to make the corner. Since even a small radius pales for dramatic width changes, it is often omitted. If not omitted, it can be run straight and level and not run at the curved ceiling. No math required beyond simple geometry.
From the original questioner:
Thanks for the response. I'm not trying to figure out the width of the crown so it will match well with the horizontal crown, but that is something I need to think about. Let me describe my question in a little more detail. You're right, it's not hard to determine the radius. So if I was just making a flat trim that would be simple. But crown molding is going up at an angle with-in the radius. In my simple mind we are really dealing with two radiuses, which can be seen if you go to the top of the barrel ceiling. The larger radius touches the ceiling, the smaller radius touches the wall. But then it seems that the angle of the crown also plays a role, so that the actual radius you use is much larger than the radius of the ceiling, but as you fit the crown in place it becomes the proper radius.
Is that clear as mud or what?
From contributor D:
I think we are both talking about the same effect - just a bit muddy for both of us. When you say you are going to have to deal with the width of the curved crown - that is what I'm talking about. As I picture this, it is all that is going on. This will override your concerns about radii. This is where the idea of developed crown comes in. Let's picture a half circle barrel vault for a moment. As the curved crown sits at top center, let�s say the projection is 3" out onto the ceiling and 4" down the wall � same with the horizontal crown, of course. Now, as the curved section comes down to the horizontal - at the point the wall goes from straight to curve the 4" drop of the curve will hit the 3" projection of the straight and not work.
If you mentally picture less of an arc, the problem is still there, and only goes away when horizontal meets horizontal. This is the same thing that happens when one tries to run crown up a cathedral ceiling. Try drawing it full size or to accurate scale. Or if some innocent bystander knows how to line up digits into a drawing, they can show it pretty quick.
From contributor J:
I am not quite sure what you're asking either. A crown molding first starts out as a flat board (or line) that is set at an angle between the intersection of the 90 degree wall and ceiling. Whenever you put a radius into either the wall or ceiling, the angle of the crown itself now becomes part of a mathematical cone which can be calculated. If you were trying to take a flat board (crown) and bend it into a finished horizontal or vertical plane radius, you first have to mill it into a different flat radius.
In order to calculate this, the radius of the floor or ceiling will be the base of a right triangle and the length of the hypotenuse becomes the actual radius of the milled crown. (The angle of the hypotenuse is of course, the angle of the flat board of the crown itself.) The only math required is right/angle trig. Does that make any sense? In practice, it is only rarely possible to bend crown molding into shape but I have done it on large radius walls (both concave and convex). The crown moldings were first run in long flat arcs through the molding machine (just like the straight stock). These bundles of curved crown looked the same in every detail as the straight pieces.
On the job site, these flat, curved crown moldings were then bent into their horizontal positions around the curved walls and screwed to secure backing blocks. The examples of curved crown moldings which I have seen here on WOODWEB were custom made from thick glued-up, squared stock and made to the correct radius (no bending required and no "tricky" cone calculations).
These moldings were shaped in the vertical position and run to the required radius. If you do it this way (and you probably will) your barrel ceiling crown molding with its' vertical radius, will require shaper knives that cut from the bottom of the detail instead of across the face. Now you have to ask yourself "if the detail can even be cut this way?" Only simple ogee shapes are able to be milled from either the vertical or horizontal position.
From contributor L:
Is this what you are talking about?
From the original questioner:
Yes, that is exactly what I'm talking about. Contributor J, once you explained it as a cone I can now see it in my head. What I'm trying to do is lay a flat board around a cone, in essence. So how do you calculate that radius?
From contributor H:
First, just in case you were thinking of going this route, you cannot take a piece of profiled straight crown moulding and bend it on a curve. Even a 1x4 flat on the wall would be difficult to bend to a curved ceiling, but a crown moulding leaning out from the wall at the top would just lay over flat down towards the floor when it was being bent. On the other hand if you are trying to figure out how to make a curved crown from scratch then the discussion is making this more complicated than it actually is.
For the moment ignore the crown profile. Instead picture a 1x4 flat on the wall, curved to follow a ceiling with a 100" radius. The radius at the bottom of the 1x4 is simply 96 1/2". Now, picture that 1x4 as a 4x4. There is no difference in the radius at the ceiling, it is still 100". Since the 4x4 is 3 1/2" high, just like the 1x4, the radius at the bottom remains the same at 96 1/2".
Finally, take that curved 4x4 and cut the profile in at the appropriate angle. Nothing as changed with regard to the radii. The top at the ceiling remains the same and the bottom is still 3 1/2" less than the top.
If you can picture this then you can see that instead of using a 4x4 you could start with a 1x4 layer against the wall, then working out away from the wall add a 1x3 layer with the tops of both layers touching the ceiling. Then add a 1x2 layer, again aligned with the top of the other two layers. What you've done is made up a stepped blank on which you can cut your profile, saving having to machine away all that extra material on the 4x4. Does this help answer the question?
From contributor H:
Now that I've written all that I think maybe I'm not answering the right question! If you are just trying to figure out the radius at the bottom of the crown then that also is pretty straight forward. Ignore the width of the straight piece of crown moulding, which might be for example a 4 1/2" crown. The 4 1/2" refers to the face width of the crown moulding which is how wide the straight moulding is when sitting on the work bench.
However, when you place that crown moulding up in place you have two other dimensions to consider, the horizontal and vertical projections. It is the vertical projection, how far the bottom of the moulding drops down from the ceiling that determines the radius at the bottom of the crown. A 4 1/2" face 45 degree crown will have about a vertical projection of about 3 1/2". If the ceiling has a 100" radius then the bottom radius of the installed crown will be 3 1/2" less than the top, or 96 1/2".
If you want to know the vertical projection of an existing piece of crown moulding take a short piece and hold it up against the ceiling and just measure the vertical projection. Or do the same thing with the moulding upside down on a table.
From contributor J:
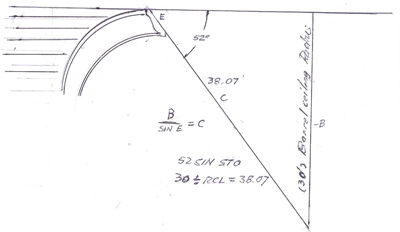
My example gives a ceiling barrel radius of 30' with a 52 degree crown molding angle between the radius ceiling and the flat vertical wall. My idea is to mill a flat concave arc crown molding on a 38.07 radius and spring it into position along the inside ceiling radius. I think this would work providing the flat crown molding will bend to a 30' radius. As I've said, I have done this kind of thing before (years ago) but I was working with curved walls and flat ceilings not flat walls and curved ceilings. Anyway, I think it's the same problem.
From contributor J:
Contributor H - you're right of course, but we're not taking a piece of profiled straight crown molding and bending it on a curve, we�re bending a curved piece of crown molding and we're counting on it to lay over at the top (to become part of the cone) and to fit the wall or ceiling. Crown moldings like this can be saw-kerfed along the back with a radial arm saw to ease the bend and help coax them into position.
From the original questioner:
This is turning into a real head-scratcher! But this input is very helpful. The drawing from Contributor L is exactly what we have to accomplish. His top view shows the crown at an angle installed. The bottom view shows the crown flat, and displays a different radius, a larger radius. Then, as the crown is installed, it is sprung into shape. This is what I was trying to describe in my second post but didn't do a good job. Contributor J also included a drawing with some math to determine the proper radius. That formula is what I'm trying to find. However, my math skills aren't where yours� are. Can someone explain at least a little what the formula is saying? I do think that a curved wall with a flat ceiling is exactly the same if you�re on the inside of the curve not the outside. If you�re on the outside I think it would be the same basic formula just in reverse.
From contributor H:
When I say straight crown I mean a piece of profiled crown moulding that is milled out of a straight board as opposed to a curved blank. I do not mean a flat faced crown moulding (not a 1x4 set up against the ceiling at 45 degrees).
So, just what is the goal here? I thought I figured out the question to be how to determine the radius at the bottom of the crown. That is just the ceiling radius minus the vertical projection.
Now the discussion seems to be talking about bending a pre-profiled piece straight crown moulding into place at the curved ceiling. I've never considered that to be doable but you say you've actually done it so there must be times when it can be accomplished. For a crown moulding it seems you would have to figure out how to hold the bottom in place while the top somehow rolled down into the correct position.
So, what is the question here? Determining the radius at the bottom of the crown or coming up with a way to bend pre-profiled mouldings into place on curved surfaces? I'm totally confused but very interested. If I could come up with a way to make straight hardwood crown bendable it would supply a real boost to the business!
From contributor D:
I think that taking a flat faced curved crown and springing it into place is not good practice. Not to say you can't make it work, but the difficulty in doing this - and keeping it in place will outweigh the cost of making the crown to the proper radius and angle and center point orientation. Just remember to describe the outer radius, and that the curve is in elevation, and not in plan. The upper edge of the crown will have a larger radius than the lower edge, by the amount of drop. In plan curve crown, the upper edge is a shorter radius than the lower edge, by the amount of projection.
So now my question comes up: how will this arched/curved/ bent crown intersect with a the horizontal? No matter how you do the arch, it still will not mate with the horizontal. If that can't be reconciled, then of what use is the crown beyond a very interesting thread?
From contributor J:
Let me give you an easier method. This involves ripping the straight factory crown molding into bendable strips. Since your crown molding is a vertical bend, rip it first into a series of horizontal bendable layers. This is done by setting the bevel of your tablesaw to cut a horizontal strip from the crown molding which is laying on its back. Now rip it all up and number each strip. Take a second piece of crown molding and rip it up also, but first move the table saw fence the width of the saw blade. Number all these strips as well (with a different colored pen). Now exchange all the odd or even numbers so that you end up with two separate bundles made up of different pieces. Stack them together in sequence and you should end up with a pair of bendable crown moldings.
Now build a bending form or work at the ceiling against angle blocks. Glue and staple each piece in place and against each other. (I use a fine wire stapler). The next day you can take the curved molding down (or off the form) and sand it all pretty and smooth and trim the edges.
If the two pieces that you started out with were cut from a single length, you should have a very good grain and color match. Crown molding bends are typically vertical and in this case, you have to build an angled ripping jig since the table saw won't tilt past 45 degrees. I got pretty good at this technique working inside a 15,000 square foot house with practically no square corners or straight walls.
From contributor J:
Draw an angle and connect the lines by a radius drawn from the vertex. Cut it out with scissors and wrap it around until the lines just meet and tape them together. Of course you'll end up with a cone that will stand up flat on the table. A curved crown molding is cut from the bottom of this cone, you just have to lay-out the right cone. The diameter of the base of the cone must equal the plan radius and the pitch must equal the angle of the crown itself.
The bent crown molding piece cannot go beyond the tangent point of the curve but at that point it should mate to the straight sections. You can make concave or convex bends by running the profile detail one way or the other on the flat arc. Your only limitation is the bend-ability of the material itself.
From the original questioner:
You have put a lot of thought into your posts. At first I didn't see the real relevance of the "width" of the molding, but as we end this thread it is perfectly clear how essential that is to the final product. Looking at your posts together gives me a rounded view of other elements that must be factored in besides a simple formula. Your experience and professionalism are apparent and give real credibility to your advice. Thank you.
Contributor J, you speak my language. You approached the problem directly, backed up, turned around, came at it again, constantly working the problem to see how you could help me with it, and teaching me in the process. The last post was the crowning touch as you described a simple way to get a mental image of the problem, which for me is essential. If I can see it, I can figure it out. Until then it's a lost cause. I'm going to work with the formula in your drawing and make a spreadsheet calculator that I can add to my collection of calculators. You are an intuitive problem solver and an excellent teacher. Thank you.
Contributor H, you too approached the problem from a couple of different directions and helped me see a bigger picture. The idea of laying up narrowing widths of material and then milling it is something I already do, but I hadn't thought of it for this application. I have the CNC to cut the arch pieces, the tilting shaper, we cut our own molding knives and templates and of course can scale the profile if needed. We have programmed the 3-D files for arched crown for some of the French provincial style cabinets we build, (which we don't build often). It's a slow way to make crown, but we could do it. We also have the clamp set up since we make curved moldings and curved jambs. So if we wanted to glue up strips we could do that too. The shaper is the faster approach to actually cutting the crown in this method. But you got me looking a direction that I have more experience in. Thank you for sharing your expertise.
Contributor L, your drawing was right on point. If you have any other direction to offer I would welcome it.
The fact is, I don't have a job in front of me that calls for this, but I know I will at some point since we are the most custom shop in our area. I have asked many who have higher math skills, but no one really understood the problem. You do understand the problem. Your combined advice though has helped me to come to some conclusions. First I now have two approaches to solve the problem. Most importantly, there are good reasons to discourage the client from this design choice, and if they stick to that choice, I have a more realistic picture of the challenges involved. I know this is a long post, but you guys have really helped me, and I want to acknowledge that.
From contributor R:
I would do this by modeling the crown in 3-D on the computer. This would give you the exact profiles that would intersect perfectly at the Barrell Ceiling/Wall intersection. You could get the profile of the wall crown milled, and cut the Barrell Crown on the CNC machine. Depending on the span of the ceiling, the crown would probably need to be jointed several times, using butt joints. This is a fairly straight-forward modeling and machining problem, although it is time-consuming. The advantage is that you know that it will work the first time, and you are not trying to bend or flex something into place, or staple a bunch of tiny strips that are trying to slide around.
From contributor J:
I just want to correct or add a couple of things before I sign off. Flat-arc crown moldings made as I have described, can be run straight beyond the springing tangents so long as you can mill them this way. My moldings were run through a radius channel so they had to be all curved but CNC can do anything these days. I also want to emphasize the use of the saw-kerfed back which is typical of these moldings. These cuts can make the installation easy and not anything like the herculean bending effort that comes to mind.
From contributor B:
When you mill an arched crown on a flat piece of wood and then bend it onto a curved wall, that is called a spring mold. I have made a few of them. The method is used when you have a large radius. For smaller radii I either stack smaller elements of the crown or glue up a blank and cut a special deep knife to shape it. Some really small ones I have turned on a lathe (usually cabinet work). The spring mold is what Contributor D is describing in his cone idea. The blank you cut is a bigger radius than the radius of the crown once it is installed. You could trial-and-error it using cardboard templates but there is actually a formula for it. You divide the radius of the curved wall by the cosine of the angle at which the crown sits. If your radius was 100" and the angle of the crown was 45� then you would divide 100" by .7071 (the cosine of 45�) and get 141.42". You would cut your flat board using this radius. You must remember that on a concave wall, the top of the crown will have a smaller radius than the bottom. For a convex wall the top of the crown has a larger radius. The 141.42" radius is used on the side of the crown that actually touches the curved wall. When you go to mill it you must consider which edge of the board to make the top of the profile. If you lay the flat crown on your work table with the top of the crown away from you (right side up), the piece will be smiling if you are making a concave mold, and frowning if you are making a convex one. An interesting fact is that you can bend a 3/4" thick crown around a curved wall a lot easier that you can bend a 3/4" thick base board around the same wall. That's because you have already cut part of the curve and you only have to bend it the rest of the way. By the way I didn't address the barrel ceiling but it would follow the rules of a concave wall. The only thing is, the profile will be upside down. For myself, I made a widget on a spread sheet to figure my radiuses. I just fill in my radius and angle of the crown. To do this you will have to use the radians-to-degrees function.
From contributor O:
As I've mentioned, this can be modeled in Sketch Up.
From contributor M:
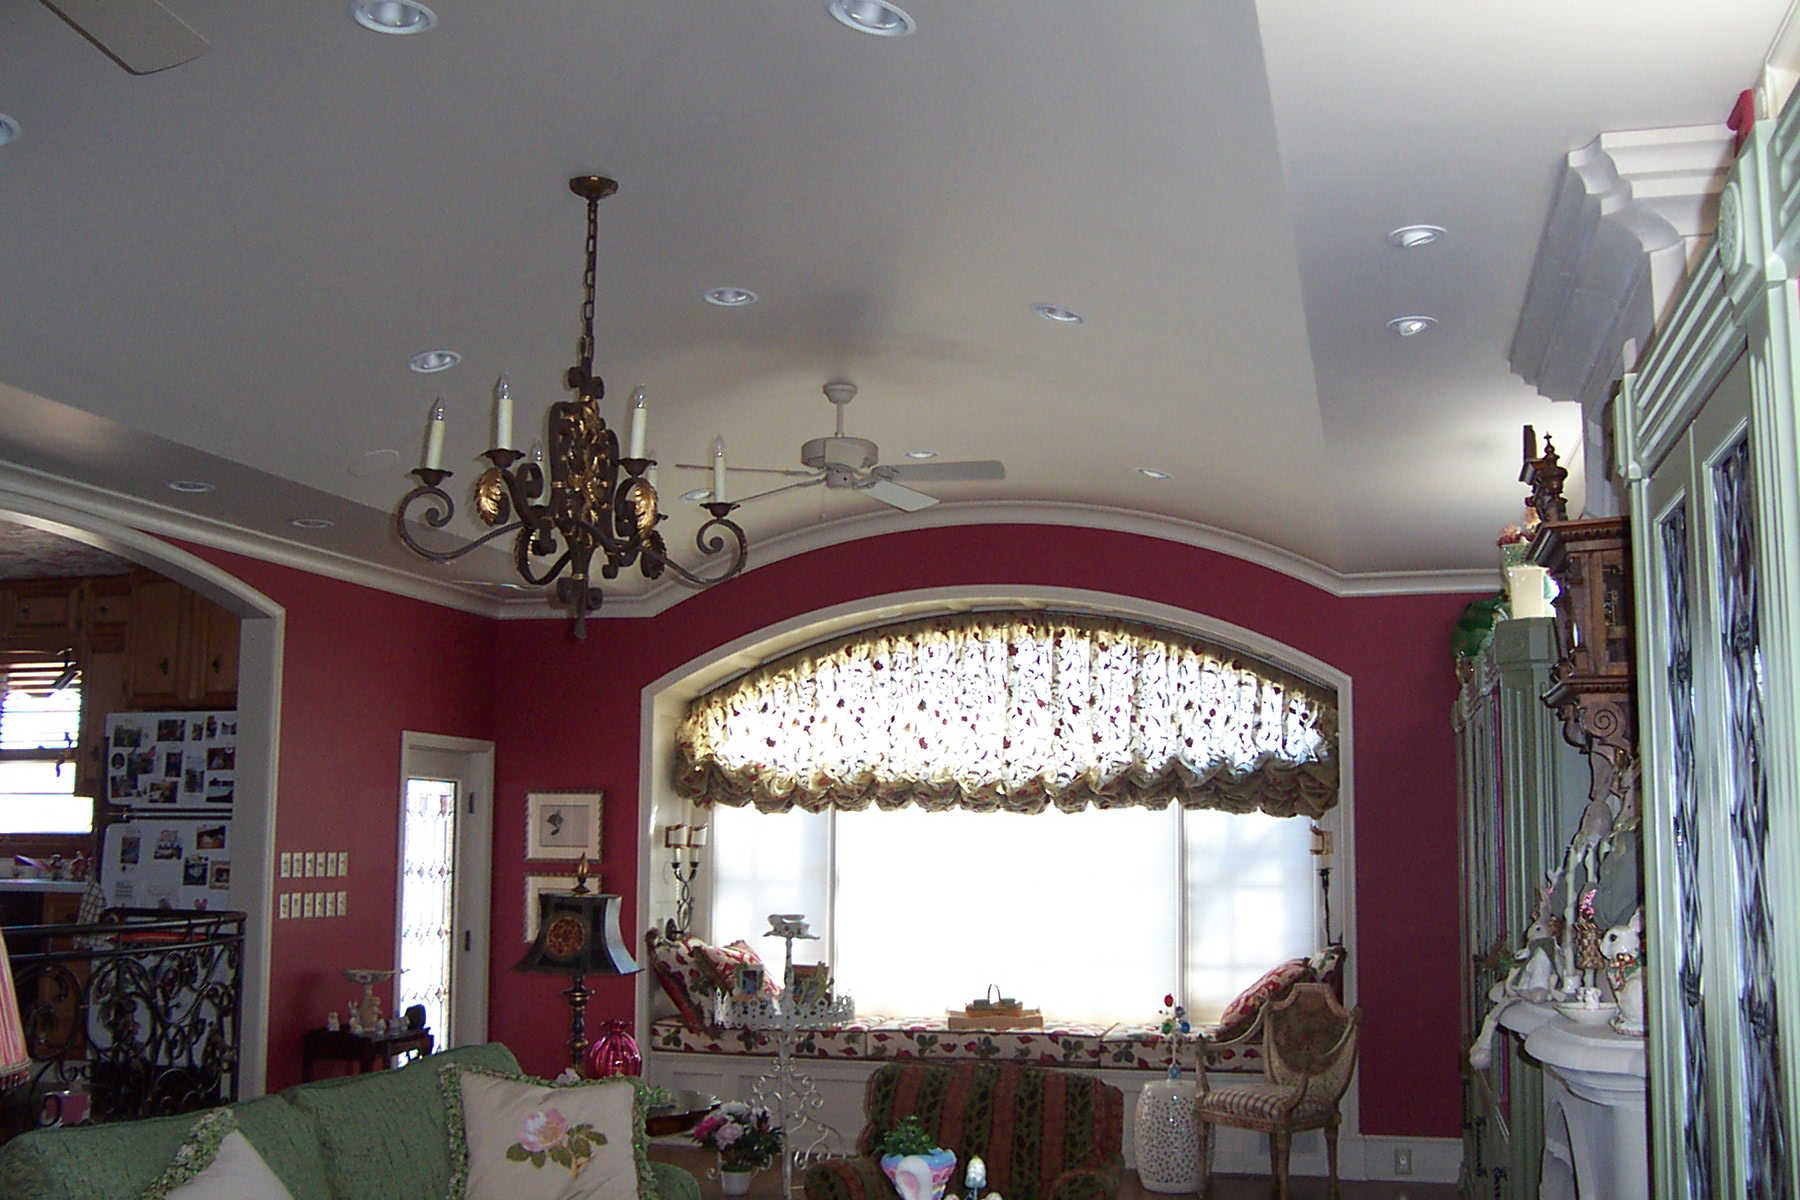
Here is a photo of crown moulding curved to fit the barrel vaulted ceiling in a room addition I did.
Click here for higher quality, full size image
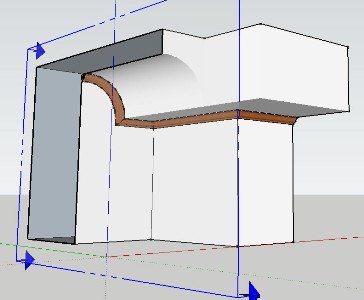
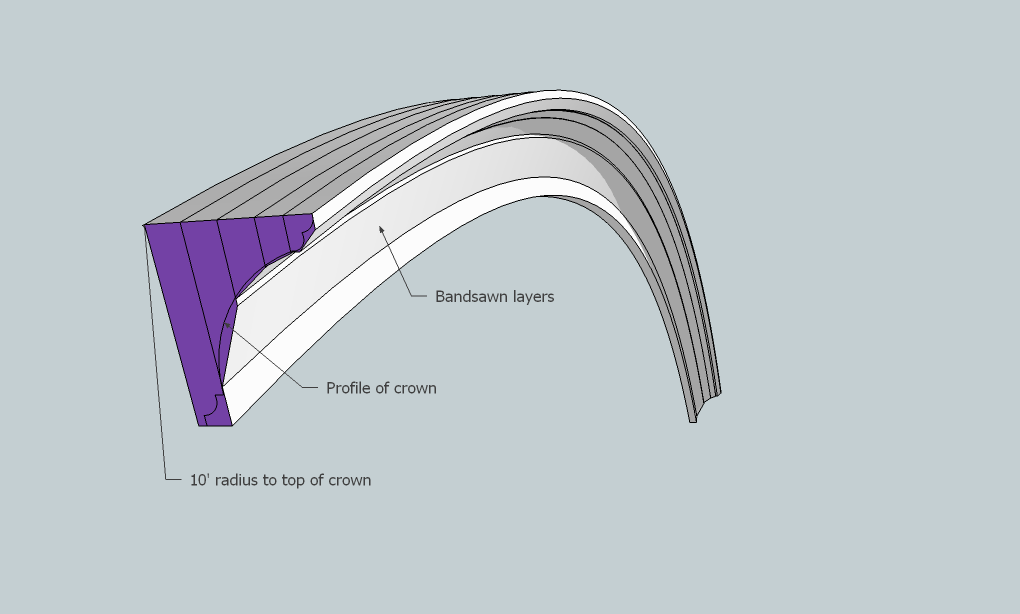
From contributor M:
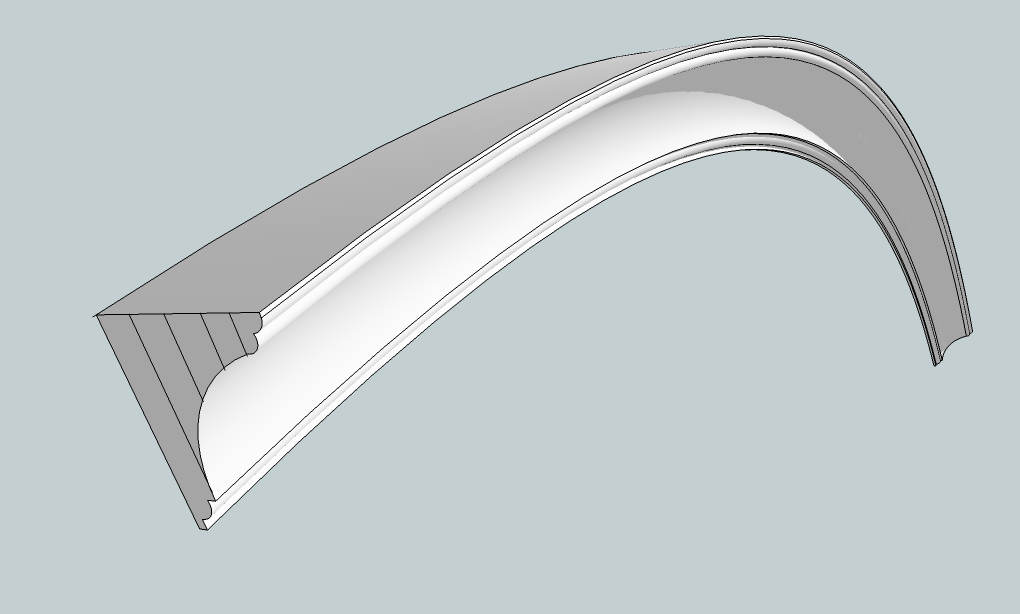
This response sidesteps the initiating question about the math involved in layout of curved crown moulding showing, however, a pragmatic approach for producing such moulding using only the radius of the barrel ceiling. The attached image (created with SketchUp) shows a radiused blank made up of bandsawn pieces with a faceted face that is just slightly larger than the finished profile. Gluing up with staggered joints yields a surprisingly rigid piece. Once the blank is made the profile is refined using various router setups and a few profile-matched shop-made cabinet scrapers. (This method was acceptable since the finished moulding was painted. To create a moulding for a stain finish would require a modified process).
Click here for higher quality, full size image
The reason I like this method is that all the faceted blank layers are quickly produced on a bandsaw indexing them off the same radius (10' in this case) while changing the face angle by tilting the bandsaw table. Once the finished moulding is complete, the ends are cut at an angle that is 1/2 of the total between the end of the arch and the flat ceiling. Again, no math needed, just a bevel square.
Click here for higher quality, full size image