Calibrating Wood Thickness for CNC Part Production
Other Versions
Spanish
French
A CNC shop needs help figuring out how to achieve consistent thickness on stock before sending it to the CNC for cutting into small parts. The discussion ranges over belt sander accuracy, planer choices, onion-skinning techniques, and more. April 21, 2008
Question
We resaw 4/4 lumber and want to calibrate the halves to .40" thickness with accuracy prior to cutting into small floor inlay pieces on a CNC router. We hold our planks by vacuum on the CNC and onion skin the parts. After CNCing, we run through widebelt face down to free pieces. Our problem is our 20 year old widebelt is very unreliable and needs replacement. I have looked at all of the Taiwanese and Chinese imports as well as Butfering and SCM entry level 2 head widebelts with a metal drum on head one and a combi head for head two. The Asian imports are cheap, but how is the quality? Butfering's machines that are less than $40k are made in mainland China. SCM is made in Italy. Does this mean better quality, better resale value, or just another option? My head is smoking with all the research, but I am still undecided.
Forum Responses
(Solid Wood Machining Forum)
From contributor J:
I am a little unclear. Is the problem that you cannot hold accuracy before the CNC cutter, or after the CNC cutter when you free the pieces? If the problem is before the cutter, then any quality moulder with the proper setup will produce .040 with virtually no variance. I hold .001 tolerance day in and day out. You can even get a furniture quality finish right out of the machine.
From the original questioner:
The problem is that we can not adequately thickness before the CNC. When we cut our pieces and then flip over to sand free through the widebelt, the difference in the thickness makes for some pieces being freed in the first pass, some the second, and - sometimes - some the third. I am thinking that better thickness calibration before CNC and after is a necessity. What level of precision of calibration can be expected from an entry level two-head sander? Are the sanders in the $35K or so range suited to do this as well as have some capacity to finish sand?
From contributor C:
How much are you removing? If very much, a sander is a very uneconomical way to do it.
From contributor L:
Have you considered a planer to do your initial thicknessing?
From the original questioner:
I have looked at planer/sander combination machines as well as planers. I have an old direct drive Oliver 299 that will not hold a good tolerance. I am looking at getting a planer with my widebelt purchase. How well does a planer do with material as thin as .40"? I have received quotes on all of the Taiwanese imports as well as SCM 24" spiral insert heads. I have the impression that a combined sander/planer may be faster for our primary purpose, but I will lose versatility and finish sanding quality with a planer/sander. It seems like a planer/sander costs more than a nice two-head wide belt and 24" planer combined anyway, so I am not sure of the benefits of a single machine over two stations.
The majority of material that comes to our shop is already hit or miss through a stratoplane from the mill. I split it on a large vertical resaw to make two matched pieces. I want to then surface accurately before CNCing parts and leaving as little onion skin as possible to still hold plank with our vacuum table. Many of our parts are less than a few sq. in., so onion skinning is a necessity. I think I am comfortable with leaving only .015" for the skin. (I currently leave more like .1" for safety since my pieces are poorly thicknessed from one side to the other.) I then run a continuous piece of 6" wide masking tape over the entire cut face to hold parts from getting sucked up in the dust collection of our widebelt when sanding pieces free. With our very old sander this takes three passes or so with a 40 grit to free all of the pieces. Is 0.015" enough skin to be safe to not cut our phenolic table and still maintain vacuum? Is this amount removable in one pass through a two-head widebelt with, say, 40 grit on the first steel drum and 80 grit on the second combi head? All of our inlay gets machine sanded once installed in the floor, so we don't really need to sand to higher than 80 grit except on the rare occasion that we do something outside of the usual like build a set of cabinets or a piece of furniture.
These odd contracts for things other than wood floor inlays are really only about 10% of our total business. I am completely self-taught in the manufacturing of wood floor inlay. We started out 7 years ago as wood floor contractors and started hand cutting inlays because the quality of most major manufacturers' product was low in our opinion. One thing led to another and we built a shop and bought equipment with little or no guidance except reading old threads from this website. I am fearful of spending $30-40k on a planer and sander that do not meet my expectation or improve our process. Any input is greatly appreciated.
From the original questioner:
Here is an example of our parts that are 5/16" thick when finished. We have also played with cutting parts into both sides of a 4/4 board and then resawing the 4/4 in half and sanding the parts free. Only problem with this is resaw can migrate a little and damage fragile cut pieces, so we can't use this method with smaller pieces and parts.
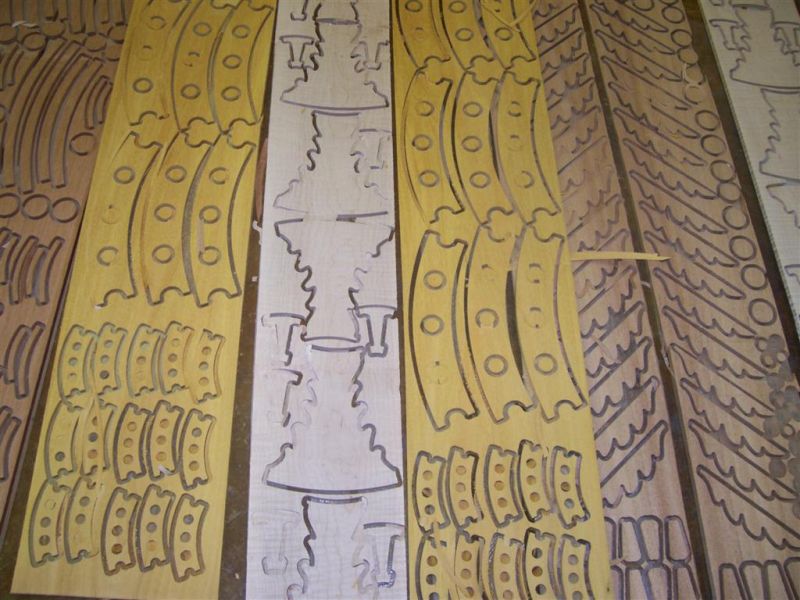
Click here for higher quality, full size image
From contributor F:
I think you are using a great method to create these inlays! What you call "onion skinning" I always call "leaving a web" on the CNC router. As earlier stated, a wide belt sander is not as exact at thicknessing as a knife such as a planer uses because abrasion is subject to problems of clogged belts and differing removal rates in areas of a board that have differing hardnesses.
So, I am not sure that even the best of widebelts will always free the parts simultaneously (in the same pass), especially when the changes in depth are slight as you re-set the sander for the next pass. I would definitely suggest that you use a good planer for the initial thicknessing before cutting the inlays onion skin style with the CNC.
With a pair of digital calipers to measure, you should be able to plane to an accuracy of +/- .005" or less. I like to surface a face of a board on the jointer as a first step before resawing. I do this to flatten and straighten, but also to establish grain direction. I use a felt tip pen on the end grain of each board to document grain direction. This step ensures that the thinner pieces will plane nicely after resawing when fed to the planer according to grain direction.
Also, I advise using an auxiliary table above (on top of) the bed rolls on the planer which helps eliminate snipe when planing thinner material.
Your .3125" finished thickness might prevent it, but we would often create small parts on the CNC leaving a .010" thick web or onion skin and then the parts could simply be broken from the web by hand. The residual web was then removed quickly with a flush trim bit in a router table near the CNC station. With .3125" thickness, it may be difficult to find a flush trim bit that would work for trimming the remaining onion skin because of the distance between the top of the cutter and the bottom of the bearing. And of course, this trim routing step is much more work than sanding the inlay parts free with a wide belt. Just general information.
I developed another method that I call "perforation." I would program the CNC to first cut the perimeter of the parts to a depth that left a web or onion skin of .020" thick. Then, the tool path was programmed to have the bit step away from the part perimeter by .030" and then cut the program again, this time leaving an onion skin of only .010 thickness.
What this does is allow parts with difficult and delicate face surfaces like two-sided melamine or solid wood, in your case, to be broken from the web by hand with no damage to the finished perimeter of the parts. This is because the onion skin will always break at the .010" thickness point, which is .030" away from the actual part perimeter or edge.
The .020" x .030 nub left on the edges of the parts is then removed with a flush trim bit on a fenceless router table.
Sanding still seems like the best bet to me for freeing your parts from the onion skin. I suppose you could apply some sort of tape to the routed side and then free the parts with a thickness planer. Might work, but you stand a chance of having some parts come loose and get destroyed by the planer, not to mention the added step of applying tape and peeling the finished parts free.
From contributor F:
One more option, although probably more time consuming than thickness with a planer first. Resaw the boards as close to halves as possible. Place the boards resaw side up on the CNC and run a surfacing program to .3125" above the spoil board before cutting the parts to onion skin level. This will leave all parts at an exact thickness before sanding the inlays free on a wide belt.
From contributor M:
Have you looked into a calibration widebelt sander? These are multiple head top and bottom units specifically designed for consistent repeatable removal of equipment. Not sure of the size of your operation or if you could justify the cost, but this is what we use to calibrate solid flooring before pre-finishing to ensure uniform bevel while removing sharp edges that would cut the rollers. Costa Grissom is probably the leader in this area, although there are others. If that option is out of the range you are looking at, I would think an abrasive planer would be the next best bet, or a moulder.
From contributor C:
A sander is a very expensive and inefficient way to remove wood. The most economical way for you to calibrate would be a knife planer. Bear in mind that to calibrate to .0025 total, not +/-, you will have to run through a single planer twice. You can accomplish the same on a good double planer. A Whitney will plane material as thin as 1/8. Also for thin material, the Whitney excels because of the small diameter head (5" cutting circle), a major Whitney feature, means that the chipbreaker and the pressure bar are closer to each other than possible on any other production class planer. This is very important when running thin material and when calibrating to exact numbers.
If you can find one used with the Quiet-Cut head, so much the better. We used to demo at the machinery shows, feeding a narrow drawer side cross grain through a Whitney with Quiet-Cut heads, an act that would suck the part into the head and up the dust pipe on any competitive production machine. The drawer side would machine flawlessly cross grain.
I don't know anything about the lighter machines, the Deltas, etc. - there may be some that will fit your needs. With your thin material, get a performance guarantee if you buy new.
Sanding is a very expensive way to remove wood. Get actual tooling costs numbers from someone using carbide knives and equivalent numbers from someone running a sander. HP is also a big factor. Removing the same amount of wood at the same feed rate will require approximately three times the HP when using a sander compared to a knife planer.
If you are planing large quantities, there is the dust/fire/explosion danger as well. I am not selling anything. My purpose here is to provide food for thought.
From contributor N:
I read through this post a couple times trying to understand your problem. Do you need .40 thickness at the router? If you're resawing 15/16� hit and miss material, .40 is going to be tough to clean both sides depending on the accuracy and blade thickness of your resaw. Initially I thought a good finish planer is what you need, but if .40 is what you need at the CNC, a steel roller calibrating sander might be better for the initial thickness, but that still leaves removing .088 to get to your final 5/16� thickness. As contributor C points out, sanding is not an economic method to remove that much material. Power is high now and as my cousin who works at a local power utility says, �we ain't seen anything yet.�
My advice would be to upgrade the planer first and take the material to a closer finish thickness at the router. For 10K to 25K you should be able to get a decent insert head single planer. Less if you buy used. I say do the planer first because you might find your sander requirements will be minimal with a good finish planer.
We have a Martin Tersa head single planer that is accurate to .001 in the 25� width and can be set to an accuracy of .005 digitally without checking with calipers. Rubber feed rolls and no bed rollers that give a snipe free surface. Boards coming out of our planer or S4S machine only require .015 to .018 over for finish sanding. The Tersa type vs. the spiral insert type planer head has been debated quite a bit here. The spiral insert might be better if you work with figured wood. The big advantage to the Tersa is the minimal upkeep and adjustment required. I would suggest trying your material through a few types of planers to see how it affects your final product. A little facing as contributor F suggests is a good idea, but at your thickness and minimal material removal, it is probably not possible or needed.
As for the sanding, if you only need 80 grit finishes, that should be easy. Our old Cemco combination head was very accurate for calibrating with only the roller once it was dressed and parallel to the bed. We now have a Kundig 3 head. For calibrating the first head is steel. We can remove .018 +- with 80 grit on that head. More with 60. I think the HP is 25 or 30. Be careful of high HP with the electric rates. For what you're doing, 15 to 20HP might be enough.
From contributor F:
Yeah, there are a lot of ways he can go. What I see is, he has 15/16 to work with. He needs to net 10 of those 15 sixteenths in product (5/16 times two finished thicknesses). That leaves 5/16 to play with - seems like plenty to me. My resaw has a .050 kerf width. Even if his resaw takes .125" (1/8"), that still leaves 3/16 to clean up four faces. That's .078" per face and I plane out saw marks with .020" per face. The other saving grace is that surface quality in a floor inlay should be loose. I mean, these inlay pieces will need to be sanded again along with the rest of the freshly installed floor?
From the original questioner:
Thanks for the input everyone. It sounds like I should be investigating a planer prior to a new sander. Contributor F's web of .020" is way thinner than anything I have been comfortable with, but I am going to see how close to that we can get and still hold our pieces. Thanks for the assistance.
From contributor Z:
I can't imagine why that Oliver couldn't do the job. It must be badly out of whack. Get a manual, tighten it up, and see what happens. It's a lot less than 35k.
From contributor F:
Correction - should be .046" per face, not .078". If your CNC is accurate and your spoil board is dressed, .020" or even .010" should hold if you have flat blanks and a good vacuum seal.
From contributor C:
Contributor Z is correct. I had forgotten when I posted that you already have an Oliver. There is no reason that the Oliver can not do the job.
From the original questioner:
Thanks everyone. I went to Louisville and demoed a Northtech planer with a carbide insert tool head. It is helical but no shear angle on the individual cutters. We planed a 1/2 board that was very cupped down to .20 in a pass. The board was within .001" over its entire length and width. The finish was nice with minimal tearout. I am hoping this machine will fix our calibration issue. When we get it set up today I am going to try to run some small parts leaving only a .010" skin for the wide belt to remove. Hopefully this will take the load off the sander so that the wide belt we have will do. I will follow up on this thread once I know. It would be great to get another 9-12 months out of my sander before making the leap on a new 2-3 head machine.
AI enhanced answer (added Mar 13, 2025):To achieve consistent thickness in wood stock, consider these key practices:
1.
Use a Thickness Planer: This is the most straightforward tool for uniform thickness. Ensure your planer's blades are sharp and set correctly. Feed the wood through multiple times, reducing thickness gradually to avoid tear-out.
2.
Check and Adjust: Use calipers or a digital thickness gauge to measure the wood after each pass. Adjust the planer's depth if necessary to maintain consistency.
3.
Flatten One Face First: Before planing for thickness, one face should be flat. Use a jointer or hand plane to achieve this, then run this face against the planer's bed for even thickness.
4.
Uniform Moisture Content: Wood expands and contracts with moisture changes. Ensure your stock has acclimated to your workshop's environment to minimize warping or cupping during planing.
5.
Support the Wood: Long boards can sag, leading to uneven thickness. Use support rollers or an infeed/outfeed table to keep the wood level as it goes through the planer.
6.
Batch Processing: Plane multiple pieces at once if they are of similar thickness. This helps in maintaining consistency across a batch.
7.
Avoid Snipe: Snipe occurs at the ends of boards. Use sacrificial boards at the beginning and end of your stock to prevent this, or adjust your planer to minimize snipe.
By following these steps, you'll enhance your ability to produce wood stock with uniform thickness, crucial for quality woodworking projects.