Corner Chisel Fine Points
Other Versions
Spanish
French
Tool choice, sharpening methods, and hand techniques for cleaning out mortise corners. November 13, 2009
Question
We do a lot of fully mortised butt hinges. We periodically get chisels like this to clean out the mortise corners but they are met with mixed review. While they produce a square cut they sometimes also just crush the wood fiber rather than cleanly cut through. Are these available with better quality (sharper) steel? Does anybody have any advice how to sharpen them? Is there a better way to clean out the mortise?

Click here for higher quality, full size image
Forum Responses
(Cabinetmaking Forum)
From contributor V:
You could use standard corner chisels, but I think that the opportunity for mistakes would be too great and their not the most production oriented tool.
From the original questioner:
That's an interesting approach. I've never seen the magnetic holders. Can anybody attest to the sharpness or longevity of this tool? How quick is it to load and re-load between hammer whacks? The problem I am up against is the veterans enjoy using a chisel but the people who should be doing this job don't know how to keep the chisel square. If it is sharp, we could afford to burn one on every job (current job has 44 hinges). At this rate a new hinge per job would run about 10 cents a corner.
From contributor F:
Use something like 3M spray 77 to stick silicon carbide paper (the black wet or dry stuff) to a scrap of thick glass. The glass is used because of its flatness and only the back of the sand paper need be sprayed with glue. Just rub the outer faces of the chisel on the sand paper to avoid a tricky inside corner grinding and honing job. The starting grit of paper you use depends on the condition of the edge. I suggest starting with 220 grit silicon carbide and working up to 600 grit. So 220,320,400,600. The tool merely needs to be held perfectly flat on the paper and glass while you are abrading the faces. Do not rock or lift while rubbing on the paper to avoid rounding the cutting edge. I know that throwing dull tools in the trash can be cost effective but it still seems like a sin somehow.
From the original questioner:
Based on contributor V's suggestion I ended up ordering a corner chisel from Lee Valley Tools today. According to the website the alloy in the chisel is supposed to hold sharp longer. Contributor Vís lesson about how to sharpen one of these was also new information to me. Up until now I've done most of my chiseling with a pencil so I haven't necessarily learned about this stuff yet.
From the original questioner:
I did not see that instruction sheet before I ordered the chisel. They had me sold when they said it was made of A2 Tool Steel. I have no idea what benefit that confers but I was convinced immediately based upon it. The sharpening sheet said to lap the backs to remove burrs. This is what contributor V was talking about, right?
From contributor S:
To the original questioner: let this evolve another step or two, and you will be thinking about going to a local machine shop and having a three sided chisel of sorts made, with a horizontal handle. The dimensions of the chisel will be exactly the same as your hinges, with bevels all to the inside.
Put a fence or depth stop on it - fixed or variable - to set the horizontal dimensions and it is used by placing the fence on the face of the door/frame at a slight angle (less that level), then levering down to align all the cutting surface with the routed surfaces. The corners, then the back edge of the chisel will contact the wood last, and be aligned by the fence and the routed mortise. One operation, two hands per mortise, short learning curve.
Further use might point to having a sharp edge on the upper side the width of the hinge height so you can clean out the corners horizontally. Square the corners, flip the tool 180 degrees, and slide it along the mortise to clean out the two little spandrels. Two operations, two hands, etc. Mate these tools with a small deadblow mallet, or you could take it further and set up a palm air hammer to do this. One hand, longer learning curve.
From contributor F:
As far as chisel sharpening goes, the absolute correct way would be to first re-grind the bevels and then hone those bevels until a burr is formed all along the cutting edges. That burr is then removed by lapping the back/backs. In this case I figure most guys have no experience at grinding and honing a regular straight chisel so one with an inside corner would be a bad first try. On a standard corner chisel like those shown above in the links, it is possible to remove enough steel from the flat backs of the chisel to get beyond the dull chipped edge and create a fresh edge.
On a custom chisel like contributor S suggests, removing steel from the outside faces would change the outside dimensions and make the cutline smaller than the length of the hinge. I personally prefer to use a wide standard chisel - 1.5" wide. The broad surface is easy to index on the straight part of the hinge mortise and then rocked sideways into the rounded mortise corner. Then turned 90 degrees and repeated. The results are not absolutely perfect but fall into the realm of looking like hand made.
From contributor R:
To follow-on a little from contributor F's advice, do some searching on Scary Sharp. That's the sort of nickname that was given to the concept of using sandpaper instead of stones for sharpening. I've used it to great success, even though I still go back to my Japanese water stones, probably because I've still got them.
From contributor O:
Contributor S has the right idea. You really notice the time chiseling and drilling hinge holes takes when you have a quantity to do.
From contributor K:
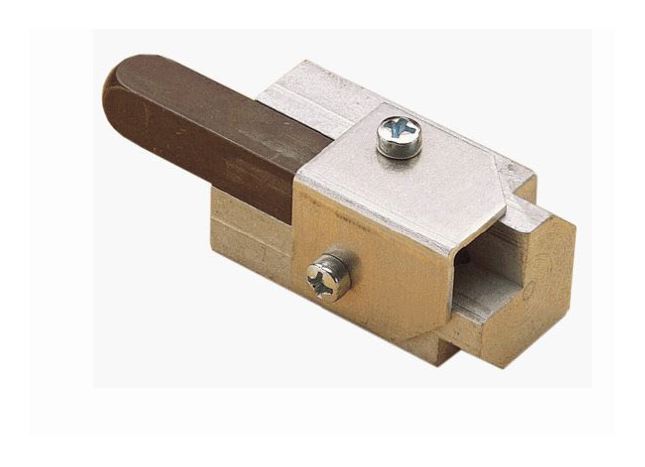
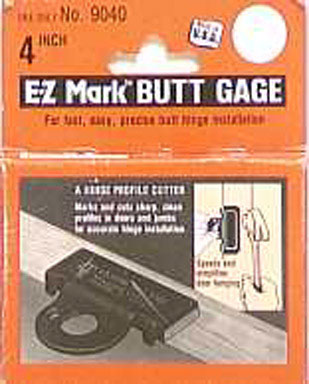
To contributor S: it sounds like you are describing a smaller version of a passage door butt gauge. Itís a handy tool.

From contributor V:
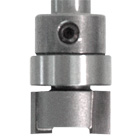
Hereís another thought. Assuming that you use a jig to mortise the doors and frames for the hinges, can you use the same jig to guide a standard corner chisel or even a regular chisel? Your jig would have square edges to guide the router bit that is shown below. After the mortise is cut out, but before you remove the jig, you would place your corner chisel into the corners of the jig so it would be guided by the jig to create a perfect 90į corner that is perpendicular to the edge of the door or frame. Tap the chisel with a mallet, remove the jig and remove the chip that is created by the chisel. I would think that an inexperienced person would be able to accomplish this without many problems. If you have standard sizes of doors you could even make jigs that have a pair of mortise templates to speed up the process.

From the original questioner:
That's a really good idea. We presently use a top bearing bit like the one in your drawing. As you point out, the hinge template could very well act as a guide for directing a chisel into the corners. We will try that on some hinges.
From contributor S:
In the interest of full disclosure, I have used the mortise corner cleaning tool as mentioned by contributor K. I found them light, inaccurate, and of very limited size. The basic idea is there, but it needs to be advanced.
However, as contributor V mentions, the bearing over 5/8" diameter bit is solid gold for almost any template work, especially hinges. The template is the exact size of the hinge, and locates exactly where the hinge goes. Direct, simple, and accurate. We have been using this for hinges and everything else we can for 18 years.
After routing, the template is left in place to register the chisel against for corner cleaning. We use so many different types of hinges, it is not prudent for us to make a full mortise squaring tool for each hinge that happens to come past us, but the bearing over bit and zero-clearance template makes it easy. You cannot (well, almost) overcut the mortise. Now, how does one fasten the zero clearance hinge template to the door and the face frame?
From contributor I:
We also use the method that mark outlined. Itís fast, versatile, and allows you to use an easily sharpened standard chisel. In answer to contributor Sís question we use small screws to fasten the template.
From the original questioner:
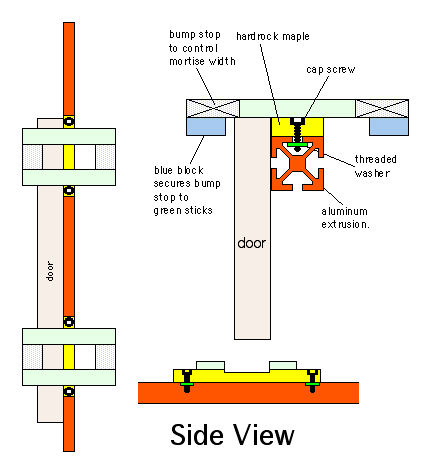
To contributor S: I'm not sure if I understand your last question correctly. I think you are asking how to temporarily fasten the mortise template to door or faceframe. This is how we do it.

Click here for full size image
From the original questioner:
I forgot to mention that the aluminum extrusion is clamped to the door. It is also handy to develop a library of spacers to control distance between the mortises. The rest of the indexing only has to be close but the offset between mortise locations has to be very accurate. Over the years I have seen lots of guys try to align the mortises with scored marks with a utility knife, or pencil lines but nothing beats the positive block for speed and accuracy.
From contributor S:
My question - more rhetorical than literal - addressed the issue of taking the door to a dedicated space where the distance between the mortises is set, and doors are put into place with positive stops, and clamped with a foot controlled air clamp, routed, then corner cleaned, then hinges applied and set aside.
But then there is the face frame - would it be best to have a complimentary frame/jig that clamps onto the face frame with the exact distance between mortises and positive stops, plus clearances, then attaches itself to the frame? I see all these little lever-actuated suction cups everywhere - will they hold? Or the vacuum pods?
The old industry "model" for this is the Stanley door routing jig. This jig has singlehandedly destroyed the ability for human beings to hang passage doors in the US due to its terrible design and arcane setup and use. The only good thing the jig had was a stop at the door head that worked as a clearance gauge for the door to the door frame. This stop controlled the clearance, and could be adapted to evolved jigs/stations for inset doors. The question is rhetorical for me since our variety prevents such detailed/evolved thinking. It is still fun to think it through, though, and there are/will be times when components of this process will be utilized.
From the original questioner:
To contributor S: there certainly is some merit to your idea of a dedicated do-all/be-all hinge hanging station. You also properly recognize that to find all of it in one apparatus is probably asking too much. Components of your idea, however, probably are viable.
I had given some thought recently to developing a station that held two inverted routers. I was contemplating attaching them to a pair of linear bearings to travel in the X and Y direction, essentially driving both routers from the bottom of the door with a joy stick.
The joy stick idea morphed into some rodless air cylinders with magnetic air switches. As the linear bearing reached one end of the cycle the opposing bearing would promote in the perpendicular direction, essentially doing your routing for you while you installed hinges or did some other temporary activity. It could be that the advantages of this chisel system could outweigh the advantages of being able to cut two mortise pockets at one time.
From contributor E:
Your question is to do with just cleaning out the corners not mortising for the hinge, is that right? You are talking about a 3/16 by 3/16 corner to remove, unless you are using a much bigger bit for your mortise. Contributor F mentioned earlier about using a 1 1/2 wide chisel, and using the straight part of the mortise as a guide. Using this method with a sharp chisel is really quite fast and doesn't take a highly skilled person to do it. Lining up a jig and clamping in place then using a chisel anyway would surely take more time. You don't even have to use a hammer, as rocking the chisel usually creates enough force to do the job.


