Customized Vacuum Setups for Small Parts
This long thread offers detailed suggestions for holding down small parts on the CNC machine. January 14, 2008
Question
We purchased a Biesse Rover A over a month and half ago. We are getting more and more comfortable with the machine each day. I am looking for advice on ways to machine small parts on a pod and rail machine. For example, we screw the material to a fixture board, place the fixture board with the part screwed to it onto the pod, and start machining. I don't like the screw holes, so I am looking for a new solution without adding a lot of time in making fixtures. Some people have told me that they glue their part to a fixture board and saw it off with a zero clearance saw blade.
Forum Responses
(CNC Forum)
From contributor M:
Did the technician not show you how to make jigs and use the aux vacuum feature? Sounds like you did not get all the training you needed.
From contributor I:
You can easily make pressure fixture boards to hold small parts. Contact Biesse and ask how. They will be more than happy to explain the procedure. Sometimes techs have their hands full just getting the machine running and basic operations explained before their time runs out.
From contributor W:
What kind of small parts are you making?
From the original questioner:
We are making muntin bars (true divided lights) for our doors. We also have various parts that are small for miscellaneous projects. At times it would be nice to have a flat table and I can see the advantages of a nested based machine. But most of our product is making door component parts.
From contributor W:
We have a Rover 24 and a new Rover B. I have done what you're taking about before, but for straight pieces, it's not worth the time. It is quicker and easier on a moulder or shaper. As for curved stuff, what I usually do is make the "T" part a little oversized, then cut a groove in some MDF and put the "T" in it, then shape the profile.
From contributor A:
Take a look at the video below of a very simple way of making muntin bars. You can also use the round disks that usually come with Biesse Rovers. They screw on to the top of the stopper and when the stopper comes down, it clamps your narrow part. I use this technique every day for small narrow parts.
http://www.youtube.com/watch?v=6KNFe2hs2-c
From contributor J:
What size is the part? Depending on that, you might buy some extra pods and cut them down to fit your part.
From the original questioner:
Contributor A, when you use the clamp, do you turn the part around and run the other side? Do you set the part on the pod and then clamp it down?
Contributor W, I am not following your description of the "T" part.
From contributor H:
Here is a simple method:
1. Use melamine faced board for the fixture board.
2. Use closed cell foam weather stripping with adhesive on one side. 1/2" wide by 1/32" or 1/16" thick works best. (3M products seem to be the best.)
3. Cut the weather stripping to fit where drills and routers won't go and still provide adequate area to create vacuum. You still have to be sure you create a closed area for the vacuum to work though.
4. Provide one or more holes to allow vacuum to hold the part to the fixture board (one or more vac cups must be located under this area then).
5. Make sure the fixture board is also held by two or more vacuum cups.
Using this method you can make fixture boards in as little as 5 minutes (10 if you really take your time).
From contributor J:
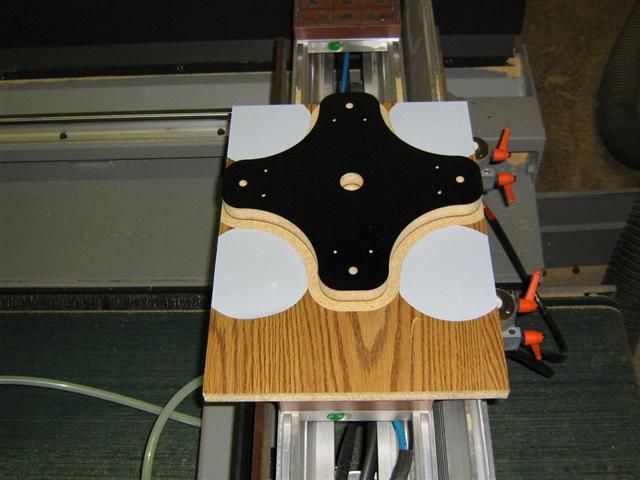
Example fixture.
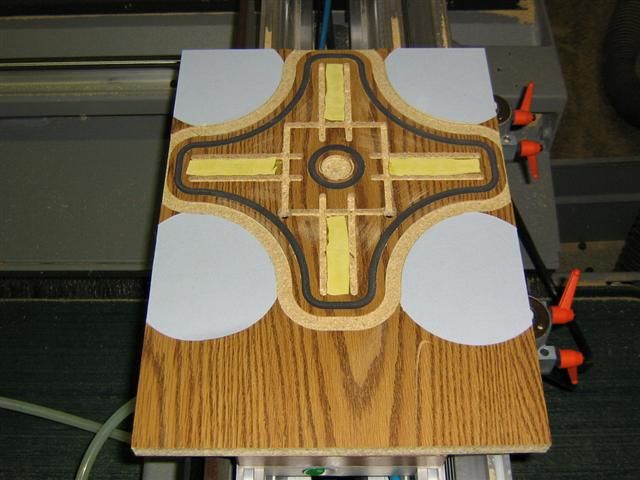
Click here for higher quality, full size image
Example fixture with processed part.
Click here for higher quality, full size image
Fixture vacuum connections.
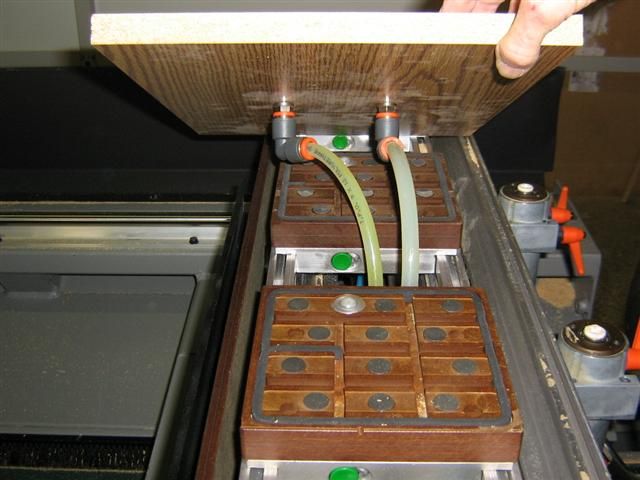
Click here for higher quality, full size image
From contributor W:
Nice work, but a TDL muntin needs a little bit different setup than that.
From the original questioner:
Thanks for the pictures. This helps to visualize how to make a vacuum fixture. Has anyone made any really small pods to hold down parts? Are the uni-clamps (pods with clamps) worth it?
From contributor W:
We have 6 uni-clamps that came with our Rover 24. I tried them a few times but I found the half pods to be better and quicker.
From contributor U:
I use my Stratos SUP to make all parts necessary for my true divided glass doors in one setup. Mullion and muntin blanks are pieces of 4/4 stock about 2" wide. They're held with horizontal screws to a fixture orientated so they're 2" high. This additional height gives me the needed clearance to use an aggregate to mill a tenon on the ends. Any member that dies into the frame gets a 1/2" tenon while any mullions that die into a muntin gets a 1/8" tenon to make locating the part easy. The part is then separated from its base.
The door rails get blind tenons milled into them (also with the aggregate). All together, it takes about 15 minutes for the average 6 light door to machine. Assembly is almost fun, as it snaps together like an erector set.
Programming for this would have been a nightmare if not for the fact that I've written my own VB code for automating the process. All I have to do is enter the variables for door frame width, muntin width, and light quantity, and watch my Alpha CAM screen as the parts draw themselves!
From contributor J:
Contributor W, yes, I understand that. I just happened to have those pictures, so I thought I would give him an idea of how to make fixtures in general.
From contributor T:
Sometimes it just isn't economical to make everything on the CNC. By the time you build special fixtures, glue or screw material together, etc., you have far exceeded your cost for a manual operation. On shaped muntins, perhaps it would help if you just machined the shape into the muntins and then manually added the stick to it.
From contributor V:
I know what you mean. Some of the guys in my shop have the mindset that everything is done on the CNC machine. We have a job that has 3,000 small, rectangular panels with a 1" radius on one corner. It's actually faster and cheaper to do it with a hand router, and the CNC can be doing something else.
From contributor K:
I've done that kind of work dozens of times. It's worked out best for me when I make the TDL out of two pieces.
From contributor C:
I think the clamps would be the way to do these on your pod and rail Biesse. Bill Blackmon from Delmac showed a video making TDL bars on a pod Busellato with the clamps. The piece was set in the clamps (there might have been a spacer to push it out a little) with the end positioned with a straight laser. First the end cutting, coping and dowel drilling was done, then the straight side was shaped. The muntin in the upside down T position. Then they just turned it and shaped the other side in 2 or 3 light passes. The clamp head was covering about � of the �� flat on the top. End position did not matter because the end cuts were already made. It seems like the Biesse clamps that can be slid into the finished side after machining would work better. Especially if you cut the cross lap or do glass bead recovery and mitering where end position is important for both sides.
At the Vegas show, Biesse was making straight TDL using larger pieces glued to a fixture held with the small vacuum pods. They did everything except the bead removal, then cut it almost loose with a zero clearance saw. They were cutting the cross half lap connection from the top then flipping the pieces at assembly. This method may have some advantages but it seems like a lot of work and extra material for straight bars. Last year at IWF they cut curved bars and recovered the glass bead using this method.