Dealing with Silicone Contamination in Wood Pores
Advice on sanding and refinishing an Oak surface after silicone contamination has become evident — but without contaminating your own shop or equipment. March 28, 2010
Question
We've been using SW conversion varnish for about a month now with very good results, until... We just refinished several tables for a customer. They had been in service in a nursing home and the finish was shot. We sanded down to bare wood and restained and shot CV at about 75° F, 8% moisture content. No problem on the first table or last, but middle two look terrible. I'm using CV as the sander/sealer coat. Resanded today and reshot with same results. Any ideas? The defects follow the open grain in the wood.
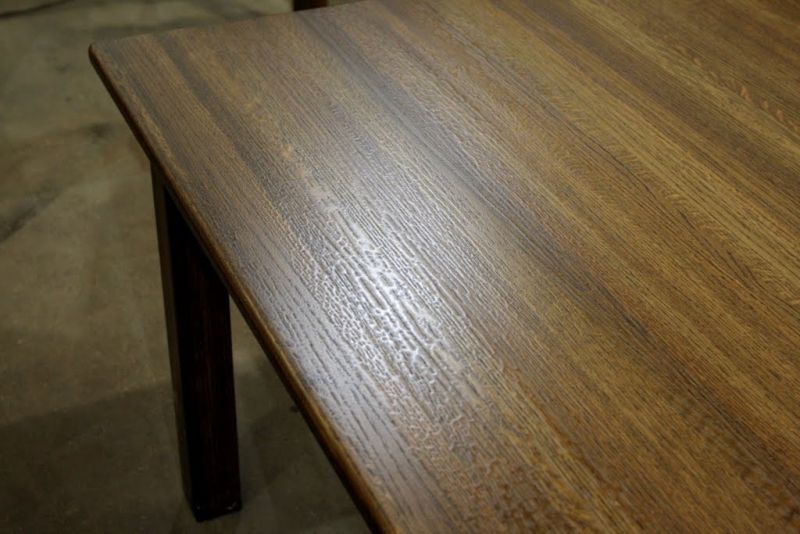
Click here for higher quality, full size image
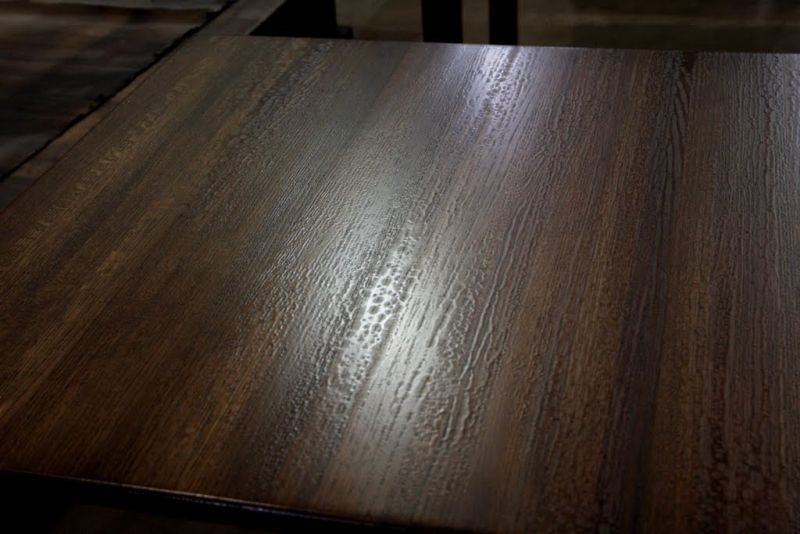
Click here for higher quality, full size image
Forum Responses
(Finishing Forum)
From contributor J:
Looks like a bad case of fisheye - probably Pledge or the like.
From contributor O:
Looks like some contamination that got left in the open grain - silicone or some kind of furniture polish perhaps.
From contributor D:
That was caused by a contaminant in the wood. My guess would be some sort of cleaning product, like Pledge. Even though you sanded the wood, you didn't get the contaminant out of the pores.
A fix might be to resand and then shoot a few coats of dewaxed shellac to seal the wood. Another thing to try is a product called fisheye remover or fisheye killer which will reduce the surface tension and allow it to flow out. If you do choose that method, buy a cheap Grizzly 20 dollar gravity gun and only use that gun in the future with the fisheye remover formula, as it will contaminate the gun.
From the original questioner:
What about sanding it off again down to bare wood and doing a double wash with paint thinner or reducer? What about trying to seal the open grain with grain filler or vinyl sealer and lightly sanding to seal the pores? Is there any sure fire fix to this problem?
From contributor K:
Re-sand the table, and this time make your first 3 to 4 coats almost dry - what I like to call dust coats. This means you're moving fast and with the gun farther away than typical. This basically allows the droplets to sit all by themselves wherever they land, and eventually after 3 to 4 coats, these droplets will bridge together, providing you a surface that you can build on. I've dealt with many silicone contaminated surfaces in this manner.
From contributor D:
There are probably dozens of ways to skin that cat. What I suggested is something that has worked for me. Contributor K's response is one I have heard works too, but I have never attempted it.
As far as sanding and filling the grain, that is possible as long as the contaminant doesn't dissolve in the filler and migrate into it. I have no idea whether that can happen, which is why I like the barrier coat personally, but in the end you have to use what you have available and are comfortable with.
Worst case scenario is it reoccurs and you found one more thing that doesn't work.
From contributor B:
You are right to strip and wash down. I would also scrub the surface while it is wet to get any residue out of the grain. I use a stiff bristle scrubbing brush, then wipe with clean rags to remove the slurry. Wash again and wipe off. Let it dry, then coat with shellac. I also add anti-silicone drops to the lacquer. That always works for me.
From contributor E:
I've seen this happen in hair salons, I believe from the hairsprays they use. Use about 3-4 coats of sanding sealer and sand each coat out and then use your hard coat with blush out or white out to slow the drying time; you will be able to work it out that way.
From the original questioner:
After reading the comments here and several other threads, we have adopted the following strategy:
Heavy sanding back to bare wood
Wash with ammonia
Wash with paint thinner
Light sanding (to knock down the grain)
Shoot with heavily reduced vinyl sealer (to penetrate the grain)
Shoot with straight vinyl sealer (to fill the grain)
Lightly sand
Possibly shoot again with vinyl sealer
Lightly sand
Shoot with conversion varnish (spot check)
We are only going to shoot a corner with CV to check and only do one table at a time. We finished the first two steps (heavy sand and ammonia wash) today. Any other suggestions based on this regime?
From contributor N:
The ammonia will turn the oak black or grey - bad idea. The easiest way to deal with silicone contamination is to apply a coat of Seal Coat or a thin dewaxed shellac, then shoot your top coat.
From the original questioner:
Hmmm... Contributor N was right. Turned the red oak a bit darker. The stain is a very dark brown though, so I think it will cover the change okay (we'll see). I gave it a light sanding just now to check how deep the color change is - not much difference after taking off a couple of mils, so I'll just have to proceed with plan A.
Live and learn. I'll get this finish thing down, though. I just hope the ammonia did some good for the fisheye.
From Paul Snyder, forum technical advisor:
Sand the finish back until it's pretty level. Mix up some sealer with a squirt of Smoothie in it. Spray the sealer, let it dry, sand it smooth, remove the dust. Mix up some topcoat with a squirt of Smoothie in it. Spray the topcoat. Spray a second topcoat if desired. Clean up and go relax.
From contributor S:
Sanding back a contaminated finish can contaminate your whole shop. It would be better to chemically remove the coating in order to contain it. If you have already done it, give your shop a very good cleaning and remove the debris from the shop completely; don't just leave it in the shop garbage can. Silicone migrates and is tenacious.
Before you reshoot the effected tops, wipe them down with xylene. Use paper towels and after wetting the top with xylene, let it sit wet for 30 seconds and swipe with the paper towel - one swipe - and throw the paper towel away after each swipe. Don't move the towel around the piece or it will just move the contamination. Repeat the process.
Use the shellac barrier coat and if the problem persists, try misting a few coats on to lock the problem in. If you don't have the shellac, you can try the same with your vinyl sealer. Once it is locked down, you should be able to spray a full wet coat.
From contributor U:
Paul Snyder has it right. Why make it more complicated then it has to be?
From contributor R:
I'm with Paul - Smoothie works the first time, every time. Even with all the washing down sometimes you just can't get rid of it all. The other thing I like to seal with instead of shellac is a 2k isolante product. It also looks like you are filling the grain on those oak tops using just CV. I would think you are exceeding the dry film thickness. If so you could be facing an even bigger problem down the road.
From the original questioner:
Does Smoothie contain silicone? What about contamination of the equipment as some have suggested? I've tried some grain filler, but it is visible in the final finish. What is a good grain filler (or other option) besides multiple heavy coats of CV?
My local SW outlet doesn't carry any 2k poly and all I've found online is outrageously high (like $200/gal). What is a good source for 2k poly? What about the amber color and brittle finish in poly?
We tried the dry spray method with the vinyl sealer today. ~16 ounces of dry spray followed by another 16 ounces of normally sprayed vinyl. The second coat should have used more reducer (we used about 15%) because we got a little bit of orange peel, but no fisheye from what we can tell. I think we can take care ofthe orange peel with a light sanding. Plan to shoot a couple of coats of CV over the vinyl tomorrow (fingers crossed)!