Question
(WOODWEB Member):
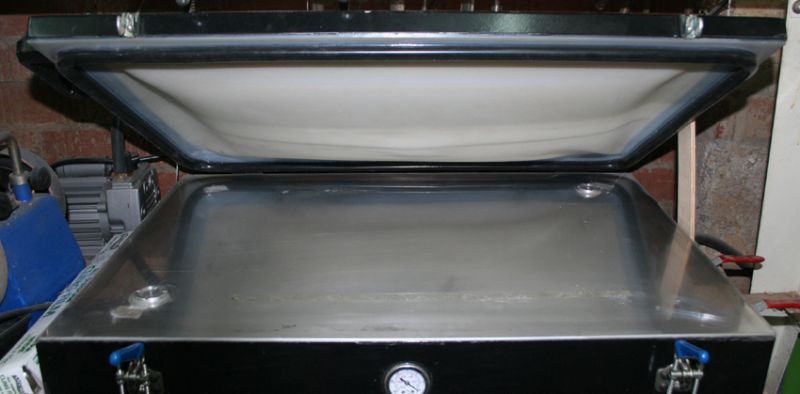
I have a frame veneering press which has a suction hole at each end. The bed is flat, but when I veneer a panel and put a ruler across it, it looks like this at the ends (the ruler is pretty straight).
I do use a breather fabric and I am veneering both sides at the same time. My thoughts are, with the suction being at its strongest at the outside, the pressure in the centre of the panel would not be as strong. It's like there is air being trapped under the panel in the centre. What is the solution? I had thought of making a MDF sub-base with holes and channels to even this out.

Forum Responses
(Veneer Forum)
From contributor J:
No, the idea that suction is stronger at the outside does not make any sense. You're thinking of this as if it were a vacuum cleaner, but it's really quite different; you don't have large volumes of air constantly moving through the press. The pressure applied to the work is just the weight of the atmosphere, which is the same everywhere. Neither is it plausible that air is getting trapped under the panel.
Have you tried putting a straightedge across the panel while it's in the press (on top of the membrane, with vac turned on)? Did you check whether the panel was warped before veneering it?
Another question - could temperature be an issue here? Is the platen heated? Is the room especially cold?
2) After pressing the panel, how do you let it dry? Do you just open the lid and let it dry in place? (Air only gets to one side this way.) Or do you set the panel on its edge so air circulates on both sides?
3) Is the bed of the press absolutely flat? Try putting your straight edge on the press table or bed and see if that is truly flat.
4) Are you using the same type of veneer on both sides? Different wood species have different expansion and contraction characteristics. The front and back veneers need to be pretty close to the same. No, you do not need a very expensive veneer on the back to match the show side. But if you put fancy veneer on one side and some plastic laminate on the other (for balance), it probably will not work. Okay, that's extreme, but that may help you get the idea.
Finally, you mentioned creating a sub-base with holes and channels. I have a frame press. Inside the press I have a layer of 1/4" board with 1/8" vertical and horizontal channels every 10". (From a distance, it looks like graph paper with 10" squares.) This helps evacuate the air from beneath the work piece. I use cauls both underneath and above my work, and the breather fabric only on top. The channels underneath make breather fabric underneath unnecessary.
The photo shows two panels leaning against each other to dry. I usually leave them in this position overnight. This is a tip that I learned from Paul Schurch.
I would not leave them in the press to dry. The moisture from the liquid hide glue has no place to go in a vacuum.
And always use a top caul over the work piece with the breather mesh over that. In other words, do not put the breather mesh next to the veneer. I did this once accidentally. Fortunately it was on the backside (unseen) of the work piece. The mesh left lots of ridges in the veneer. The uneven mesh applied uneven pressure on the veneer, making the glue line thicker and thinner instead of even. I recovered from this, but have heard of others ruining the show-face of their project this way. So, you have been warned. (You may already know this, but just in case!)
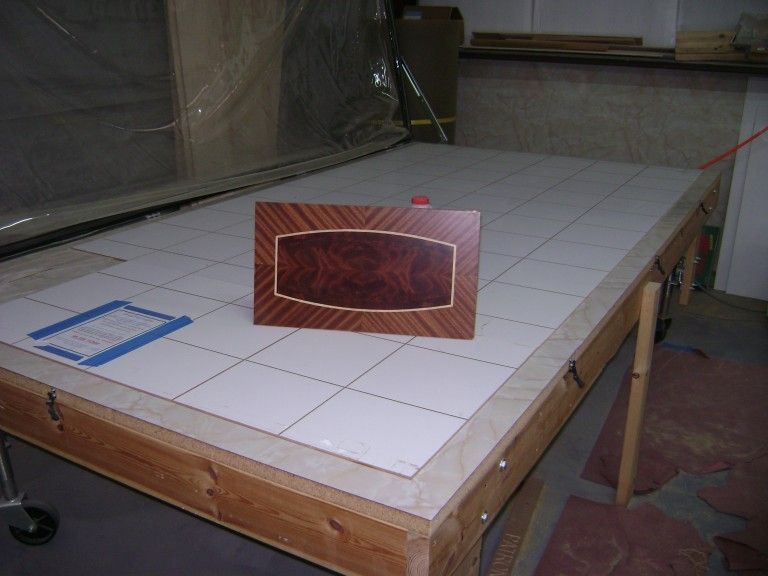
I have a CNC, so I used it to cut the grooves. You can probably do the same thing with a hand-held router and a straight-edge as a guide. The 10" does not need to be exact. The spacing was specified by my press manufacturer (Vacupress.com). The grooves are 1/8" wide by 1/8" deep. There is a small hole in the whiteboard for the vacuum connection. The hole is located at the intersection of a vertical and a horizontal groove. Actually, the hole was located first, then I made the grooves to align properly.
Also, you will notice that the whiteboard does not cover the entire table. The seal on the press top must still meet the table, of course.
The missing piece of whiteboard in the upper left corner of the photo was the result of a mistake. I accidentally glued a work-piece to the whiteboard when the plastic covering shifted. I rarely glue a complete 5'x10' piece, so I did not replace it.
Recently I have been gluing up some large (2'x8' and 4'x8') panels. So, I placed another piece of 1/4" whiteboard directly over the grooved board. (That is the whiteboard shown in the photo in my previous post.) Then I placed a large sheet of plastic (4 mil painter's type sold by the roll) over that. This makes a semi-permanent bottom part of the veneer sandwich for glue-up.
So when I need to glue something now, I only need to address the rest of the sandwich; that is, bottom veneer, glue, substrate, glue, top veneer, top plastic, top caul , breather mesh, close cover and turn vacuum on.
I always use the breather mesh, even if I don't think it is necessary. One of the side benefits is to prevent the sharp corners of the caul from damaging the top cover. I have a 4'x8' piece that only takes a few seconds to put in place. It is cheap insurance for protecting the cover.
Finally, you will notice an extra leg on the long side of the table. It is a 5'x10' table constructed of a 2x6 framework with a 1" MDF top. There can be a slight sag in the middle sometimes. So I added the extra leg. The adjustment is made by raising and lowering the wheels on the corner of the table. I used trailer jack wheels (Harbor Freight) instead of fixed legs on the corners to make the entire table mobile. When I get it where I want on my uneven concrete floor, I raise and lower the four corners until the center legs (one on each long side) touch and the table is flat. I don't care about level. I just want flat. I use a 10' piece of extruded aluminum channel (rectangular cross-section) for a straight-edge. The aluminum has very little flex. But, there are other ways to check for flat as well.
Another thought about flat. You said your frame press is flat. I am guessing that you checked it while it was open. Is it still flat when you have it under vacuum? I doubt this is a problem, since you said you had good results since the warped piece. And that looks like a commercial press, not home-made. So it is probably fine.