I have been doing frameless cabinets off and on for a couple years now and still struggle with one issue. When using 3/4 melamine and a 0mm euro hinge and plate the max overlay is 11/16. So in a perfect world you would get an 1/8in gap on butted cabinets. The problem as we all know it not a perfect world and adjustment is always necessary. Is there a trick i am not seeing here?
BTW i cut all my parts on a cnc, have a cnc horizontal bore and dowel and use a case clamp for assembly. I know my parts are accurate and material thickness is consistent.
From contributor Br
So, what's your problem? I overlay 17 1/2mm on a 19mm panel making the space 3mm total between fronts. I use a "0" plate and a 120+ hinge and a 4 1/2mm tab distance. Doesn't always work out perfect. Measure your melamine, mine runs 19.3mm thick most of the time. That .3mm adds up in a run of cabinets. Does it matter, NO.
From contributor ke
Change hinges or plates. full 3/4 overlay +- 1/8 is available.
From contributor Ch
What ken said. Call your rep.
From contributor Ge
We use 5/8" material for all vertical parts & 3/4" for all horizontal parts. Back & gables are 5/8" everything else is 3/4". We do this for many reasons but it does resolve your problem also.
Gerry
From contributor Je
I've thought about going to the 5/8 system. I like the idea of the 3/4 on horiz parts for sure. The only problem I may encounter is many times in specs they will say 3/4 for box parts and a 1/4" back with nailers behind. Do use a 5/8 nailer behind your back?
It would be nice if they would make a hinge plate for 3/4 thick ends so you could have full adjustment. Thanks for the reply.
From contributor G
Hi,
We use 5/8" for the backs & blind tenon them in on 4 sides with the router. I find the savings between a 1/4" & 5/8" not a big issue for us & having the ability to fasten through the back in any location is quite useful. Also having to cut & install nailers is time consuming. We use PL premium in the back mortise during assembly.
Gerry
From contributor Ja
Jeff,
Not sure you hinge provider, but talk to the Mfg of your hinge if you can't figure it out. The right hinge, plate & tab difference will give you good results on 19mm panels. I use Salice, 200 series hinges and plates, 5mm tab, for 15 years minimal adjustments in the field. I like Salice because it has more overall range of motion, and changing one adjustment, does not throw the others out of adjustment.
-I hope that helps.
From contributor Ad
Euro hardware and hinges was designed to be used with 16mm(5/8") panels. The American 3/4" melamine screws up the system a bit.
From contributor Je
Tell me what does tab mean? Is that just the distance from the edge of the panel to the edge of the door
From contributor ca
Jeff-
The "tab" is the edge of the door to the edge of the cup for the hinge.
I will say this- pick a hinge manufacturer, run some tests on your software and cnc and stick with what you like. What our overlay is does not matter. It's what your standards that you are trying to achieve is what matters. (we run Blum and the Grass, Salice and Hardware Resource guys want us to change,, monthly).
We use 3/4 melamine and layed up panels on 11/16 pb and 1/4 backs for our casework. The nailers are 3/4" ( I tell the software it is 13/16 thick so the nailer sits in deep enough at the back of the case). Our drawers are 3/4" thick materials. Our overlay is 5/8 +/-.
I chose all the above because of our volume. It kept the chaos down when we were running a lot by hand. Now that we are cnc it doesn't really matter with all the materials catalog availability. We are now getting into 1" horizontal parts.
Good luck.
From contributor De
Here is a quick lesson in overlay.
Every hinge manufacturer should have a chart in their catalog that describes the overlay achieved when using a specific mounting plate thickness and TAB distance. The charts are all based on a universal formula that takes into consideration the factory setting of the hinge (constant), the mounting plate thickness and the tab distance.
For �full overlay� Salice Series 200 hinges, the formula is:
D = (15 + K) � H
D = desired overlay
15 = the constant
K = the TAB distance
H = mounting plate thickness.
Example (1): If you want a �full� 19mm (3/4�) overlay:
19 = (15 + 4) � 0
Here you would get a 19mm overlay by using a 0mm plate and a 4mm TAB distance.
Example (2): If you want a 17.5mm (11/16�) overlay on a 19mm side panel:
17.5 = (15 + 4.5) � 2
In this case, you would get a 17.5mm overlay by using a 2mm mounting plate and a 4.5mm TAB distance.
Example (3): If you want a larger overlay like 21mm (13/16�)
21 = (15 + 6) -0
Here you will get a 21mm overlay using a 0mm mounting plate and a 6mm TAB distance.
This constant is the same for the 94�, 110�, 120� and the 165� full overlay Salice hinges. For larger overlays you can use either the 94 � or the 165� hinges and increase the TAB to 8mm with a resulting 23mm (7/8�) overlay.
If you are using a �half crank hinge the Salice constant is 6. If you are using a full crank, inset hinge, the Salice constant is -2.
In all cases, the TAB distance and the mounting plate thickness can be adjusted accordingly to get exactly the overlay you need.
For a Blum hinge, the same formula can be used but the constant is either 11mm or 13mm depending on which hinge you are using (110, 120, or165).
Additionally, other hinge manufacturers have a constant unique to that manufacturer.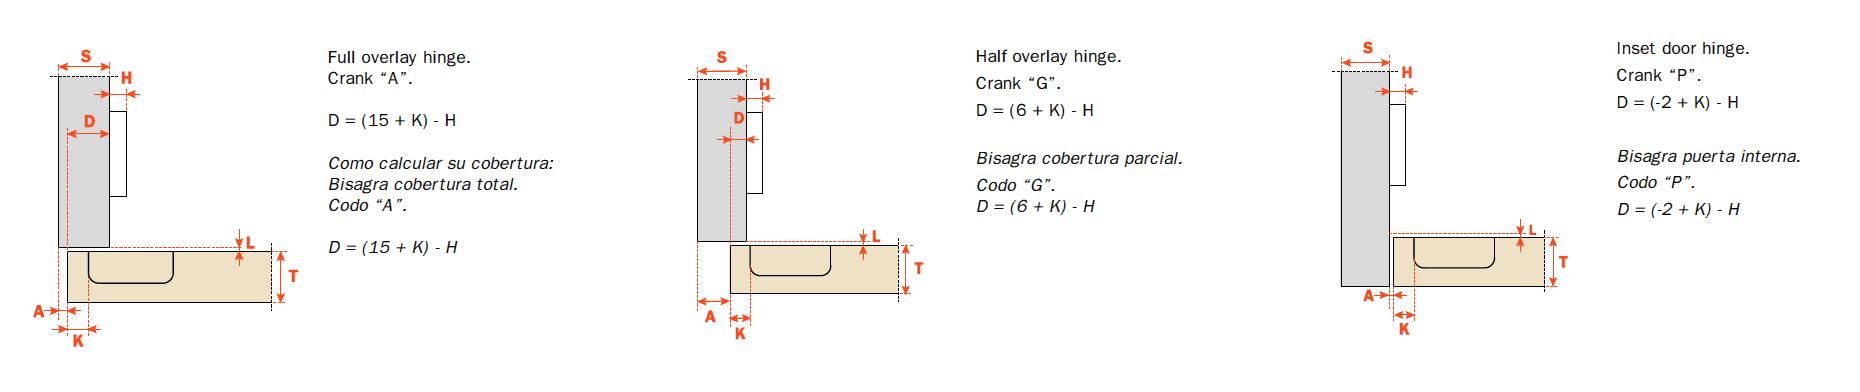
From contributor Je
Thanks for the in depth response. I think adjusting that tab depth is going to be the best bet for me. I did a few test panels today and that seemed to work great it gives you that little bit of extra adjustment that you need when working with the thicker panels. Thanks for the thoughtful d responses.