Glaze technique problem
Other Versions
Spanish
Trying to match a unique mystery finish sample. April 9, 2003
Question
I often create a finish for one of my clients that they call ceruse. I prep the wood with a wire brush, digging the soft part of the grain out, then stain the wood of whatever based color, then seal it. I use M.L. Campbell glaze, leaving it only in the grain crevices, cleaning the surface completely. I finish with topcoat.
Recently they gave me a sample to match that at first glance looked exactly the same, but is not. There's a small difference that has a dramatic effect. When you look very closely at the deep parts of the grain, some grains are full of glaze and some grains are completely empty, so having stained the wood previously, these grains show up very deep brown or almost black. Overall the sample holds three colors: the hard parts of the wood are a lighter stained color, the deeper grain is quite dark and the glaze that I use is usually a beige color. I've tried a few different techniques and can't seem to get this effect, trying to leave more in the grain or wiping it harder. I've even tried squeegeeing it off. No matter what I do, the dark grains are always covered with the glaze. It just looks thinner or thicker. Are there other techniques or maybe even a different product that would give me this look?
Forum Responses
(From WOODWEB's Finishing Forum)
From contributor M:
Is it possible that he used three different glazes? Let's say color #1 is applied over the sealed woods. That glaze is then sealed. A second glaze is applied, only in certain areas, and then sealed. Glaze #3 is applied randomly, and then sealed. It would then be clear coated.
You may be able to do it with 3 different glazes in one application, by randomly rubbing the glazes in the area you want to add colors.
Perhaps colored paste wood fillers were used, then sealed and glaze coat applied. Some of the unfilled grain from the sealer would still accept the glaze. Just a guess.
From the original questioner:
Some of you may be thinking a little too large. The problem that I am referring to is all happening from one grain line to the next, sometimes within the same grain line. These grain lines are no more than a thick pencil line wide. I am using rift sawn white oak, wipe stained medium brown - at this point there are two colors. The grains hold a lot more stain than the parts between the grains. The problem comes when I put the glaze on - it goes in the grain and covers these dark grain lines and if I wipe it harder, the glaze just becomes thinner, more transparent, but still covering all the grain lines, for the simple reason that the grain lines are lower. I need a solution that will leave some of the grain lines completely exposed and at the same time others will be completely full of glaze, just millimeters apart from each other, sometimes even occurring in the same grain, like a dashed pencil line.
From contributor M:
Is there a repeated pattern of color or are these random throughout the finish? This finish sounds unique, but kind of hard to see in one's mind. A photo could make the difference in finding a solution.
I enjoy the challenge of trying to duplicate finishes. In most cases it will not be done the same way, but the end results will be a fairly good match.
Your description sounds somewhat like my failed early attempts at filling oak to achieve a smooth surface. I hadn't got quite enough filler in places, and the stain alternated light/dark in the grain depending on my success in filling.
So, could it be that the filler/glaze was applied before the stain? Fillers often take two passes to fill the grain completely. So if a first coat of filler (or glaze) was put down, then the stain, those areas that were completely filled would stay more or less the same color, and those grains that had not been completely filled would be darkened by the stain. The pattern would be somewhat random, as you suggest.
Maybe it's powder glaze that you spray on and scotch bright off.
I am probably way out of line with this, but I'll give it a shot anyway. Could it be due to the surface tension of the glaze they used?
I say this because when using water stains, I get an effect sometimes where some of them stain well and turn dark, while others will not take the stain and in order to get all of the pores filled, I have to wipe it in. It can be as you described - parts of the same line or two side by side with different results.
From the original questioner:
Here is a picture of the sample.
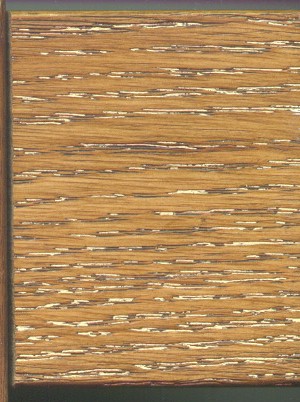
From contributor D:
That doesn't look too difficult to me, but then I'm not standing where you are, trying to match it.
Looks to me that someone stained and sealed, then filled with a white filler (try common wall board compound), another sealer coat, followed by a glazing compound, partially rubbed out, then a clear topcoat to seal in the whole package. You may have to experiment a little with the order of steps I've given, to include slightly shading the "white" so it is not so bright, but I think it should be relatively easy to match.
Could it be that when the original finish was applied, the dust was left on and not wiped off between sanding the different coats? Could it not have dissolved all the way with each coat added on top and stayed a whitish color? Just a thought, being on an oak board with a heavy grain.
It looks like someone tried to use auto-body polish to get a glossy smooth surface, was surprised that the grain filled up white, tried to wash it out of the grain but went ahead and clear coated... i.e. just like contributor D suggested with the white glaze last. But is it beautiful or merely curious? Hard to judge from a small sample.
Do the white areas look like a void of color in the pore or is it something that filled the pore? Can you pick it out with a needle? Contributor D is on the right track, but finding the right process is always fun. Sometimes gesso works better than drywall mud.
Bob Niemeyer, forum technical advisor
From the original questioner:
This thing does have a glaze on it. It is only the off-white color, and you can pick it out if you try hard. The dark brown is the stain and there is no filler (they want texture). I tried oil glaze, pickil pine powder, wall board mud, even latex paint. It all covers the dark grain. I can thin it or wipe harder but it still covers the dark grain. This sample is abrupt, i.e. glaze, no glaze, glaze, no glaze. Would water born glaze be any different?
Try sandblasting, then stain the pores, re-sand the surface and apply the colored stain to the top by dry wiping your stain on so as not to get it in the pores. Sandblasting gives great texture.
The comments below were added after this Forum discussion was archived as a Knowledge Base article (add your comment).
Comment from contributor A:
This looks like a finish that we do. We stain wood first, apply sealer coat (in our case, high build post lac lacquer). Sand. Repeat sealer. Apply dry filler glaze in white. Remove with scotch brite. Wash off residue from flats with rag dampened with alcohol. Topcoat. The open grain of the white oak has to be semi-filled. This allows the filler just to collect where you see the glaze in the picture. If you do not seal heavy enough before glazing, the glaze will cover dark lines.
Comment from contributor B:
Looks to me like a problem we sometimes encounter when your sealer coat or first coat cannot penetrate to the bottom of the woodgrain. Then clear coats are applied and bridge over the pore. If you look at the grain with a magnifying glass does it look scaly or shattered in appearance? Does the whiteness in the pore go away if you place the product in a horizontal position or can you only notice it in the vertical position? If it goes away, it is light reflecting in the pore - that is why it looks white in color. Hence what we call "white pore."
Comment from contributor C:
After viewing the sample, I would approach it from two possible angles. First, the overall color is not a problem, but getting the white is. In that regard, you can use a catalyzed primer such as ML Campbell Clawlock, add some yellow toner to it, spray it on and then when it is dry, sand it completely off. You may want to try this on a scrap piece of bare wood and also a piece that has the stain and one coat of finish. The other approach would be to use ML Campbell's new Amazing Glaze. It's a wonderful product but it has to be used in complete catalyzed applications. This glaze, as opposed to your standard linseed oil glaze, is a spray-on and then scrothbrite-off product. I think either of these processes should allow you to acheive your effect.