Reprinted with permission from Custom Woodworking Business.
An easy glazing technique enables you to create unique patterns and designs.
By Mac Simmons
Glazing is one of the most prized techniques used in the art of finishing. Almost any form of finishing can be glazed somewhere in the finishing process. You can glaze over raw woods and stains that are sealed, on top of transparent and translucent toners, and on clear and opaque colored coatings. Glazes are the coloring medium that is used to create faux and fantasy finishes.
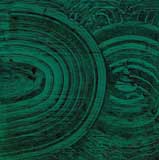
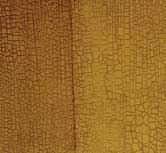
Glazing can be used to add very little color or lots of character to the finish. It can also create all types of special effects, like marbles, leathers and woods. Looking at the photos here and on the following pages, you can see some examples of glazing and how it adds a new dimension to a finish. In this article, I will explain another technique where a glaze is used to create art in finishes. The technique is rather easy, and with it you can do many interesting drawings, patterns, designs, initials, etc., on your work to make it more appealing and profitable.
Getting Started
All finishing starts on clean, well-sanded wood. To be successful, all finishing materials must be compatible. To be sure they are compatible, I suggest making up complete samples from start to finish before you start on an actual project.
To begin a sample for this glazing technique, apply a sealer to the wood using any coating you are familiar with and allow it to dry. Apply a second seal coat and allow that to dry thoroughly, too. Then use a fine sandpaper to lightly sand the dry coating so it is smooth and level.
If you have your own ready-made glaze that is compatible with your sealer and clear coats, then proceed with your glazing. For readers who do not have a glaze or who may not know how to make one, following are two formulas. One is for solvent-based coatings; the other is for water-based coatings. These formulas may need to be adjusted, since many finishing mediums used in them may not be exactly the same and will vary from one manufacturer to another.
� Making an oil glaze: Use 1 to 2 ounces of either an artist oil or Japan paste colorant. Add 8 ounces of boiled linseed oil and 22 ounces of mineral spirits. Mix them well, and keep the glaze covered when not in use.
You can control the glaze by adjusting the amount of oil or solvent in the formula. If you need more open time to work with the glaze, add a little more oil. If the glaze is taking too long to set up and dry, then increase the amount of mineral spirits.
� Making a water glaze: Use 1 to 2 ounces of either an artist acrylic or water paste colorant, 22 ounces of water and add a few drops of glycerin, which gives more "slip" and workability to the water glaze. Again, mix the glaze well, and keep the container covered when not in use.
You can purchase the artist paste colorants, boiled linseed oil and mineral spirits at most finishing suppliers. They also can be bought at most arts and crafts shops in small tubes as well as in bigger quantities. Glycerin can be found in most arts and crafts shops or at any drug store.
Note: For either an oil glaze or a water glaze, you must allow the glaze to dry thoroughly before you can coat it.
Adding the Art
Once the glaze is mixed and ready to go, you can use either a cloth or a brush to apply it over the sealed wood. Another flat brush is needed to brush out the glaze. You also need a pointed tool; any pointed object should work. (I use assorted sizes of sharpened dowel rods.)
You begin by applying the glaze. Then take the flat brush and work the glaze back and forth with the grain until you see the wood. Let the glaze set up for a few minutes, then be ready to draw on top of it.
Now, take your sharpened object and begin drawing. You will remove the glaze as you draw, taking off a little with each line you make with the point. Once the artwork is complete, allow to dry thoroughly. Apply a seal or clear coat and allow that to dry, too. If you are happy with the look of this finish, then add more protective clear coats.
If you want to enrich and enhance the finish further, you can apply a second glaze to add more color. You can use the same color glaze or add another color. Apply the second glaze and brush it out to a uniform color. Be sure you allow the artwork created with the first glaze to show through the second one. Allow the second glaze to dry completely and apply your protective clear coats.
I strongly suggest that you make up complete samples to get the feel of the finishing materials. This way you can make any changes in the samples before you attempt glazing an actual project. As you can see in the photos on the previous pages, glazing helps you create numerous effects. You can see why it is one of the most popular techniques in finishing.
With a little practice and some trial-and-error testing, you can add the title of glazing "artist" to your resume.
Additional Glazing Techniques

Reprinted with permission from Custom Woodworking Business.