Question
I thought that maybe someone here might be interested in a process I worked out for drawing tool paths for curved handrails. I looked at some 5 axis CNC programs and observed that the movements were a whole lot of little straight line moves, each being around 0.3125 inches long. The following is a process to draw such a path. This is a really simple concept. It gets a little more complicated to make it practical, but this shows the basic idea.
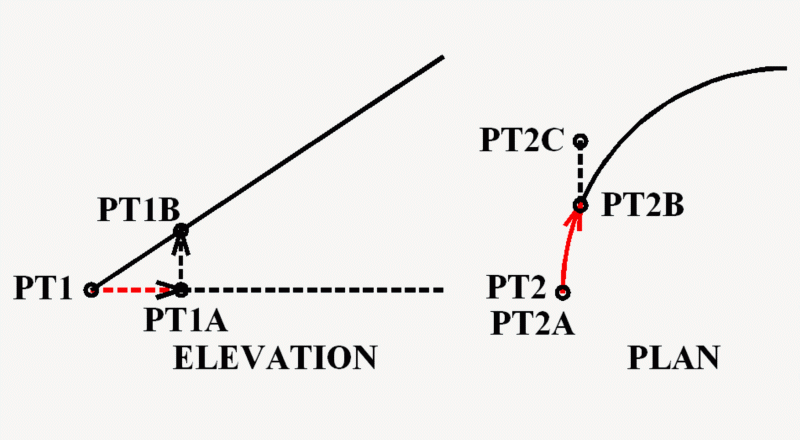
Pick start point of line in elevation view (PT1).
Pick start point of arc in plan view (PT2) and (PT2A). (These two points are the same.)
Start of process: Move along arc for an arc length of 0.001 (PT2B). (0.001 = arbitrarily tinny distance.)
Move horizontally under line in elevation view from PT1 for a distance of 0.001 (PT1A).
Move upward from PT1A until you intersect the elevation line (PT1B).
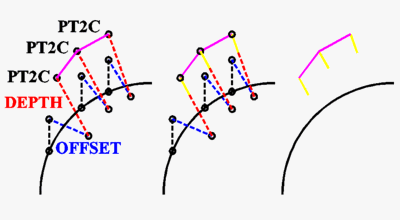
Use the X and Y values of PT2B for the X and Y values of point PT2C and use the Y value of PT1B as the Z value of PT2C. (In the illustration PT2C would actually be coming out of the screen toward you directly above PT2B rather than as shown.)
If the distance from PT2A to PT2C is less than 0.3125 then:
Move PT1A and PT2B an additional 0.001.
Recalculate points PT1B and PT2C.
Repeat this until the distance from PT2A to PT2C is equal to or
greater than 0.3125.
Draw a line from PT2A to PT2C.
Change the X, Y, and Z values of PT2A to the values of PT2C.
Repeat the above process for the entire length of the arc in the plan view.
This process can be made to work for any combination of lines and arcs in the elevation and plan views. I had the elevation and plan views drawn for the center line of the bottom of the rail and then had the actual tool paths drawn according to where the tool center line path should be in relation to that.
Forum Responses
(CAD Forum)
From contributor L:
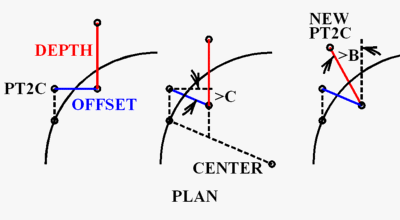
As I explained earlier, point PT2C is on the center line of the bottom of the rail. To get the point needed for the center line path of the tool, I need the distance from the center line of the profile to the center line of the tool (offset) and the distance from the bottom of the profile to the point being programmed for on the tool, usually the bottom of the tool (depth).
I then come straight out from PT2C for the distance offset and straight up for the distance offset to get a temporary point. I then rotate that temporary point so that it is lined up with the center of the arc in the plan view. This will be the angle of C axis of the router. Next, I rotate the temporary point to an angle that is perpendicular to the line in the elevation view. This will be the angle of the B axis of the router. The temporary point is now where it needs to be for the tool path (new PT2C). Note that the rail is routed with the profile up-side-down, but the paths are drawn with the profile up-side-right. The path is then rotated into the position it would be in on the router.

In the meantime it drove me nuts that I had no idea how this 5 axis router worked and so I was looking at the programs and trying to back-engineer between the G-code and the part. After I figured it out I told my supervisor that I thought I could write my own software using AutoCAD and he said to go for it. I don�t know if this was the best way to go, but it was a tremendous amount of fun.
Secondly, functions can be written arcos any domain from "A to B", "B to C", C to D", etc. with exactness.
Thirdly, function programming is continuous across the profile, not tangent (as your describing).
Function programming can be shifted and rotated in any direction. This is a versatile programming method whose endpoint is a smoother operation, can be integrated, and written parametricly (time). If you want to program complex plane curves, your application must have a math library with algebra, trig, and log functions.
For a typical solid handrail length of 5', you would need at least 192 individual reference points (60" / .3125) for the inside edge alone (is that correct)? Of course every stair is different and would therefore have its own required geometry (that seems like an awful lot of code to manually compute every time). There are also helical curves which are not generated from regular (straight) spiral lines but from curved lines required for pitch changes within the cylindrical plan. What about handrails which are taller than a typical single cutters' capacity? Would you then have to stack a series of perfectly parallel position points? There are a lot of curiosities here.
I am wondering if a true helical handrail might be computed quicker by using "helix-radius and torsion calculations" instead of your "quantum-calculus" approach? Since we're really trying to re-invent the (helical) wheel here, I wonder how it's already being done? What are some of the objections (or limitations) to the programming that you are familiar with?
I know of one company who claims to write all their own tool paths (claiming that commercially available software programs are inadequate). I thought "tangent handrail" was complicated!
As for the math used, I did have to incorporate some algebra and trig, but a great deal of the math was done for me by AutoCAD. One thing to consider is that I wasn�t trying to program complex plane curves as in a graphical representation of the rail, but rather to come up with what the router required.
Contributor B - plotting a series of 3D position points is pretty much it (with lines drawn between those points). Perhaps someone knows if there is an easier way. You are right about the 192 points. Not only is that just for one edge, but also just for one pass of one tool. It might take a lot of passes of a rough cutter going up one side and down the other, and it also has to plane the bottom of the rail. The profile tool made a rough pass and a finish pass. There were more operations in addition to that, so the CNC files were huge and were drip fed to the router.
The points didn�t have to be manually computed for each stair. This was an AutoCAD automation and its only purpose was to draw paths of those little line segments. It was only necessary to draw an elevation view (un-curved that is) and a plan view of the rail. That was also later automated, but that is another story.
Rail that was not a regular spiral was no problem, as in the case of pitch transitions like you would have with straight treads at the top or bottom of a circular stair. I wrote the program to work for any combination of lines and arcs in the elevation and plan drawing. For example, you could replace the line in the elevation drawing with an arc. The principle still works the same. You get your Z value by going straight up until you intersect the arc just as you would go straight up until you intersect the line. You could also replace the arc in the plan drawing with a line.
It was also possible to have more than one segment in each drawing (an arc and a line in the plan view for example) as long as the elevation and plan view matched. There was no problem doing tall rail that required two profile cutters. I don�t know if a stack of perfectly parallel position points were produced or not. If the distance from the center of the profile to the center of the tools was the same, it probably did. I don�t think that it would matter as everything would tend to smooth out and blend at that scale. Anyway, they liked the rail that they got.
"Helix-radius and torsion calculations" might be faster than my "quantum-calculus", but since the computer was doing the calculations it was fast enough. I probably am trying to re-invent the wheel here. I would love to know how it is being done elsewhere.
You asked about what are some of the objections (or limitations) to the programming that I am familiar with. Well, I guess the problem is that I am not actually familiar with any other software. It was a very long time ago that I looked for something and couldn�t find anything. I do remember a few things that they didn�t like about the DOS program that they were using. One was that it didn�t drill balusters holes at exactly the right angle and that made it a bit difficult to install them. Another was that it didn�t cut the rail to exact lengths. When the stair was built they would have to overlap the ends of the different rail sections, line up the baluster holes, then mark and cut the ends manually. I think that the biggest thing they didn�t like was that the software could not be changed in any way.
I am quite pleased to know that there is a company out there that likes to �roll their own�. I wonder what it is that they don�t like about the commercially available software. At least if you create your own software you are in full control. You don�t have to change how you do anything to fit the software and you can alter the software anytime you want to.
An equation similar to the one I stated could be written using this moving particle algebra over infinitesimal 2pi intervals while incorporating "z" shifts and increasing and deceasing amplitudes to define, say "a finial". Much, much, much more complex graphing (programs) solving difficult complex curves can be written and run.
The rail is not actually drawn, only the tool path is drawn. The rail is imaginary. For the section of rail to be cut out, I draw an imaginary line from one end of the imaginary rail section to the other end. I then rotate the imaginary line, the imaginary rail, and the real tool path around the Z axis so that the imaginary line is parallel with the X axis. Next I rotate everything around the Y axis so that my imaginary line is flat in the Z. This makes my line parallel with the router table. I then rotate everything around the Y axis 180 degrees. This makes the rail bottom-side-up as this is how it is cut out. Last, I move everything to a particular point so that it is in relation to the origin as it needs to be in relation to the router�s origin. I am now ready to generate code from the tool path.
Generating the G-code for the 5-axis router from the tool path is an interesting process. To draw all of the tool paths for a section of rail and generate a CNC program with 3600 lines of code takes about two minutes. I think that is a subject for CNC rather than CAD.