How To Correct Blotchy Stain on Cherry
Here's a complicated finishing situation that draws a lot of different opinions, and some useful insights. February 15, 2015
Question
I am in the middle of a kitchen remodel. The island is cherry and we selected a darker stain to add contrast to the white wall cabinets but we wanted to still see the grain. The painter I contracted to stain the island applied a Sherwin Williams oil base stain today. I believe the stain was not applied properly based on the results. The painter did not apply a wash coat (which I read he should have but after the fact).
I have two questions. Is the stain finish acceptable as shown in the photos below, or am I correct in questioning the results (blotching seems excessive)? If the application was indeed done improperly, what can be done to correct the issue? He has suggested sanding the areas with excessive blotching, applying a wash coat, and then re-staining. Is this the best solution?
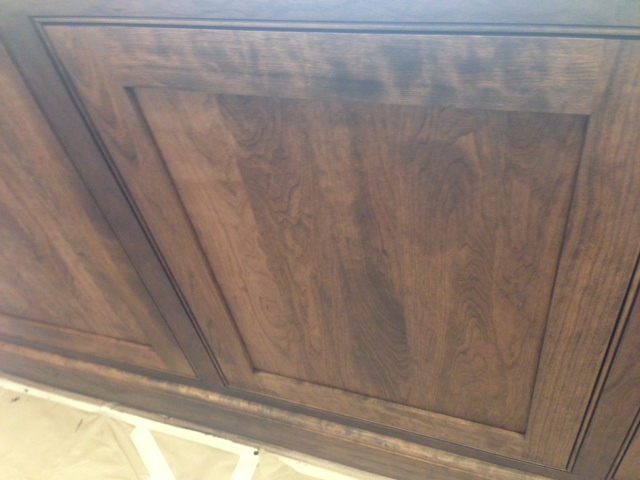
Click here for higher quality, full size image
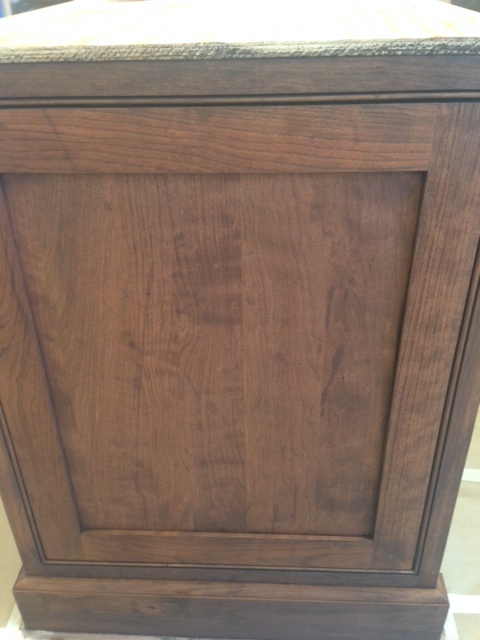
Click here for higher quality, full size image
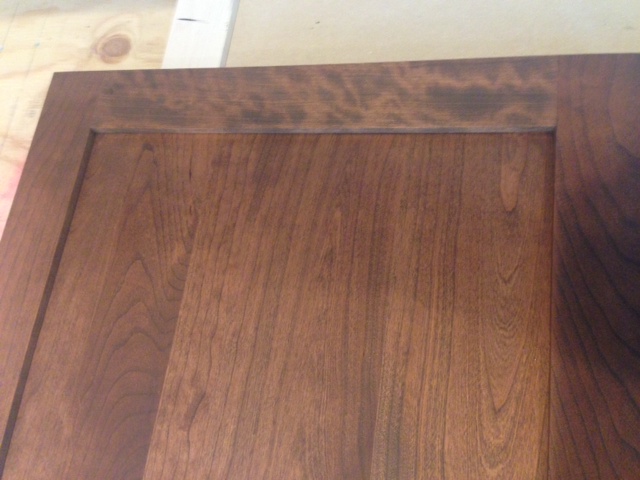
Click here for higher quality, full size image
Forum Responses
(Finishing Forum)
From contributor N:
First off, one man's blotchiness is another man's figure. Secondly, getting samples beforehand is key to getting what you want (I know it's a little late for that now but in the future). Third, as to who's responsibility it is that you are not happy with the look of the stain, most likely both of you. Forth, sanding, wash coating then staining again in the areas you don't like sounds like a recipe for an unnatural uneven look. Test this idea on the back of some drawer fronts before moving ahead. Second to last if the sanding idea doesn't work, try lighting the stain by wiping with lacquer thinner, butyl acetate or zylene. Lastly, put some finish on the back of a drawer or door - who knows you might like how it looks.
From the original questioner
The painting contractor is licensed and specializes in finishing cabinets. He had references. I used a licensed carpenter with years of experience and references to build the custom kitchen cabinets, and they came out beautiful. The carpenter�s partner who does his finishing wasn't available, so I hired a professional to finish the cabinets on site, post install. The cabinets were sanded by the carpenter before and after install. The painter then spent three hours this morning sanding the island cabinets before staining them.
I'm not unhappy with the stain color or look over 80% of the island, just questioning the leopard like blotches in only some locations. Is this normal, or is it an application issue? Would a professional cabinetmaker look at the cabinet and see it as professional workmanship or not? Would you be happy with it in your kitchen after spending a lot of money? As wood is a natural material I expect variation and that is what makes wood beautiful. I am simply asking if the stain was applied properly. By the way, this is not some fly by night contractor charging dirt cheap so that I get what I paid for. I am paying thousands of dollars for the finishing of cabinets I paid a lot for.
From Contributor R:
There are a few ways to apply an oil stain, it can be brushed on or sprayed on or rolled on or ragged on. Either application techniques simply require the applicator to wipe off all the stain with a rag once the particular area has been stained. Judging from the photos I personally would try a ScotchBrite pad dipped in some Naptha or Paint Thinner and gently wipe the offending dark areas This would remove some of the stain. Now; had it been a dye stain, it might need to be sanded off. On a side note, some of those darker areas just might look good once a sealer coat has been applied but that's just my opinion. The variations in a stained piece of wood just show some of the character. All is not lost and neither is the sky falling. With a bit of maneuvering to remove some of the dark areas I think you and your customer will be pleased with the outcome.
From contributor M:
I do not think you got a bad job, maybe just not the one expected. A wash coat typically makes the finish look lighter. A sample door should have been produced. I think Contributor R�s idea of trying to lighten the worst offending area's is a good idea. Also, you may want to do a spray toner coat to even things out. My finisher does this often to even out maple and cherry stains. Years ago I installed a natural finish hickory kitchen that did not look like the sample. The cabinet co. gingerly toned in the lighter areas and then lightly toned the whole kitchen and all was well again. Keep a cool head and this should work out.
Two other thoughts: If you are concerned the finish will get to dark with a toner coat then maybe you could wipe down all the wood with naptha or lacquer thinner to lighten then do the toner coat to bring it back and even it out. Secondly, before you do anything I would just do a test on the back of some doors, one with a clear finish and one that's toned. You might find it evens out without a lot of fuss.
From contributor D:
I don�t finish anymore but I always used a toner when a really even, consistent color was required. So if that�s the overall color I was going for I would start with a light stain coat then toner.
From Contributor C:
In my opinion the unsatisfactory results rely more on the cabinetmaker than the finisher. An experienced woodworker would have easily read the grain on those questionable pieces and set them aside for use in an inconspicuous area (on this project or another) or used in a more calculated manner. Use all similar grain patterns on the same door and/or all on one side of the island for example. Sanding should have been done prior to assembly or at least more consistently. Your face frames all look darker than the doors and so does the base molding for this reason. In the last picture the door also seems to have a water stain that follows across the door in a pattern. That may just be a photo issue. The door panels are made from all narrow, varied grain stock which just adds to the inconsistent look of the whole project. Add the no washcoat to the project and this is what you end up with. At this point try wiping down some of the darker areas as others have mentioned. If that door is water stained re-sand entire door and stain again. If you are spraying your topcoats a little toning will help even things out at the expense of darkening the project some.
From contributor J:
Simply put that's how cherry looks when it is stained with a wiping stain. There are many ways that you can get around this for a more even look, but why? If the idea was to have uniform color something like beach or alder would have been a better choice. You could sand the darker areas and continue on with sealing but the results will not be dramatic. In my opinion this is one of the reasons cherry looks so cool.
From the original questioner
One additional question, the color we had hoped to achieve was darker on average (but similar to an opposite side not shown in my photos and similar to some of the darker areas in the photos). Is there any issue with applying a second coat of stain to further darken the color? The
Sherwin Williams stain instructions don't comment regarding re-coating. The look we were shooting for was a darker "expresso" color with the grain still apparent, contrasting the SW CV off-white on the U-shape wall cabinets.
From Contributor O:
I don't think they look very good to me. It is hard to tell anything from a photo but I am betting since those aren't raised panels they are veneer. If so they are horrible. No one should be using a veneer with that small of a flitch on the face of a door. If they are solid wood then a dye should have been applied first, sealed and final color achieved by shading, glaze or both depending on the final look determined by the sample. We do have one of those right? Blotching can be a misunderstood term relating mainly to the application technique of the color. On highly figured wood it can actually enhance the figure if done properly, however on the door frames a rail has blotching and a stile does not. That is not a good look on any product. If you are intending to go a little darker and don't want to just strip everything down and do it again, a good finisher should be able to even everything out using a shading technique. Do not apply more stain, this will cause adhesion problems.
From contributor P:
I agree with what Contributor M said. Cherry is a difficult wood to finish properly, so welcome to the club. If the finisher had applied a washcoat the overall color would be significantly lighter than what you ended up with, which would be the wrong direction based on your desire for a darker color. Go with toning to get you 80% of the way there, and wait a year for the cherry to darken to get the final 20% (just kidding, but not totally). If you're really after espresso level darkness, blotching will not be visible as overall toning will reduce the contrast between light and dark areas. Be careful trying to correct a single door or drawer by sanding, solvent, toning, etc. It's very easy to end up with that piece sticking out like a sore thumb compared to the rest of the project. I think you should tone the entire project consistently, and nail down your full schedule on sample pieces or the backs of drawer fronts and doors first.
From the original questioner
Rather than try to address the underlying grain variance issues resulting in the blotching, would it be possible to simple apply a high solids dark SW CV over the stain? Would there be any adherence issue?
From contributor B:
Well the good news is the color you�re looking for is darker. First off, exactly which SW oil stain did you use? Contributor M noted more stain could be an adhesion problem if you do another coat. The first thing I thought was to put on a thinned coat of the original stain and build the color up to what you want. Check the mfgs tech sheet to see if multiple coats are compatible. Otherwise I'd go with the ScotchBrite and solvent to the darker areas then seal with color added, sand and start toning with a thinned down NGR to get your color.
From the original questioner
The SW stain is Wood Classic interior wood oil stain.
From contributor B:
Well per SW application sheet: Apply a second coat if you want a darker look. Also, apply a second coat if staining badly weathered or unfinished wood. There you go. Hit again. Personally I'd try to spray and no wipe the second app. The darker pigments are what are causing the blotching when you rub/wipe them. If your finisher is any good he should be able to even this out to some degree, (remember this cherry it won't completely uniform). I'd thin it some (from SW: Thicker, richer formula means less drips or splatters) as this is a heavy body stain. Crank up the air pressure to get atomized.
From Contributor T
Since you are trying to go darker you are fine. More steps need to be done to achieve your color but you are actually in good shape.
You have three options:
1. Apply another coat of stain. Gel stains are a good option for a second coat (good for a first coat to so that things don't blotch). To go real dark with a hint of cherry General Finishes Java is a good choice. Black Fresco color will darken it even more. For an aged deep cherry look Minwax's Aged Oak would give you a great look over what you have already there and it's available at your local hardware store.
2. You can tint each coat of sealer and topcoat you put on. Depending on the finish you use there are different ways of adding color to this. Because I don't know what he is using to topcoat I won't make recommendations.
3. You can glaze it. In between topcoats a black or deep van dyke brown glaze would look fantastic on those.
4. You could use a combination of these techniques. Either way, more work is required but you are well on your way to a beautiful project. Make sure from this point forward you use a sample board or door to get the results approved.
From Contributor S:
A pad stain is made from NGR. It's cut with water to reduce the chemical bite but that's not an issue over a cured CV finish. Use a rag to apply and mottle it with another rag dampened with denatured alcohol. Water will help keep it wet. Generally, it's a rag-applied dye stain almost similar to how you might apply a glaze, then you topcoat right over it.
From contributor I:
If you really need dark expresso finish don't waste one of nature�s most beautiful woods. Use some birch or soft maple. Cherry ages to a magnificent dark red with age. That figure makes it look even better. But in my opinion, you commit a crime when you dump on layers of pigment and end up with something that looks like plastic laminate with a muddy looking dark color. The use of cherry for this is usually based on a customer's lavish demands to be able to brag about the choice of wood they could afford. Too bad they can't actually see what the real wood looks like!
From contributor V:
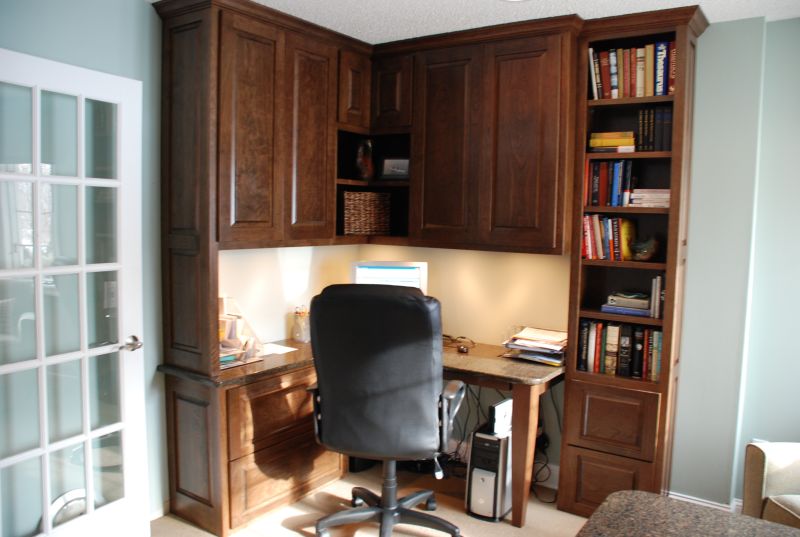
You have just described my worst nightmare. In my experiences, that's cherry, and I think it's gorgeous. However, I understand that many consumers are looking for a uniform look. Many of the pre-finished cabinets that you see with a uniform dark color are the result of automated, multiple step operations.
I've included a picture from an office project I did a while back. It's actually much darker than the picture depicts - the photographer used a flash for the picture.
Steps:
1. Sand to 280 or above, being sure to eliminate all swirls.
2. Spray with dye stain to obtain color depth. I used walnut colored ML Campbell Microton for this project. I've used their cherry Microton on projects where the customer wanted the cherry color to come through.
3. 1-10 wash coat.
4. Stain - I used ML Campbell Windsong II coffee bean. Water-base stains typically result in a much less blotchy appearance but I don't particularly like working with them. Since your project is already stained this information might not be of much use to you. I would try applying a wash coat and then a dye stain. Spray multiple coats until you achieve the color you're looking for - I have done this successfully.
Click here for higher quality, full size image
From contributor O:
At this point I would strip them and then sand them good, it is next to impossible to fix or change them at this point. Once they are back to bare wood you need to spray on a toner, then a wiping stain and then your clear finish. Like mentioned you should get some samples and get a supplier to make the color you want. My supplier matches everything I throw at him.
From contributor V:
You don't need to use a toner. That will probably just lead to a different problem. I have had great success spraying a dye under a wiping stain. The stain you are using makes a big difference. For what it�s worth I don't use SW products.
From contributor F:
Use a vinyl was coat and then light sand with a ScotchBrite. It will slightly seal the wood but not completely and your stain will come out more evenly. Water popping could be another option (color will come out much darker).