Question
I have a several pieces of furniture to build in which cylindrical legs are reoccurring themes. I have three nightstands and a sideboard to build where the leg remains a constant cylinder from top to bottom, (with no flats for joinery) and where the table top does not cover the legs, but the legs surround the top. That is the legs crown slightly above the tabletop, and the tabletop is sort of let-in to the legs, so that the corner of the square top would extend slightly past the center of the cylinder. Making sense?
The client wants everything to take design cues from his ladderback chairs, which share a similar look (if you look at the seat, you see the rounded tops of the legs). Now, my question is: does anyone out there have experience joining pieces to cylinders?
As far as I see it, I have three options, all of which would be simpler if the mortises in the legs were done with a router before the leg gets turned, and while it is a square blank.
1. Cope the aprons to the diameter of the cylinder. I can�t figure out anyway to do this, besides maybe wrapping a cylinder of the same diameter with sandpaper, somehow chucking it into a drill press, and coping the width of the ends that way, or buying a spindle sander (the diameters are 2�). Anyway, I�d use floating tenons.
2. Remove a 90 degree 'piece of pie' from the leg cylinder, the height of which would be the width of the pieces that join into it. Then, the aprons/carcass gets assembled first, and the legs are in a sense applied, and fit over the assembly.
3. Cut straight mortises into the leg, and devise something where the corners of the aprons/carcass end with a 45 degree flat, to which a mortise is attached.
I don�t know if I�ve explained myself very well. Does anyone have any ideas?
Forum Responses
(Furniture Making Forum)
From contributor J:
You did fine explaining the relationship between the legs and the top, but I'm not clear whether these pieces are primarily cabinets or tables. I don't think much of the idea of cutting mortises before turning the legs. It�s much better to build a jig to hold the turned legs for mortising after turning. Solution one is not going to give you tight joints without a lot of painstaking hand-fitting, and maybe not even then. Solution two could work, but I don't know enough about what you're building to say so with any confidence. I�m not sure if I understand solution three.
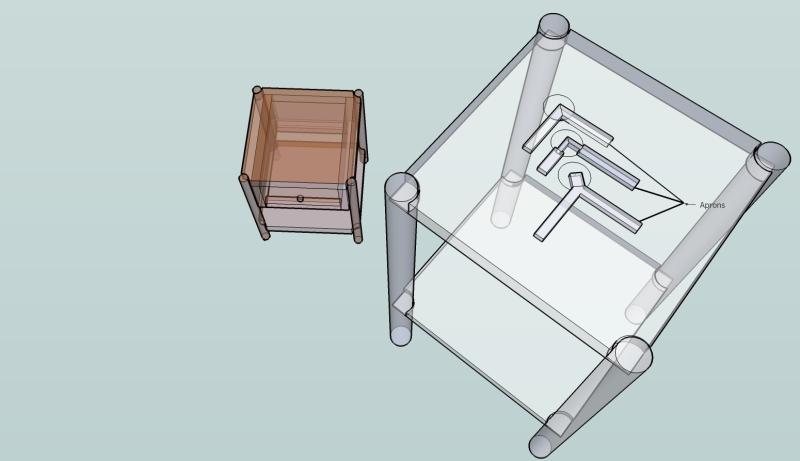
The examples (top view) of how I can imagine attaching the aprons (which house a drawer) to the legs are there to see. Of the three options that I can think of, I'm leaning towards the third one I explained (nearest in picture).
Contributor N - I understand what you�re saying about handwork - I enjoy it too, but in this case I'd have to cope 24 ends to make three of these tables, and the aprons are going to be about 10" wide - I want something fast and repeatable. Lacking any kind of cutting tool with a 2" diameter, I'm examining some other options.
Also, I should have mentioned that I'm thinking about making the cylinders with a router jig I've read about. I'm not much of a wood turner, and my lathe is a piece of junk, good for the odd chisel handle - in fact I'm considering cannibalizing the lathe parts to make the jig! Anyway, maybe I'm making this too complicated, but the client wants top notch work, no pocket screws or shortcuts. Is this any clearer?
What I ended up doing was using the table saw to cut the square legs into octagons, then 16�s, but backing out the wood around the mortises (now 3/8 wide) to leave a flat, then shaping the legs fully round with a spokeshave and many boring hours of sanding. In the end it worked well, with a little bit of a sculptural quality to the legs as they form slight rounded lips leading to the flat area. However, it was very time consuming.
In retrospect, the best way to do it, I bet, would be to turn the legs, then make some sort of carriage to push the legs part way through a jointer, then again at right angles to the first cut, and form the flats with the jointer. I hope this helps anyone mulling over a similar problem.
Comment from contributor L:
Don't overthink this, it's not that tough. If you do use full width tenons, you have to make smooth mortises. You can cheat by rebating the back of the tenon. Sand the front face, then cut the rear of the joint to fit the mortise. Don't worry about shrinkage on the thickness of the tenon, it's across the 10" width that's the problem. Still, I'd pin it or split it. Overall, I think you are less likely to show a crack than to show a face if you flatten the round for the tenon shoulder.
Back to Contributor N's idea - 24 tenons times 10" is a lot. How about a simple router jig? Rout endwise with a very big cove bit to relieve the joint. If your floating tenon is large enough you can put the bearing inside. You only need to touch the shoulder at the outside to get effective bracing. Yes, it's fussy, but I hope you are charging for this.