On-Site Laminate Cutting Tips and Tricks
Cabinet re-facing work calls for a lot of cut-and-fit laminate work. Here's a long discussion of ways to go about the task. May 6, 2007
Question
Does anyone have tips to share for cutting HPL to size? I use a Virutex laminate slitter for strips, but when I need to cut larger pieces, it's a real pain. Right now, I either use Wiss scissor snips (too much time), or I turn the laminate back side up and use a straight edge and score with a razor (this method I usually veer a little off from the edge on an 8' run). Mind you this is all done in the field (re-facing cabinets), so a table saw usually doesn't work, as I need a nice clean factory edge for the end panels that butt against the wall.
Forum Responses
(Cabinet and Millwork Installation Forum)
From contributor K:
If you are talking refacing or countertop production, use a laminate trim router.
From contributor D:
Laminate trimmer and a straight edge clamped to the underside of the plam. The pilot guide follows the straight edge. I make the straight edge about 8" wide to keep the clamps out of the way.
From the original questioner:
I am talking about taking a 4X8 sheet, and cutting it to size before gluing it to the cabinet sides.
From contributor D:
Me too. To work efficiently with laminates in the field, you need a work surface big enough to lay the material on flat.
From contributor L:
I have never had any trouble using the table saw or beam saw.
From contributor K:
It sounds like you are new to this, so here's some more detailed info. I think what you are probably looking for is a Virutex laminate slitter that can cut up to 30" wide. The reason most use a table saw to cut the 4' x 8', is that this slitter is $2500, and performs the same function as a table saw, with the limitation of a 30" cut.
If you have a shop, when doing your on-site measures for materials for your re-facing job, be sure to measure the end panels, and pre-cut your pieces 1/2" bigger than your measure back at the shop. You can then measure your exact cut onsite (get top and bottom measure), shy 1/6" for expansion and contraction, and use a straight edge, clamps and a laminate trimmer to trim the end cap pieces to size.
For example, if your upper cabinet end cap is 12" at the top from the wall to the front of the cabinet (for frameless) or face frame and 12 1/4" at the bottom, you clamp the straight edge at each mark, and run the laminate trimmer along the straight edge and it will cut to size. This will usually give you what you need for a nice clean fit, unless you have a really cockeyed wall - then you can scribe the laminate piece and trim. Of course, if you're onsite, you can do this on workhorses.
From contributor J:
I agree with contributor K. I always try to cut my stock to more manageable size in shop before going on site. Make sure you jig your table saw fence to prevent the laminate from sliding under the fence. 1/8" hardboard cut a foot longer and wider than your fence with a rectangular cut out slightly bigger than your fence will prevent this problem. Just adjust the fence to proper width for your rip and lay the jig on. Now lay the laminate on top of the hardboard. If you are cutting small strips, run the blade up through the jig. It takes some getting used to, handling the laminate through the saw. I kind of hold it like a big pizza box and feed it through. One tool that is very useful is an 18" guillotine paper cutter. They make very quick, clean cuts for butt joints. I have always wondered if a rotary cutter would work, but someone on this site recommended the machete type (if you look at one, you will know what I mean) and I have never been sorry.
From contributor O:
I rough size laminate in the shop on the table saw. You do have to be concerned both with it sliding under the fence and also with the sheet being raised up by the blade during the cut. The way I've dealt with this is to spring clamp a 2" x 2" aluminum angle about 6' long to the fence. The sheet rides on top of the angle's base, which is on the table. As far as the piece rising, I made a large T-square that is also clamped to the fence and extends out over the piece in front of the blade. The square is clamped elevated by about .125" above the laminate so there is no friction. I only seem to need this when cutting large sheets. Smaller ones, I can use a sacrificial plywood as a big push block covering the piece to be cut as it goes through the blade. Everything else gets cut with a laminate trimmer.
From contributor K:
As you can see from the responses, there are lots of ways to cut. Experience will be your best friend, but when cutting laminate on the table saw, because most fences are not flush to the table saw top and the laminate would ride under, we raise the blade to about 1" and use one of the following fences (just be sure to allow for them when measuring the cut).
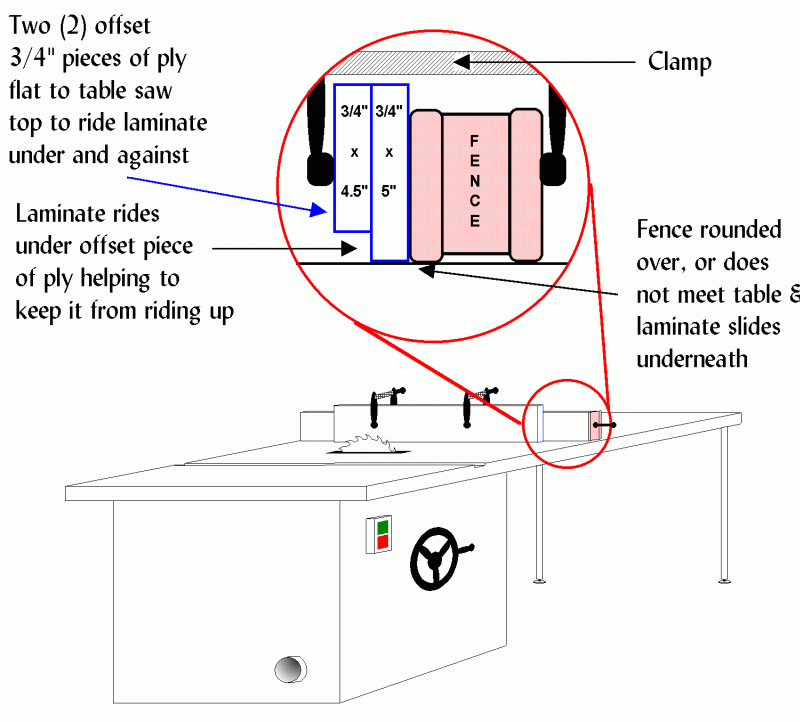
Click here for higher quality, full size image
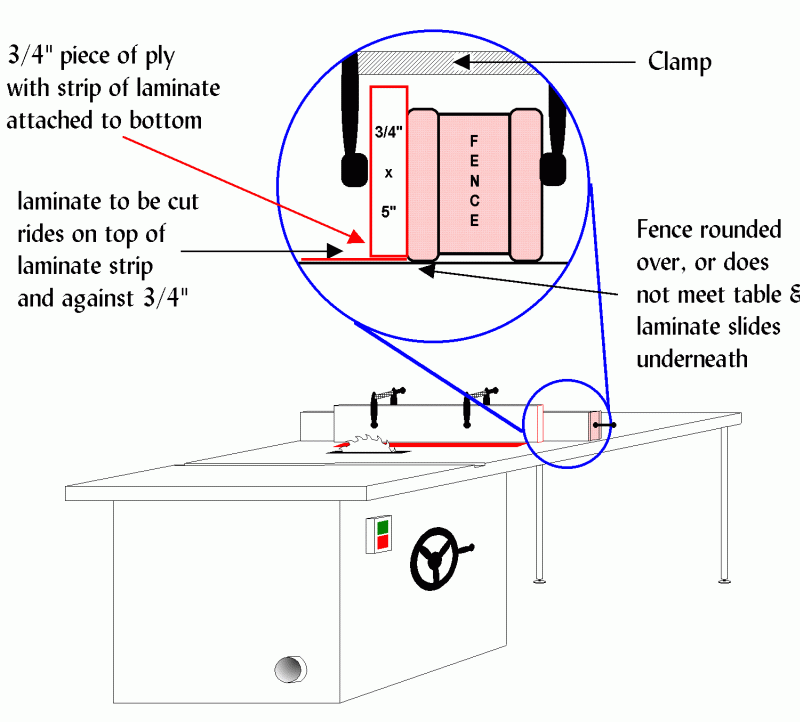
Click here for higher quality, full size image
From contributor M:
Has anyone ever tried a Rotozip for this application?
From contributor E:
When I'm going to a site where I know I have to use an HPL finished end, I generally take along a 24.5"x 31" piece of material cut in the shop. Some of the TS jigs mentioned are useful; I'm sure you know the drill.
No razor blade for me. I scribe it to the wall with conventional flat-pencil, and use a block plane to cut to the line. The front obviously sticks out, and I carefully mark top and bottom of the gable, use a good straight edge to mark the line, and use an Olfa-p-cutter to score the break, maybe a 32nd over width. Glue it in place, use the block plane to get it close to the edge (if the ctop is in place, you cannot obviously get too close to the top, or wall). File off the remaining with traditional HPL filing methods.
Block planes work good for shaving plam, although it does dull them faster than wood, and if you need the drawfiled edge, or you got a teeny tiny corner that you cannot get a file into, well folks, the un-cutting edge of an olfa knife will work exactly line a cabinet scraper and scrape HPL edges down to where they should be (can't catch 'em with your finger nails).
The Virutex hand held slitter is a god-send. The imported knock-offs never worked for me. It is unequivocally worth every cent it cost, and has paid me back many times. I also have the bench-mounted Virutex slitter, and I'd rather slit my throat than try to run a 12' length of laminate through it. The Virutex guillotine works okay, but is always stiff, and I'd rather use a try-square and scriber to cut a square joint on an end, than drag that dust-covered beastie out to a site. It's real only good use is to cut square ends, and on site you already got the methodology to accomplish that without yet another tool. In the years I have had it, I ain't ever had cause to use it's mitre capabilities.
For the mitred edge corners, I use a klenk cutter to cut the edge close to the mark and a kludge shooting block made out of squared up dunnage - one end at 45, the other at 22.5 and with a few saw slits along it. Just use the block plane to "shoot" the joint, in the traditional jointer fashion. I don't know if that made sense to everyone, but it's methodology I've used for years.
The comments below were added after this Forum discussion was archived as a Knowledge Base article (add your comment).
Comment from contributor S:
I have found that my
Festool T55 circular saw and guide-rail are absolutely fantastic for cutting all large pieces of sheet stock and laminate on the job. My "portable" work surface is usually an interior door laid on a pair of horses. For 4x8 goods I put a sheet of any 4x8 ply, MDF or particle board on top of the door and then top that off with a 4x8 sheet of 3/4" foam core rigid insulation. The insulation board allows me to set the blade depth on the saw to just cut about 1/16" to 1/4" into the foam board. This setup gives me precise, splinter-free cuts.
Festool makes guide rails in a number of lengths to about 16 feet. For portability and ease of use I usually take two 55" rails to the job and couple them when I need to rip 8'. The T55 saw makes great plunge cuts also.