Planing on edge
Other Versions
Spanish
Processing stock through planer to define parts' widths. January 3, 2003
Question
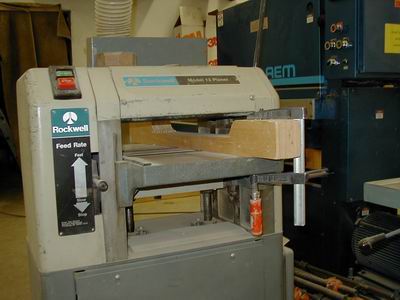
I've always wondered if processing stock through a planer on edge to define the parts width was a viable option. I assume some type of jig that holds the board vertically would be necessary. It would also be required that one edge of the stock be straightened on the jointer. Has anyone tried this technique?
Forum Responses
From contributor J:
I use a jig constructed out of three layers of high density plywood, 3 inches high in the front and back and slightly less that 1.5" in the center, that when clamped to the planer bed on a slight angle forces my door and face frame stock to run through square to the bed.
From contributor K:
I have done this with some success, and yes, you would have to joint one edge first. But be aware of some other conditions that help and hinder the process. First, if you have a large volume to machine, gang the pieces up and hold them tight together (be careful doing this - it might not exactly meet OSHA standards). This obviously will speed up the process, but also helps keep parts vertical, which translates into square corners. But if you have a piece with a lot of twist, it can be hard to keep it vertical even with a jointed edge. Be careful of pieces that get wide. The wider the piece, the more it wants to roll over. This is where ganging them up helps even more. I have developed an outboard fence system on my shaper that I use as a jointer and to parallel the second edge. This gives me the ability to machine a short piece or a large volume with perfect accuracy all the time, and safely! It is not as fast as ganging them up in the planer but a lot safer.
Contributor J's idea reminded me of a new method we are using for sizing face frame parts.
We have a 24 inch Tersa head planer that we use for a lot of our sticks. The bed height is calibrated with a readout that is kind of like an automobile speedometer. This is okay for most of our work but requires a bit of trial and error to get exact repeatable dimensions.
To work around this we added a cheap 12 inch jobsite planer. The height adjustment handle is locked in position. All height changes are made via a sled such as the one contributor J describes. Each sled produces a specific dimension.
This method works very well for producing pieces to fit in bead and quirk haunch cuts. It is also a fairly elegant way to produce 1/8 inch thick banding. We have two of these planers set up now. The one with new knives will produce banding as clean as you can get on a wide belt sander, and thinner than we can get out of our sander.
Ganging up parts definitely makes it easier to keep them all square. If you run them through the planer or sander ganged up on edge at much of an angle, they want to roll over easier. Run them square to the head and no problem.
I size parts that way, too. Another advantage of ganging parts together is that my planer leaves feed roller marks on the edge of the board if only doing one.
I've used a Dewalt jobsite planer and I was impressed with the finish, too.
Contributor J, I just can't visualize the jig the way you described it. Could you post a picture?
This can be an extremely dangerous operation and, in my opinion, the technique should only be used with planers with segmented infeed rolls. Even then it's not completely safe and all standard precautions should be observed.
If one piece out of the batch is slightly narrower than the other parts going into the machine it can be fed below the pressure applied by a non-segmented feed roll. When the cutterhead knife hits that piece there's nothing to keep it from being forced backwards. This can happen at tremendous velocity.
Some years ago a worker in a local pallet plant was killed under these circumstances.
There are other production techniques that are far safer, produce cleaner, square parts with far less risk. For example, when we still built cabinets, we used a standard shaper and a series of custom-built fences that keyed to the shaper table. Each fence was set up to produce a standard width part. The parts can be fed at high speed using a stock feeder. They are produced clean and square no matter what the width.
From contributor J:
When clamped to the planer bed on a slight angle it works like a fence forcing the pieces being run through on edge to run at 90 degrees and to keep them from rocking side to side if they were not jointed first.
From contributor B:
If you were to use a shaper with a feeder and out board fence it would be much safer and you would be able to do wider boards than in the planer. Learning to set the out board fence to get the desired dimension of part is the key. I made mine so that the dimension it overhangs the edge of the table is the dimension the board will be cut.
Contributor J, that's a great idea with the planer. I've been doing it for several years without any problem except once in awhile for some reason they twist a little and the edges get angled. But I can see that the pressure forces the wood to remain vertical.
From contributor J:
Contributor B, how much of a cut can you take at a time and do you run one edge over the jointer first?
From contributor B:
How much you can take off will depend upon your shaper and the condition of your cutter. I use an insert cutter from Felder and have a 7 1/2 hp shaper so 1/2" would be no problem. In reality I usually take off less than 1/8" on the first side and less than that on the second. I do not run either side over the jointer. You could accomplish something similar with a long infeed fence. This set up does not have any way to snipe the ends of the boards as the guide fence is out board of the cutter (only works with a power feeder). This setup is quite accurate and tends to straighten the parts.
From contributor K:
Contributor B has got it right. I have also been doing this for many years with great success. I have set up a Powermatic model 26 with an outboard fence fitted with an Accurate Technology digital ruler. I run all lumber under 9" through it to edge joint and parallel both edges of every board. Using a cutter head with 4 disposable knives at about 7500rpm you can make pretty good time and get material S4S to within .002". If you try this, remember that the fence will generally be shorter than the table of your jointer, so run your first edge crowned to the cutter to help straighten as much as it can, then run the second side. Of course, this must be done using a power feeder.
I use this method but I rough cut the pieces slightly fat on the table saw so they at least are all the same width and send them through 4 to 6 at a time. I probably wouldn't do it for anything wider than face frame stock. I think 2 1/2 inches is about as wide as I would go with this method. I do like that shaper trick but I don't have one.
Editor's Note: Machinery from Felder (website) is well rated and reviewed by it's owners.