Power Feed Versus Manually-Operated Mill
Guess which one's easier to operate? Here's a discussion with some pictures of power-feed rigs. April 30, 2009
Question
I�m getting ready to purchase my first small band mill, and was wondering whether or not the power feed and up/down motion would be worth the extra cost or not. I will be using this mill for 50-100 trees a year, and maybe more one day. If so, is 20-23 hp enough for a motor feed mill or would more like 30hp be ideal?
Forum Responses
(Sawing and Drying Forum)
From contributor A:
First of all I hope you looked into a Cook�s mill. I have two mills and love them both. Both were purchased without power feed and power up and down. I have since installed these items on both. It increases production by more than 25%. Unless you want a good workout to me it is worth the money. But be careful, some manufactures put too small on feed motors on their mills.
From contributor V:
I would suggest purchasing your mill with as much as you can afford. My mill is a totally manual personal use mill with a 15 hp gas motor. It cuts well but logs and boards are heavy. The quicker you can saw the logs the more time you have to stack and sticker, clean up and do something with the slabs.
From contributor L:
I have a Cooks MP32 mill and am trying to design a manual hand crank feed system. Has anyone already built one? I have ordered 30 feet of #60 Roller chain to reach from one end of the mill to the other but that's as far as I have got. Ideas, pictures or specifications would be greatly appreciated.
From contributor A:
Cooks uses a #40 chain for their drive system. A 1/4 hp 12 volt electric motor would work in your case. My portable mill has the second power drive system that Cooks produced. It happens to be 1/2 hp but, here in the northwest I saw trees 24-60" in dia. most of the time. I also have made changes to my mill to cut 28" wide from the 24. If you have any more questions call Cooks and they will send you pictures of their drive system. They did for me when they were in the process of designing the system.
From contributor R:
Here is a past post I did with a chain operated hand crank feed. This was on my first mill a little over two years ago.
ShopBuilt Hand Crank
I now have a much larger manual mill which is a knock off of the MP32, and I also added a chain hand crank feed to it, but the chain and drive is on the outside of the mill bed. The only time I push the machine is with small narrow cutting.
From contributor R:
Here�s a couple pictures of the feed on the larger mill.
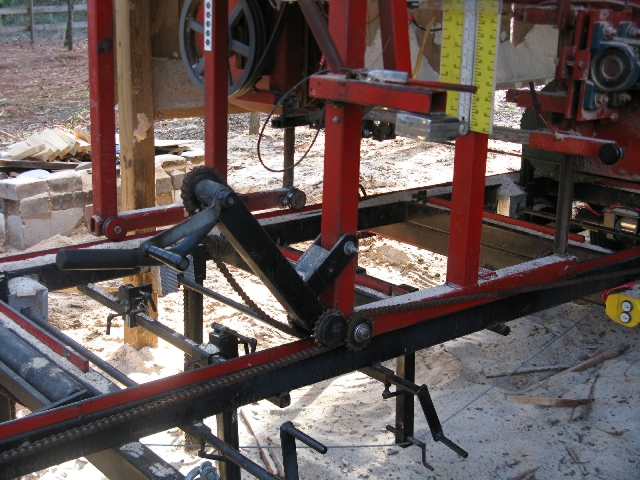
Click here for higher quality, full size image
From contributor R:
Sorry about the dark quality. It was early morning here. The previous picture is with the feed engaged, this one is disengaged. Next to an electric feed or hydraulic, this is the only other way to go. A couple weeks ago I ran a WM LT15 with the rope feed. It was spongy and had such a short handle stroke that by the time I made a few cuts my arm wanted to cramp. It took lots of force to turn it. The handle on this is about 8". It came off of a winch and was fitted to it - you don�t have to disengage it to return, just pull the carriage back and it will wind backwards. I usually do disengage with the handle you see attached as it makes for a faster smoother return.
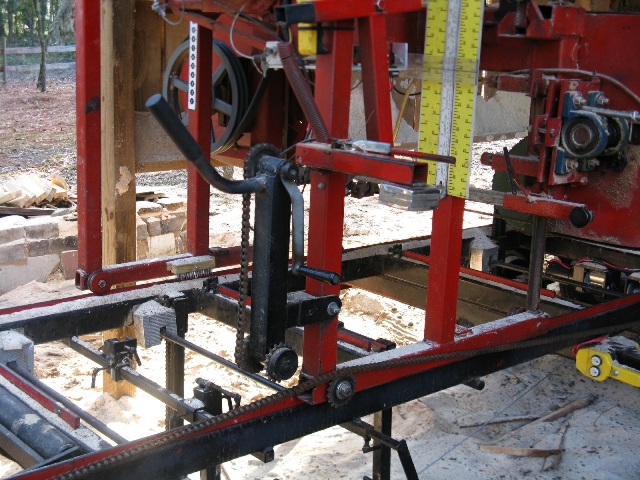
Click here for higher quality, full size image
From contributor A:
I have an 85
Woodmizer LT40 with power feed and up/down and 24 HP. I still have to load, turn, remove boards, stack and sticker. If you want exercise, go manual. If you want to saw logs, get every advantage you can afford. You may get old and tired someday.
From contributor L:
My son used to help me with the mill. Now he has a job and the true meaning of a manual mill is kicking in. I have figured out that a small bottle jack to rotate large logs can be a man�s best friend.
From contributor I:
I have a six foot handle for my cant hook and it's amazing how much the extra leverage helps on big logs.
From contributor B:
I am in the process of making a hand crank feed system. I have had a piece of pipe attached to one side that has been my push handle but realized it cut much better when pressure was put on both sides. I have two pieces of #35 chain, one for each side. I will attach each piece to saw then run over a sprocket at each end of the saw. The sprockets at one end will spin freely on a shaft but the sprockets on the end I will crank will be attached to each other so when one turns so will the other. I will probably be looking into switching the hand crank handle to an electric motor soon. I will want the motor to have a forward and reverse and a good variable speed. Other than being fan cooled is it something else I need to look at when picking out a motor?
From contributor B:
I am thinking more along the lines of a 110 volt motor. My mill is a 10hp electric therefore no alternator to keep battery charged.
From contributor J:
I too have a mill powered by 220, single phase. When I installed the feed system I used a 90 volt dc motor, with the speed controller and rectifier in one unit. All the gears and other parts came from Cooks. I just copied the 12 volt one they built for me.
From contributor B:
I understand basic electricity (did all my own wiring for my house and shop) but have never looked into DC current. What do you use for the electric source when using a 90v DC motor? 110v AC, or something else? I was thinking DC was for batteries? What would the advantages be for using a DC motor instead of an AC?
From contributor L:
Is the wire brush rail cleaner your invention or did it come on the mill in the picture? My plastic cleaners always break on the Cooks mill.
From contributor J:
Speed control in DC is less expensive than AC. The power for the DC comes from 110 Volt AC, or in other words, plugs into the wall.
Here are the part numbers and some other information.
1. 1/2 hp DC 90 volt gear motor from Leeson, 92 RPM, Part. # 108711. This is for the feed system.
2. Speed controller for the gear motor above, also a Leeson Part. # 174308
3. 230 volt single phase up and down motor, 1/2 hp, 5/8 shaft, 115/208 230 volt, Leeson Part # 110086.
4. Drum switch for up and down motor from Grainger, Dayton Part # 2X440A. This was tricky to wire so I have the electrical shop that ordered these parts wire it for me.
I bought all the small parts from Cooks, (gears, bushings etc.). Then I just copied what they had done for my gas powered head, all the brackets and how everything was put together with some modifications that I thought would be better. Hope this helps a little more.
From contributor B:
I guess this shows if you don�t get power feed from the start you will want it soon. And on my mill it is easier to push back and forth than to raise it up and down. So I would suggest to get power feed and up/down from the start.
From contributor G:
I would suggest that you consider using hydraulic instead of electric motor. There are lots of reason for going to this approach and you will notice that many manufactures have determined that hydraulic systems have the flexibility to handle all of the work that a sawmill needs.
It would be quite easy to install an AC motor/hydraulic pump system, there are plenty to choose from. Then a simple hydraulic motor and you would have your saw drive. Later when you decide to raise and lower the saw head, to turn logs, or to dog logs more hydraulic parts can added by added. The challenge will be to learn how to design the hydraulic system so that the parts work correctly.
From contributor L:
Does anyone own a Cooks MP32 mill with electric feed? I would like to see some close up pictures to see how it is mounted on the mill.
From contributor J:
Here are some pictures.
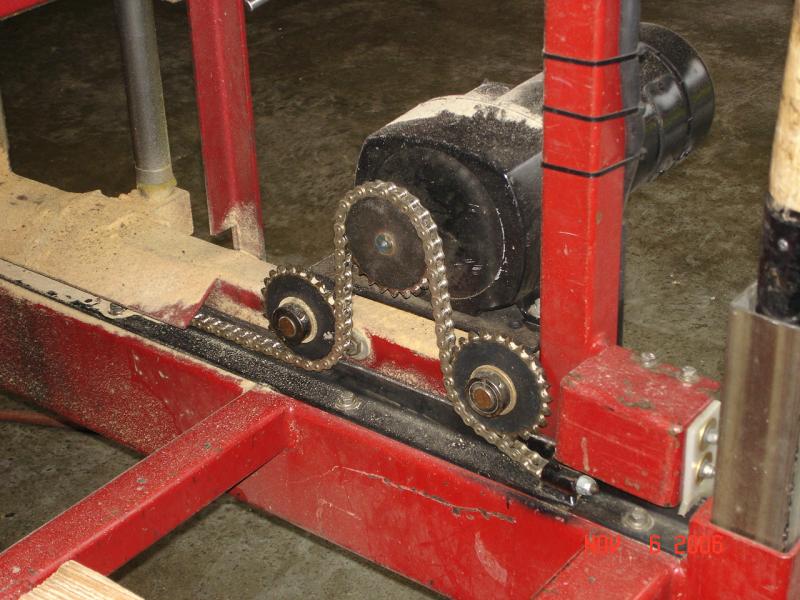
Click here for higher quality, full size image
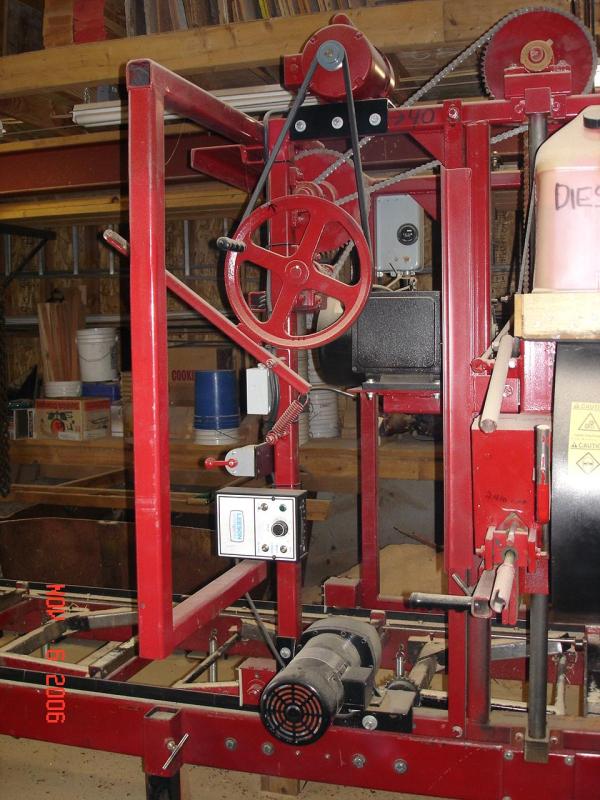
Click here for higher quality, full size image
From contributor L:
I�m glad I saw the pictures. I was planning on putting my chain on the outside of the mill. The way yours is mounted makes more sense. Are the idler sprockets mounted in the original shipping bracket holes in mill? That's what I was planning on doing.
From contributor J:
The idler sprockets rest on top of the 2" square frame. The black bracket has split collars welded to it for the 3/4" shafts. The bushings and extra parts were bought from Cooks. All the sprockets have 24 teeth. The chain is #40. There are bushings, washers, split collars and the ends for the chain. A point of information, the wheels that the head is riding on have to be turned down on a machine lathe because they do not clear the #40 chain. It is more complicated than it looks. I had the advantage of copying the 12 volt they had built for my portable head, since I do have two of them. Hope this makes sense.
To contributor J: in the photo it looks like the chain rests on a black angle iron on the bed. If so, does the angle iron run the whole length of the bed?
From contributor J:
The chain does just lie on top of the 1-1/2x1-1/2x1/4 angle iron. Yes, the angle runs the whole length because the head travels on top of this. Cooks' MP-32 is stock with 1" angle. I changed it to the 1-1/2 for my bevel siding attachment. This raises the head 1/2� to clear the stops I added to my mill frame.
From contributor L:
Actually my mill is a MP-30. It is the grandpa to the mp32. I guess that�s why some things are mounted different on mine. My mill cuts away from log stops and towards cant clamps which is backwards from yours. It�s still a great mill for the price.
From contributor J:
I also have two of the older MP-30's. The mill heads are the same except for a few minor upgrades. How they cut and basic design are the similar. Or at least I thought so. Yours cuts away from the squaring arms? I never knew they had done that. Do you know what year it was built? Hope the info I have given you was helpful in your desire to upgrade it to power feed.
From contributor R:
There is what I believe an old MP-30 about ten miles from me, I stopped in one day to talk to the owner, and I did notice the carriage working opposite like all I have seen. I figured it was just on the tracks backwards. For some reason it�s got to be a pain to either reach over the log to clamp it, or to have to walk around to do that. Wouldn�t it be a normal mill, in a sense, if you turned the carriage around?
From contributor L:
I watched the Cooks video and realized mine was backwards so I did turn the head around when I set it up. That's when I realized the blade guide had to be opened all the way all the time to clear cant. I turned head back around again and everything works fine.
I have ruined numerous blades trying to cut the clamp in half. It's very easy to do being that it's on the blind side. The most sickening sound when you hear that distinctive noise of the blade digging into metal!
From contributor J:
I have made many upgrades to both my mills. One of the first I did was adding squaring arms in every bay on all three mill frames. They are long and short. The long ones are a little less than 13 inches; these are the ones that come stock from Cooks�. I then decided to cut some shorter ones. They measure a half inch shorter than 9 inches. This means that I have both 9 and 13 inch squaring arms. I also moved the felt drip system to be able to open the throat up 28 inches. The fix roller guild was also moved as far back as I could. This is what is required to cut the 28 inches. When I cut 30 inch logs the 9 inch arms work with the curve of the log so I can cut 28 inches wide.
I did manufacture a mill frame that is 35 feet long in one piece; it has 7ea. of the 13 inch and 6ea. of the 9 inch squaring arms on it. This allows me to cut 2 to 3 logs end to end at a time. It is nice to cut 200 to 1000 bf in one set up of the mill. If I need to cut a log that is 50� long, I can do that. It takes time to set up but, it is possible.
I also formed 14 ga. stainless steel that I installed on the bed rails and the face of the squaring arms. I cut wood that, to me, is too valuable to lose it to rust staining.