Repeatability at the Shaper
Other Versions
Spanish
French
Advice on ways to set up shapers to consistently produce mouldings that are identical to a previous run. June 16, 2010
Question
How do you tackle repeatability when running beads or any other detail at the shaper? I was running some quirk bead the other day and it took way too long to adjust the shaper to duplicate the pattern I had from a past run.
Forum Responses
(Cabinetmaking Forum)
From contributor T:
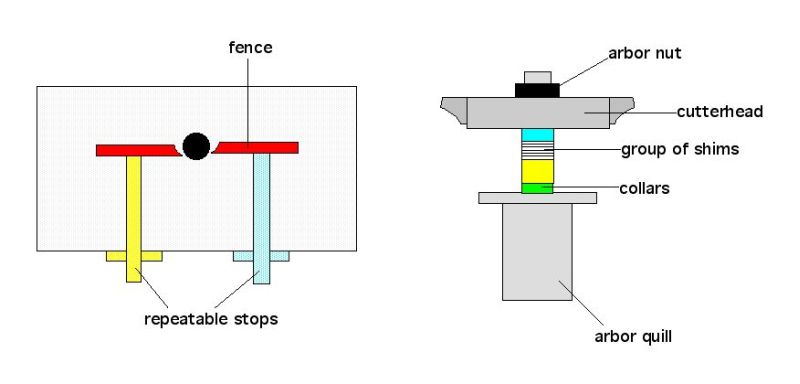
Lower the spindle to lowest position. Stack a bunch of collars on the spindle to elevate the cutterhead to final position. You likely have a bunch of big collars that shipped with the shaper. Reid Tool Products (or others) will sell you bags of small shims to make up the little adjustments. The circular shims are shaped like a donut. They come in different thicknesses like a feeler gauge.
From contributor F:
If you save a few scraps of the profile each time you make a new run, you should be able to use the scrap to set the elevation and fence depth quickly. After that rough but very close setting, you can tap the fence and also fine adjust the elevation.
Working with digital calipers can also do a lot in terms of accuracy when you want exact duplication in later runs. I can plane or saw a molding blank to within +/- .005 by using digital calipers in the machining process.
From contributor L:
I'll make the assumption that you can raise the spindle to the correct height easy enough. Always stop while going up, not down. Mount the cutter as low on the spindle as possible - reduces run out. Next time you have the correct setup, make a setting jig from a panel and a stick that fits the miter slot. You will need to have the fence parallel to the slot. Put the panel against the fence and over the stick in the slot, and fasten panel to stick. Mark panel with its use. Keep a sample of the profile with the panel to use for the spindle/cutter height or use the height setting gage. The advantage of this system is it always makes the fence parallel to the slot, so you can use it for sliding jigs that work from the slot. A second way of height adjustment is to use a vertical height gage. You can buy good enough ones fairly cheap online, either dial or digital. We use one to preset our tools on the CNC tool holders.
From contributor M:
If your shaper is old and worn out, or a cheap light model, none of these suggestions will be perfect. But if there is not too much backlash and sloppy movement, it is easy to accurately adjust a shaper, repeatably.
All the methods before are tried and true. They work well. In my shop we have too many employees and too many profiles to keep track of all the setup blocks. I made a catalog of all our profiles and setups. The setup names are the same as the profile name in Cabinet Vision, so the guys know exactly what to use.
Using a height gage (analog) we set the tool to 0. For most tools this is the position where the tool is below the table and the top edge is flush to the table or coping sled. Then we raise the tool to the correct height and write down that height in the catalog. Once this is done the operator can simply dial in the height stated in the catalog and it is correct within .1 mm.
The fence setting is done the same way, but we reference the spindle, not the tool.
From the original questioner:
Thanks for all the tips. I ordered a couple sets of shims today as well as a height indicator. I plan on referencing the fence off the front of the table because I usually run my stock across the table the long way (I have a Delta 3 hp HD). How to you do it? I figured the long way would give the stock more support but would like to hear reasons for running it the short way (other than using the miter gauge).
From contributor R:
I get a height gauge and record the cutter height. A height gauge is about $40.00. I can duplicate the height of any cutter in less than 15 seconds and do it with an accuracy of .001.
From contributor T:
One of the advantages of simple systems for indexing is that it also changes who is qualified to make the setups. We used to do this with a dial caliper that was magnetically mounted to the table, but then you had to teach someone to zero it out and this gave us another step to screw up.
The advantage to shims is that they only go on one way. If you get some shower curtain clips, the small arbor shims will be easier to wrangle. If you keep your eyes out you will soon amass a stack of shaper collars for various setups. Color coding these will also make it harder to screw up. Repeatable indexes at the fence can be made with two pieces of wood. Very simple stuff.
Click here for higher quality, full size image
From contributor R:
The shims are great for fixed spindle shapers, but since he has a shaper where the spindle height is adjustable (Delta HD), he needs to reference his cutter height to the top of the table and adjust it via the hand wheel. Using a height gauge will make duplicating setups a snap.
Below is a video showing just how quick it is to set cutter height to within .001 on a Delta HD shaper using a 6" height gauge. In the video I am using a router bit in a shaper spindle. I can use the top of the bit as a reference point but when using a shaper cutter, it is better to use the cutter body or upper cutting edge as a reference point.
Once you have the correct height measurement, documenting it for the future is the only thing you need to do. The height gauge has saved me much time and aggravation when duplicating previous setups.
If you are seeing this message, your version of flash needs to be upgraded to view this video.
Click here to get the latest version of the Flash player. |
From contributor L:
About shapers: Great tools, if you have an industrial/quality machine. You can't appreciate the difference until you replace the Delta with one. I just saw an SCM T130 sell online for $2000. I hope you are all using power feeds; the safety factor alone makes them worth it.
From contributor R:
I agree with contributor L. There are shapers and there are shapers. I place them in 3 categories. You have the small shaper which is like the Delta light duty or 3/4 hp Grizzly. Then you have the more common shaper like the Delta or Powermatic. Then you have the production shaper. This is like the Northfield. Each one has a definite purpose and capability. For short runs, the common shaper is tough to beat. For long runs or heavy cutting, the production shaper is king.