Question
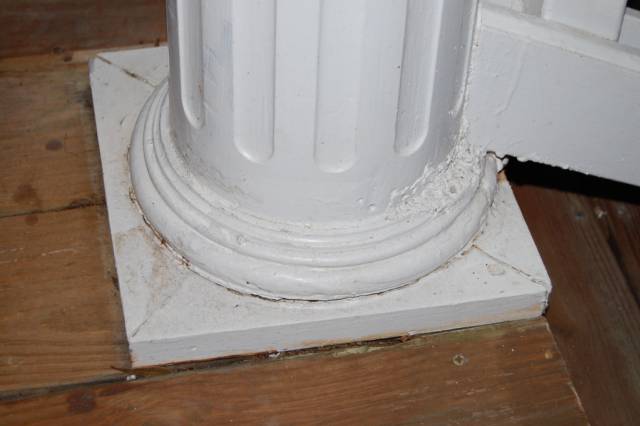
I am wondering if I could use a router table to put a complete round edge on a 10" diameter 3/4" thick board. I was thinking of using a router table and 3/8" bit, pushing the round work into the fence. Is this possible? I am making the piece on top of the plinth.
Forum Responses
(Architectural Woodworking Forum)
From contributor M:
Yes, you can do it, however you need to make a new fence in the diameter of the finished piece you are moulding. The fence needs to be concave so that you can push your work piece into the bit without overdoing it (the fence acts as both a guide and a depth stop). This way you just push your work piece into the bit (carefully of course) and then rotate it until you have gone all the way around it. You can do the cove moulding in the same manner with a second setup except you need to make the fence thick enough that you can flip it over and still have the larger diameter... Read bottom of the work piece on top and the cove bit will be clear of the fence whatever distance is appropriate to achieve the desired profile. I hope this makes sense. You will also need to make a couple of test pieces to use in making your setups accurate before you commit the actual work piece to the bit.
You asked about doing it with a router table, hence my response. But if you have a lathe with a big enough swing or the ability to turn outboard, you might find that to be the quicker, better way.
Cut each of the pieces and, using the centre hole that located the router jig, glue and fix the sections together. Dead simple. About a half hour's work I reckon, and then without raising a sweat (so no excuse for stopping for a beer!).
The advantage of that central locating hole is that it can be used to fix the new base centrally to the plinth, locating in a hole you'll have marked first in the square insert-base you'll have cut and then circled-up using the straight fluted cutter, glued and pinned into the base ready to drop over that locating pin.
If the plinth can't be removed, then cut the moulded base as above, then move the straight cutter into the radius = plinth diameter and gradually plunge cut in increments to separate the moulded circle. Halve it and just push the two sections onto the base of the plinth, glue to the square base and plinth, with wood filler in the joints of the two halves to allow sanding to profile.
But give it a little thought and you'll probably see that you could actually make that circular fixture yourself, or something like it that'll do the job just as well for a fraction of the cost.
I'd fix the circular piece down onto the bench, screwing through a spacer smaller than the intended finish diameter so that the cutter doesn't foul the bench. But you'll already have thought of that. Just one other point, make sure you have support for the router base around its external course of travel, which of course need only be rudimentary as long as it's the same level as the surface of the piece being cut, otherwise the tool could tilt as your weight shifts as you work around the piece, and you don't want any ridges in that cut.
7". Jeez, I see what you mean about the tightness of working on it. Trouble is, to make the job pay you can't really afford to mess around with elaborate jigs and fixtures, so I would definitely be inclined to fashion something myself out of MDF. The principle is straightforward enough once you've got the image of what you're trying to achieve in your mind's eye - just something to tie that router base down, a bit like nailing someone's foot to the floor - they're only going to be going one way!
You're working to replicate an existing item, which is actually not something I've had to do for some time. The last time I made this kind of item was for the bottom newel of a staircase and I used the lid off a tin of paint to guide the template cutter to make the circular template and then just routed around the circumference with a bearing guided cutter.