Routing Through an Edgebanded Edge
Tips and techniques for routing into an edgebanded panel edge without tearing the edgebanding loose. February 17, 2006
Question
I am wondering what the best way to route through an edge that has edgeband on it is. We are having a problem with the edgeband being torn off when the router cuts across it. I am including an image to better convey what I am trying to say.
The router spins clockwise. If the spin is going into the board, the edgeband stays on. When the spin is going out of the board, the edgeband is ripped off. This is consistent whether the router is moving in or out of the board. What can I do to solve this problem?
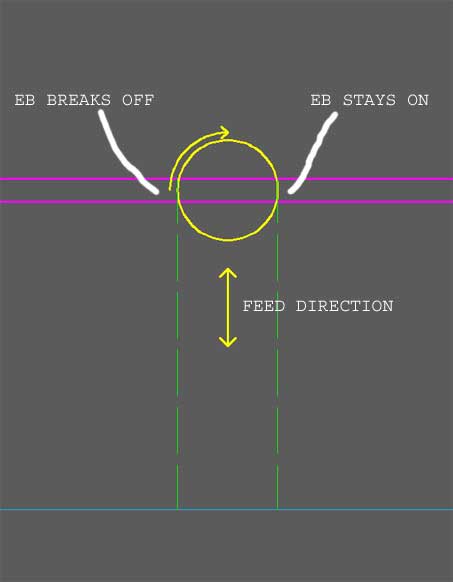
Click here for full size image
Forum Responses
(CNC Forum)
From contributor C:
Does your machine have line boring? If it does, then using a left hand through boring bit, drill a hole right where the edgebanding is being torn. Drill first, then rout. For example, if you use an 8mm V bit, then bore a hole 4mm off set from the edge so it will shear off the banding on that side before you rout the edge. We do this often with great results.
From contributor F:
In your question you did not state the type of edge - tape, hpl, or solid wood however, one trick I have used over the years is to use a bottom cutting router bit and plunge the router directly into the edge. The bit should cut on the z-axis move and prevent tearout of either side of the edge. This works fairly well even up to 1/4 in solid wood. Feed speeds may need to be a little slower in solids and depending on the application, minor adjustments may be required in location of the plunge.
From contributor M:
What you have found is normal when cutting through an edgebanded panel. Anytime you make a single pass, you will find one clean edge and one "kicked-out" edge. You should try slowing down the feed a bit about an inch or so before the edge. Usually this will give you a decent cut, but you could cut it short an inch or so and come back with a left-handed router bit and finish it off with a clean cut.
From the original questioner:
I use a left and a right compression bit and it works every time. I also have an insert knife bit that has a right hand rotation setup at the bottom and a left hand setup at the top. This king of tool eliminates the need to do a second tool change to do both cuts. A third option I sometimes use is with a saw aggregate I snip the edge on one end and cut through with the compression bit on the rest of the profile.
From contributor G:
The only way to completely eliminate this is to use a left hand tool, as has been mentioned. We carry from a .375 to .750 left hand compressions. Ensure the toolholder you have will be a left hand, otherwise the tool may come out.
From the original questioner:
To contributor G: You mentioned that a left-handed tool holder has to be used with a left handed bit. I have been using right handed tool holders with left handed compression bits for the past several years and I have never had any slippage. I talked to our tool supplier and they tell me that I don't need a left hand tool holder. I run a 1/2"left and right compression at 40m/m trough 1" melamine on a daily bases. What is the correct setup for left handed bits?
From contributor G:
The threads on a RH toolholder are designed for RH cutting. This allows the collet nut from becoming loose. We have a lot of customers using what you are using with no problems. We have also seen to many toolholders letting lose of the tool and falling out. It seems you have a precision toolholder, meaning the threads do not have high or low spots on them. The ones with high/low threading will cause a RH(LH) toolholder to loosen up and drop the tool. It's just a safety issue.
From contributor E:
Will the left handed bit just move the tearout to the other side? It always has for me. I either bore along the edge as mentioned, or I vacuum a piece of scrap along that area to give the edgebanding some support so it cannot tearout.
From contributor M:
In all my years I have never mixed the rotation between the spindle, chuck and bit. There are many operators that do and still receive fair results. I do know that long-term this is not good for the machine or tooling.
A friend from a nearby shop had an employee that used a left-handed bit with a right-handed chuck. During one pass the router bit loosened up and as it slowed down cutting, the machine kept moving and the router bit tore through the board and the pods supporting it before snapping into two. The pressure put on the router spindle was enough to throw it out of balance and caused a major spindle rebuild. This is the only instance I've ever heard of this, but that's the reason for the different direction tooling. I don't think it�s worth the risk.
From contributor J:
To the original questioner: "I run a 1/2"left and right compression at 40m/m trough 1" melamine." How many flutes and what spindle speed are you running? Also, how long would say your average cut is, and what is your longest and shortest?
From contributor H:
If you only have banding on one edge, you can put a stop or 'fence' on the spoilboard and put the banded edge against this strip. If nothing moves during the run, you will have a clean cut against the backer board. It�s quick and easy.
From the original questioner:
I use 2 and 3 flutes at 18000-24000RPM. The cuts we make range from 24"-120" X 18"-60".