Sanding Problem with Hemisphere Mouldings
Other Versions
Spanish
A woodworker asks for advice about sanding a complex moulding that's coming off the CNC with a rough surface. But the answer turns out to lie with improving the CNC side of things. September 17, 2014
Question (WOODWEB Member) :
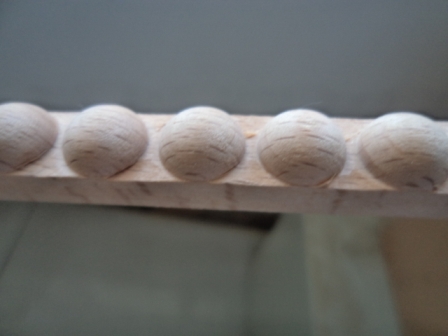
Our shop has a very large quantity of a new moulding profile. We outsource this moulding to another company with a CNC. The CNC cutters are leaving many machining marks. We need to do a great deal of hand sanding to prepare the moulding before painting. The moulding is only 12mm wide and the half ball shape is 5mm in height. The CNC cuts are much better on one side of the ball but the opposite side has more machining marks. Hand sanding is a very boring and tedious job! I need to find a way to make this job more efficient. Does anyone have a method to solve my problem?
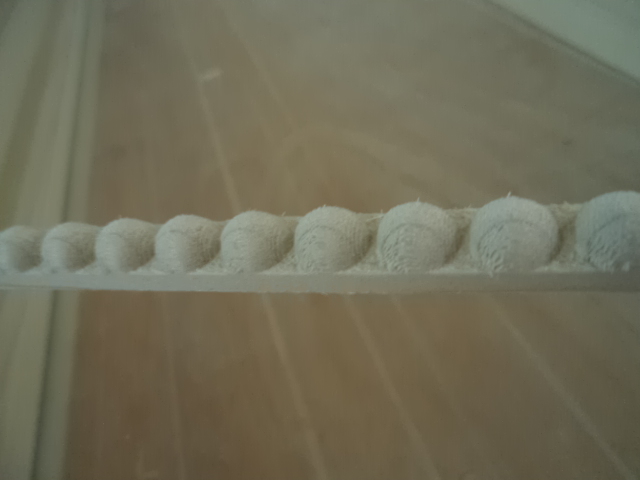
Click here for higher quality, full size image
Forum Responses
(Architectural Woodworking Forum)
From contributor C:
I recall seeing a �how they did it� show where they used a drum filled with sand of appropriate grit, put objects in and turned the crank which they welded onto the drum. I'm sure there must be some more hi-tech way like a brush sander.
From contributor X:
What type of wood are you using? The material in the picture looks very soft and fuzzy which will require a lot of sanding. I would experiment using different types of material that will machine better and create less work prior to finishing. A lot of times you can use different woods for accent pieces than the rest of the project and get away with it.
From Contributor H:
The problem is the product you are sanding not the sanding methods. Talk to your CNC supplier about why this is happening. Some possible culprits are wood species, dull bits, cutting direction, cutting speed and number of passes. I've unfortunately never found anything other than hand sanding that is going to clean up that kind of fuzz and tear out without totally distorting the profile. Tumble sanding is a clever suggestion but I've done that and while it does a good job of breaking the edges and may take off some of the fuzz it doubt it will get these to a usable point. Plus tumble sanding is really for small parts as vs. long mouldings.
From Contributor O:
I had this problem with about a mile of alder bead molding, with 7/16" diameter beads. I could not find anyone to quote the stuff with a CNC for less than $15.00 per feet, or that would quote it with a dedicated cutter that made the half dome shape in one punch. First I made the molding with a half round bead continuous so I had only to remove the ends to make a half hemisphere. Then I made my own cutter to make the final cut and rig to hold and index it. This enabled me to keep the cuts as clean as possible - the first step in eliminating sanding. After that, I set up a 120 grit flap wheel and a power feeder and fed the stuff through the wheel twice, at angles, to eliminate the fuzz. This took about 3-1/2 days - tedious as can be. Cost was about $0.50 per ft. I also made the speech about hand work, and how if you look close, as the Keno brothers advise, you can see the hand of the maker.
From the original questioner:
I knew this was not going to be an easy answer. We have been making this moulding with yellow poplar. The trim is being painted so the type or color or type of wood is not an issue as long as it paints well. We are certainly open to other woods so maybe this is my next step to try? I have spoken to the CNC supplier and they seem to think their cutters and methods are all right. I do not have the experience with CNC cutting so I cannot verify what is right or wrong.
There have been some interesting thoughts but the end results are still a tedious hand sanding job! Maybe I also need to do some more testing with a mop sander. Even for the mop sander there still are issues with sanding. For now I guess my guys need to wrap more masking tape around their fingers so they can keep the skin on their fingertips!
From Contributor H:
Try soft maple. That should give you a better finish.
From Contributor O:
Here is a photo of our setup. Anyone that knows this shop knows we are old-school, but we can figure it out and get it done. Drill press on a higher RPM, hand ground cutter, hold downs and fences (to the left) and indexing on the right. The indexing had to be variable so we could miter the beads in the corners.
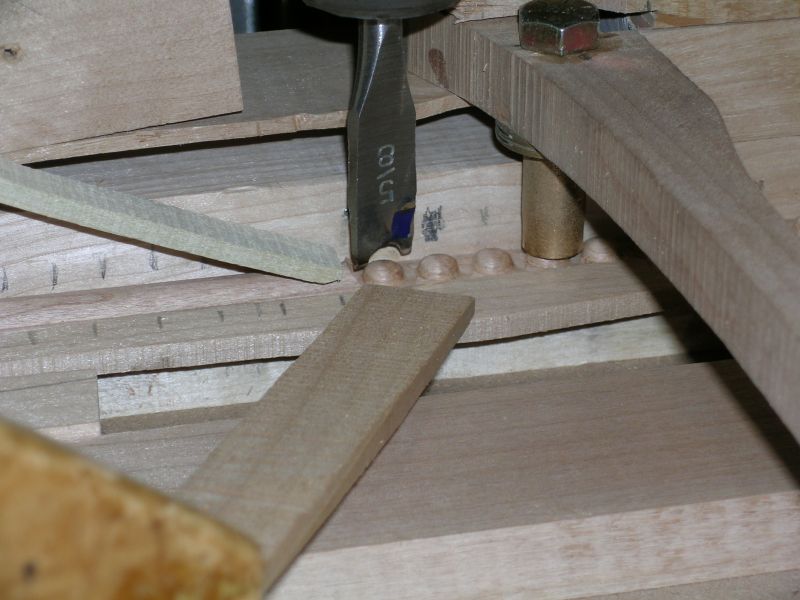
Click here for higher quality, full size image
From contributor X:
Since its getting painted, what about MDF? That would machine up nicely. It just depends if the application allows for it.
From Contributor O:
Well, this is not my job, but I'll offer an opinion here on the MDF. One of the problems we had was the beads twisting off the alder stock/background. We had to keep from getting too frisky or one would just twist right off on the grain. MDF has no grain, so I think it might be too weak to hold up to this type of machining. Also, this work was done years ago to show skills. It should be hard to do. Molded plastic or even MDF is not the real thing, and in respect to the craft and ourselves I vote for doing it in wood. Also, some judicious hand grinding did make the cutter sharp enough to cut, but with a low enough angle to do a bit of burnishing. That can be seen in the photo of the molds, prior to sanding. The photo shows the worst part of the operation was the ground or base mold, where the cutter left mill marks. This is where the flap wheel excelled.
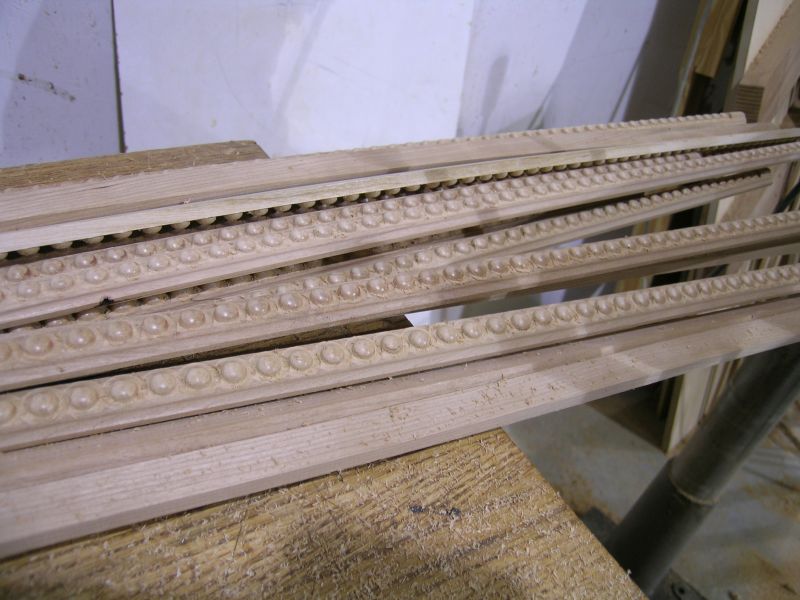
Click here for higher quality, full size image
From contributor A:
I agree with Contributor H on the soft maple. We've tried using poplar on circular moldings and they come out furry just like your moulding. You'll have better luck with a harder material. I would be tempted to use a high quality refined MDF. It will paint and sand better than wood. Do not use regular MDF for mouldings as it�s too porous when you cut into it.
From the original questioner:
We are now testing other woods to see what happens. Beech is the wood that was recommended to us. I hope to have this new sample in the next couple of days. Soft maple is probably another good choice.
From contributor S:
I agree that trying other species would likely help your cause, especially if the fuzz/tear-out is consistent from board to board (on the same part of the round). There is almost certainly a change to the machining process that would reduce or eliminate the problem. Contributor H doesn't elaborate when he suggests cutting direction, speeds, depth of cut, etc., but dividing up the toolpath such that it is climb-cutting on both sides of the round could help a lot. Also, taking a lighter finishing pass while climb-cutting would help. This will add to machining time and therefore expense, but might be worth it overall. The poor quality of the cut on the base makes me think they are running too fast or using dull tooling. As Contributor H it is a problem with the product. Hopefully the CNC shop will be amenable to making some trial changes to their program.
From contributor D:
When cutting with a CNC you can get perfectly clean smooth cuts - no sanding. Picture each of those hemispheres top down as if a camera were in your spindle and each one were a clock face. Think if you were cutting by hand which way would you approach it, then utilize your powerfully accurate machine to do it for you. My answer in this case is two plunging roundover cutters left and right turning. Set the clockwise turning cutter on a toolpath running counterclockwise from the 12 o'clock position to the 9 o'clock position, as well as from the 6 to 3 o'clock position. Likewise, the counterclockwise turning cutter you'd run from 12 to 3 and from 6 to 9. A final clean up run cutting the last 1/32" or so should overlap to insure you won't be left with bumps, so perhaps have the clockwise cutter start at say the 12:30 position and then the 5:30 position, and the counterclockwise turning cutter starting from 11:30 and 9:30 positions.
You should experiment on a scrap with different lead in/lead out paths and feeds and speeds until you can get one perfectly slick dome, with no burning or fuzzing. It only takes one really, and the problem is pretty much solved. Then, it's just a matter of copying those operations thousands of times or whatever. The machine can run all day and not get tired while you can then concentrate on other things.
From contributor V:
If it was me, I would call FlexTrim and order it from them. If you are painting it, it doesn�t matter if it is wood or paintable plastic. They make it in a mold and there is no sanding required and I guarantee you it will be a lot less expensive than doing it on a CNC and then spending days sanding it. Usually they make 12 footers but they can splice it and send you any length you want.
They will require a couple pieces of the wood moulding so they can make their molds and from then on you just place the order and in a couple of weeks you have it. I've been using them for years and they are great to work with. The shipping is free if you order enough.
From the original questioner:
We have seemed to have solved this problem. Our supplier has purchased a new CNC machine. They have also adjusted their process. We have changed the material from poplar to beech. These changes have resulted in this trim to need almost zero sanding. The results are much better than I expected! I appreciate the help from everyone. Some of the suggestions where good but the problem is our client will only accept solid and plywood in their cabinets! Other types of material such as plaster mouldings, MDF etc. were all rejected by the client.
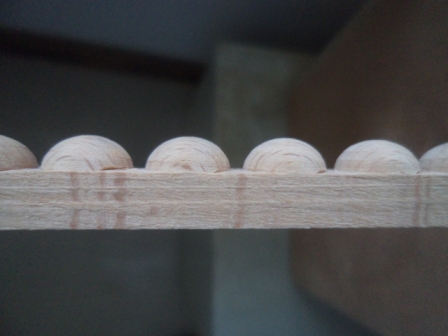
Click here for higher quality, full size image
Click here for higher quality, full size image
From Contributor O:
Looks great. There is nothing wrong with the real thing except that it sometimes is not the easiest thing to do. We are all problem solvers. We just happen to work in wood.