Shaper Outfeed Fence with Power Feeder
Advice on customizing the outfeed fence of a shaper so that milled stock runs straight as it feeds out. January 25, 2010
Question
I'm trying to set up a power feed on my shaper and I'm having a problem with the moulding gouging into the cutter when the end of the wood leaves the infeed fence. It seems I need to have the profile similar to the moulding to keep it straight after it is cut. I have added pictures to show set up and how it digs in at the end of the cut.

Click here for higher quality, full size image
Here�s another picture.
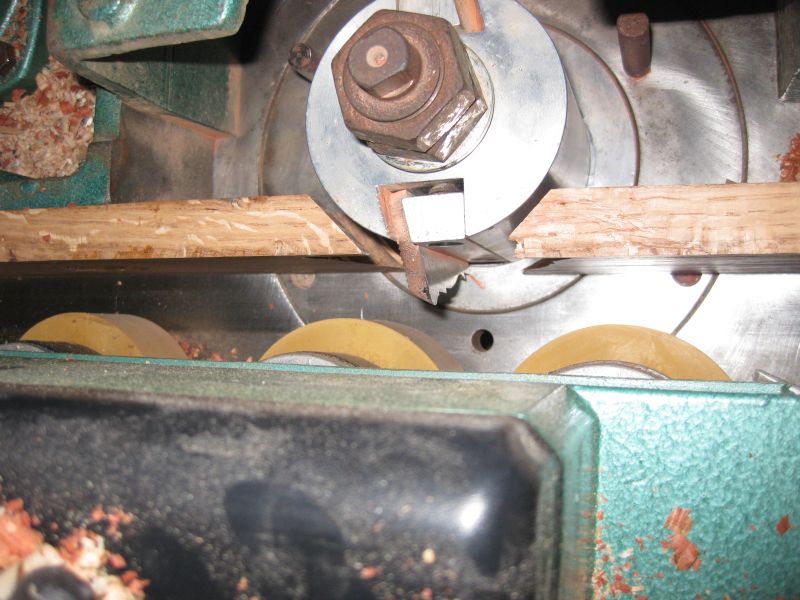
Click here for higher quality, full size image
Here is one of the wood.
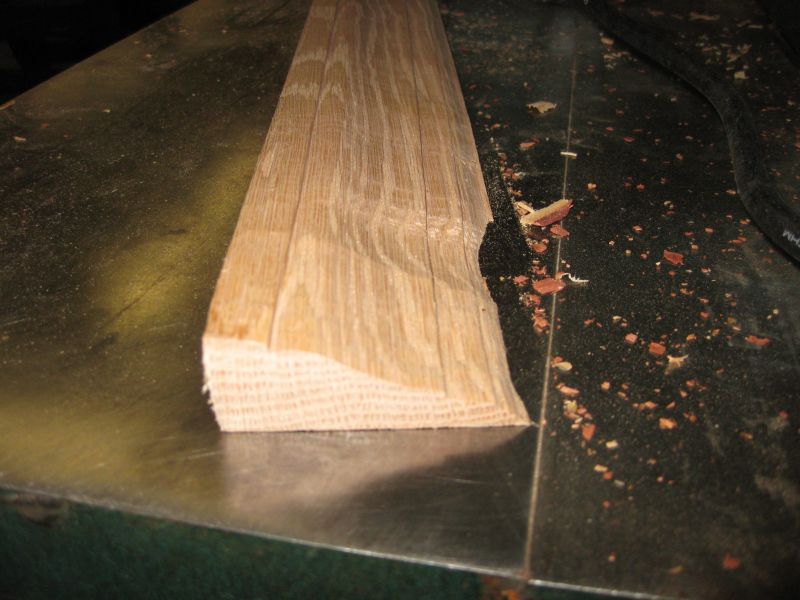
Click here for higher quality, full size image
Forum Responses
(Solid Wood Machining Forum)
From contributor C:
You need to create a negative profile outboard fence. What�s happening is your blank is tapered after profiling, and when the stock leaves the inboard fence, it�s being pushed into the cutter head by the feeder. You need to create a spacer on the outboard fence so that the piece continues to run "normal" after profiling. You may be able to get away with a simple build up at the bottom, where your deepest part of the cut is, but really you should create a negative of the profile and mount that to the fence. It doesn't have to be perfect, just the basic dimension changes.
From contributor R:
Depending on how much of this you have to run (10's or 100's of feet vs. 1000's). If it were me, I'd leave the moulding wider than the profile cut, and rip to width after, that will give you a flat registration that will properly follow the outfeed fence.
A bit hard to tell from your picture, but it looks like your fence is not as high as your cutter, so it would have to be a bit higher. It's also safer this way as the profiled stick would not want to tip into the cutter. The negative profile method would work fine too: I just find this to be much more work.
From contributor G:
The negative profile can be quickly done with a Bondo cast. You can also use a short section of the moulding you just ran turned over and attached to the fence.
From contributor A:
We often take a brad gun and tack a strip of wood top and bottom. Make sure you bevel them on the chopsaw before you nail them on. It is a good idea to have sacrificial boards fastened to your original shaper fence for these purposes, as well as those times when you need to jam the fences into the cutter head for better support.
To the original questioner: when we use 3 wheel feeders on shapers we typically place 2 rollers on the infeed fence and 1 on the outfeed. You've got it the other way around. Also it's hard to tell from your pics, but we tilt the feeder so it's feeding into the table as well as the fence.
From contributor J:
I think everyone is right on here. Just run your stock it a foot or so, cut it off, and flip it over and brad nail it to your outfeed fence. It's a quick way to get the exact thickness you need for that fence. We do keep pre made strips of wood for shaper applications on hand. It might be something to consider. If that's not your problem than your out feed fence is "in" to far causing the snipe. Wood fences wear so you might want to true everything up, lock everything tight, and take the whole assembly off and run it over the jointer just to re-surface everything. That is a maintenance must every now and then.
The reason suggesting that is you can run the base of your cast mounting against your jointer fence and square your wooden fences up as well as dressing them.
From contributor O:
I have been running my moulding with an outboard fence. I set up the feeder on the outboard side of the cutter bearing on a tall outboard fence. I made a pressure shoe affair on the infeed side. You have to push the stock past the cutter so the feeder will pick it up. I was having trouble with chatter on larger mouldings. The feeder would allow the stock to bounce just slightly and produce a slightly rippled finish. With the solid outboard fence, this problem is eliminated as well as the snipe issue.
From contributor X:
With picture #3, I'm seeing the infeed end of the molding stick, not the outfeed end. Fat edge down, thin edge up, CCW rotation, conventional feed means this is the infeed end. Or are you climbcutting?
From the original questioner:
Thanks for all of the responses, they are all great. The end of the moulding that is shown is the infeed end. The other end looked the same way. I set the feeder up several different ways and this was one of the ones that screwed up on the infeed side. I like the idea of a pressure foot with the feeder on the outfeed side. Thanks again for all the ideas.