Question
I am considering a Martin shaper to eliminate my 5 SAC shapers. When I first started fabricating window sash, I found it fast and efficient having one machine per profile... I would love to have the precision and repeatability of a Martin, but I am severely cautious in committing to one. The reason is that the fences on all of the new shapers I have are a pain in the butt to keep parallel or in the same plane. We don't offset the fences and they are never coplanar (meaning if you put a straight edge across the fence wings, there is no concave/convex voodoo), therefore it is always shim, shim, shim and setup is a bloody nightmare with fingers being crossed regarding snipe. So with that being said... Can anyone verify that the fences on a Martin are dead on? Lastly, I make all my sash with true mortise and tenon joinery... with a Powermatic 2a tenoner that is moody as well. All I want is the parts to be perfect so the eye is on production, not on what isn't working.
Forum Responses
(Solid Wood Machining Forum)
From contributor T:
I'm a supporter of dedicated machinery myself. Martin equipment is fast to set up but there's nothing faster than not having to set up. We solved the coplanar problem by running auxiliary fences on the outboard side of the stock. The material travels between the spindle and the fence. Since there is no break in the fence, we can run pieces as short as 5 inches through the cutterhead. We also use tractor feeds on our powerfeeders.
We use an Aigner digital outboard fence for shaping all parts. About the only time the split fence is used like a jointer is for outside sash cuts. We have successfully run the outside sash rebate on very large windows and doors (we have the extendable support on ours) up to 4� X 10�. It�s a little tricky and takes a helper or two. We also have run the outside edge cuts of 7� wide X 10� high L&S doors. We are bearing against the Aigner integral fence for this so if the piece slips away you get a second chance. And we machine the euro groove for multipoint locks all the time on very tall doors. We do bead removal on this machine also.
We recently added another programmable sliding table shaper for cope and tenon cuts only. We had been using the bolt on Panhans sliding table that is quick to set up but cumbersome and not adequate for long and heavy parts. Martin probably makes the best side mounted heavy tenoning table in the industry, but to use it effectively requires a separate machine. It involves removing the fence to set up and, although easy, it takes some time. Unfortunately Martin no longer supplies a cut off saw to use with this. Almost anything would be an improvement over the Powermatic. Modern tenon tools don�t adapt well to those and they look like a bear to set up.
All door and window cutter setups can be done in 2 to 5 minutes. Here is where contributor T can gain some points for his dedicated obsession. I can achieve these times, but have 30 years of shaper experience starting with some poor machines. I have not been successful with training shop guys to set this up quickly. It�s a little intimidating at first and fences or cutters can be damaged easily if not careful. I have the best luck on interior door jobs where only 3 or 4 setups are needed and building in batches daily. But complicated entry door cuts and windows that can have 14 different cutter heads are just too much to remember, even with written instructions. Especially when not done daily. We use mostly European insert tooling that is almost a must to get the benefit of a machine like this. A lot of our window and door cutters are set up on a sleeve and require no change of fence position or height.
Dedicated shapers are just not an option for us. In a normal month we will have 20 or 30 setups done several times with other odd setups mixed in. I think large cabinet door manufacturers have the best luck with this. In a small shop, dedicated takes a lot of real estate and does not give much versatility. Making doors and windows also requires more of a machine than a Delta or Grizzly type.
Another plus to the Martin is the great personal service Carl and Dan offer. We had some minor service issues with our S4S machine this last year and a few broken parts (mostly self inflicted) and they were quick to respond and solve.
All this said, the shaper is still an entry level machine for door and window making even in a small shop. We are in the process of going CNC for our most often built and complicated frames. I still see a lot of use for the Martin for the one-off and specialty items. Another thing you might want to look into is the late model used angular window machines available from Europe now. Door and window technology is changing over there and a lot of these machines are available for less than 100K. They are very fast for tenoned window frames and sash. Some can do 8 to 15 complete units per hour including bead removal. No curved parts though.
We allocate and air dry our door stock for the whole kitchen, but typically build no more than two to four doors at a time. We build them at the rate they are needed at the door hanging station.
We have also worked pretty hard on setup reduction. We have a dedicated cope shaper and a dedicated stick shaper. We can change from a mission style profile to an ogee in about 2 minutes, without running any test pieces. This process used to take our most skilled guy 45 minutes.
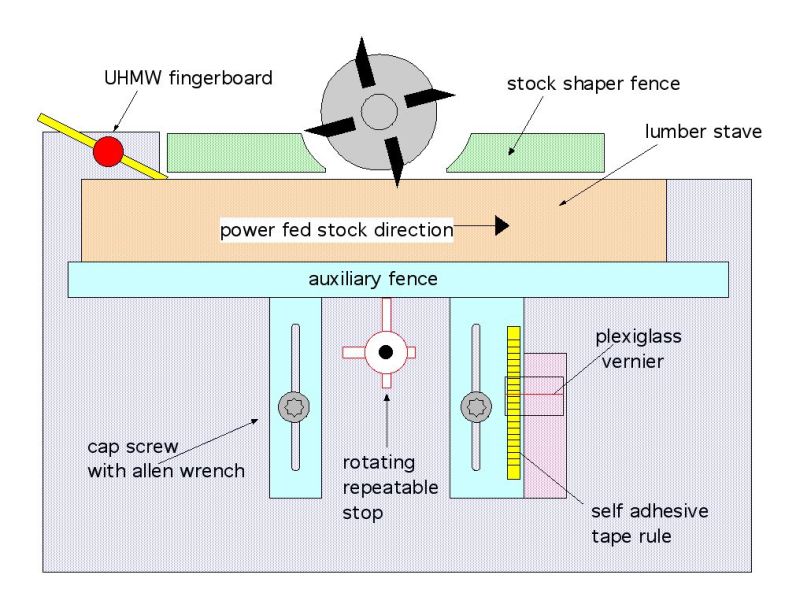
In general, the things you do to reduce time spent in setup also tend to increase accuracy. One of the reasons contributor J's system works so well is the digital readouts. He can achieve repeatability without spending a lot of time making test cuts. You can emulate the digital readouts with repeatable stops. An example of this might be the rotatable stops you see on a plunge router base or a back-fence repeatable stop system such as is sold by the JA Dawley Company.
The Martin is something I want, but might be out of my reach. How much was it? The t27 is a beautiful machine.
Regarding the shapers I have... I would really like to get them to work. Also I don't know where I'd unload 5 shapers. I feel a little defeated but the fighter in me won't give up. I like these beasts I have, but (perhaps too high an expectation) the fence/snipe issue is driving me crazy. The outboard fence idea could help a lot.
Tenoning is a 3 dimensional nightmare with the Powermatic. They are bent and twisted, meaning they are off a fat 1/32nd over 1.5 inches. This creates a pinch in the mortised joint and a shoulder issue... again back to fiddling with parts. I can't find anyone near me that knows how to effectively dial it in. I need a new option.
When you do your tenoning, is the coping done at the same time, or do you do the tenon and then go to another setup for the cope cut? Also, how long are your tenons? It seems all I have are production problems. It leaves very little time to find work, and honestly it's taking the joy out of work.
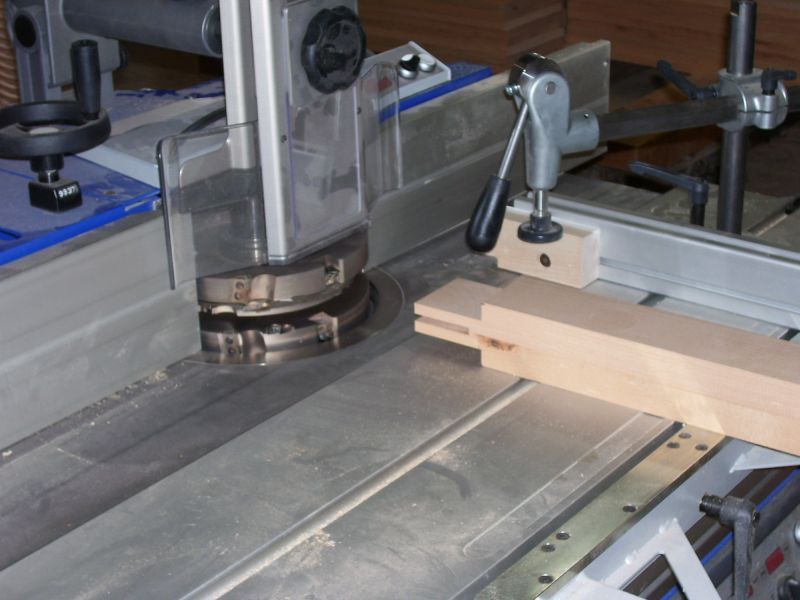
This is the Aigner outboard fence (they call it a thickness stop). Not shown is the feeder in place, the device that clips to the shaper fence to keep pressure against the outboard fence and the Centrix guard to cover the cutters. This is two cutters on sleeve stacked to make inside frame cuts and inside sash cuts for our 78mm thick T&T window design. The sleeves are 100mm high so it takes 8� under the nut to do this. Cutters are the same cutting circle, so no adjustment to the fence is necessary. The Aigner fence installs about as fast as you can set it on the shaper table, reads digitally and I think is less than $800.
As for cost of Martin shapers, they still have some basic T20 left that are about 20K. Probably 35K for a mid range machine and 60K or more for one with all the bells and whistles. They are coming out with a smaller shaper this year to compliment the T60 saw.
Contributor J, thanks for the photos and advice. Are you coping one side of the tenon and then using a groover to create the cheek on the other side? I like the idea of insert tooling. Who would you suggest? Lastly, is that the Felder with the sliding top? How are you doing your mortises?
The powerfeeder is biased to push against the auxiliary outfeed fence. Since this is a fence indexed against a spindle, there are no issues a parallel setup fence to shaper. Small parts work because of the tractor feed. There are no rollers on the powerfeed. It is a big rubber tire that operates like a half-track vehicle. If you google Western Roller I am sure you will see an example of what I am talking about.
There are several ways to install this platform to the steel table. Bolting it on is the most complex and probably not necessary. Any purchase to the table that keeps the platform from slipping will be held in place by the bias (out and down) of the powerfeed.
The Aigner systems that contributor J uses are probably worth investing in for what you do. My systems work because I only change the width of the cut. If I used this shaper for a wide variety of moldings, I would want the kind of fence he has because it wraps so nicely around the cutter profiles. The Aigner outboard fence looks pretty slick too. Digital readout with fast install makes for inexpensive flexibility.
The Aigner catalog itself is really interesting to look at. It is very informative about different machinery setups. They have, for example, a magnetic wedge that helps to keep small pieces of wood from migrating back into the blade when doing small trim work on a sliding table saw.
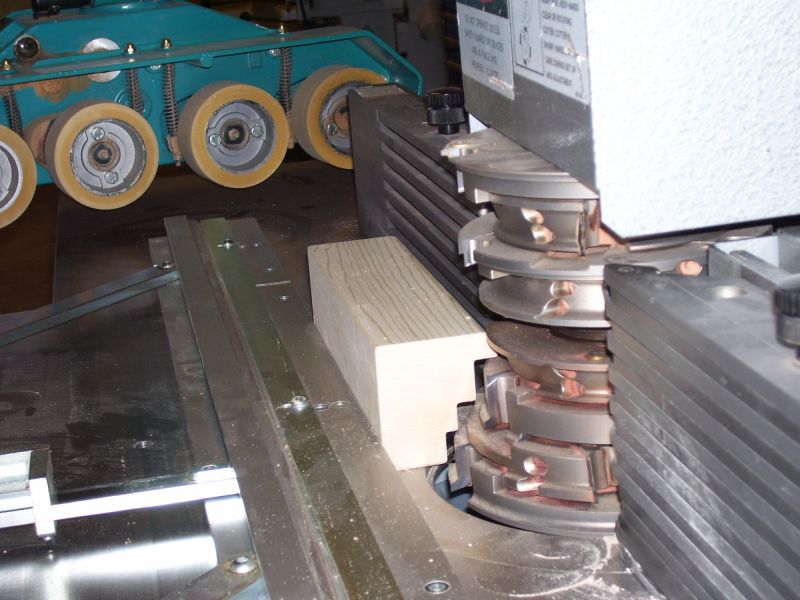
All our tenons and copes are one pass cuts. The cutter in the photo is three cutters on a sleeve with spacers to adjust. To do the mortise there is another cutter head that does the slots to receive the tenons. One pass also. So for a window, one pass on rail ends to do the tenon and one pass on stile ends for the mortise, two cutter heads involved. As I said we are 90% dowel construction. I�m guessing you�re doing traditional double hung sash. Mortise and tenon is the best way to do these but you need something better than the Powermatic and an investment in good tooling.
SAC is not a bad machine and I am sure they offer a heavy side tenon carriage for their machines. At the least, a bolt-on table like we used would be better than what you have. SCM sells these bolt on tables as well. With some accessories for your existing machines and better tooling, you could boost productivity and quality a lot for a small investment.
Most of my tooling is Garniga but there�s a lot of good insert tooling companies out there. The tooling is a bigger investment than the machines and before spending a lot of money, you might want to think out where you headed with machines in the future and build the tooling to suit.
No, tall pieces feed fine. You just have to be careful of feeder position. That piece in the picture is a sample provided by Garniga and narrower than our 85mm wide parts. The fence does flip up if needed for tall pieces. There is also a small ramp for running small moldings or glass beads. I thought you had one of these? The Okoma Mac of the Fog restored is a small angle machine.
Also I agree, the SAC equipment is good stuff. This should take a lot out of the headache department.
Just out of curiosity and a little off topic... I like the idea for simplification of an open mortise or "saddle joint"(it really predicts a perfect joint compared to the tenoner I have and the pull down mortisers). I have been making them as blind haunched m/t joint for water issues, i.e. wicking on the lower rail. The point is if it's not necessary, then it relieves a huge production issue.
Contributor T, I agree. I think my original posting was "Considering a Martin" - and I still am. Can you elaborate this new concept of indexing...
"You could also make the stationary fence easy to set up with a series of pins and collets."
I wish my uncles were still alive - 4 of them and my grandfather were all tool and die makers.
I too use outboard fences when shaping certain parts on my machine. One thing to remember when you start to do that is that the cutter wants to pull the part away from the outboard fence and back into the "regular" fence. Just picture the rotation of the cutter and its arc moving into the wood and you'll see why. For long parts it's not an issue, as you can hold your piece against the fence until all the wheels on the feeder get a hold of it. Short pieces can be problematic - that is 8" or less. Keep the wheels biased over towards the fence and they'll be fine, just be aware that it does want to pull away.
As for your original question, is the Martin worth the money? I would have to say yes. I don't have a Martin shaper but I have a T 74 saw and the difference between that and what it replaced is night and day. I can only imagine what the shaper would be like.
I spoke with Martin today and ordered the Aigner thickness stop. It seems to be thoroughly engineered and I could stand a good dose of German perfection. Their man said it was stout enough to run a power feeder against and there was no need for the pressure jaws.
I'm still curious about contributor T's idea of using indexing pins. Indexing I do on my mortiser (poorly, I might add), but pins... hmmm, so much to learn.
The "fence away" system or "outboard fence" is a common sticking setup. Weaver brand dedicated door making shapers have used this setup for years. They also have a regular type fence but the infeed side is spring loaded and actually helps push the work piece against the outboard fence. We have run parts as short as 3.5" with very good results. One plus that helps is that they have what I consider to be the best feeder made. It very positively, accurately and safely feeds the parts. It has a DC motor and is infinitely variable speed. Using different width spacers for different width stock is also very easy, fast and accurate.
A while back a Gladau tool rep showed me a video from a small shop in Italy building reproduction entry doors with double tenon construction like my picture shows, only haunched, split on the wide rails and through wedged. All with a big CMS router. It was pretty impressive. Myself I�m happy building with super hard rot resistant dowels.
Regarding the email about the HSK Martin shaper, that�s a very difficult question also. It�s an expensive option and the tooling costs more. But that is where all the CNC tenoners and routers are headed. SCM for example will build a single end machine with combined HSK and stacked 50mm spindles. Even a single 30mm spindle if you want. But with the shaper, once it�s HSK, that�s what it is and will not mix with your other shapers and tooling. For a frugal small door and window maker, the tooling is a difficult question. I have several thousand dollars of old LRH, Sthele and Freeborn carbide door tooling collecting dust. I guess they made money and paid for themselves several times over just like the new tooling is doing now.
Great tip about not using the pressure jaws. We have a batch of interior doors going next week and I will try moving the feeder back one wheel and see if the irksome device can be eliminated.
To the original questioner: The HSK is that fast.
I have the Dornfix. It�s pretty fast and I would guess 30 seconds, but I have never timed it. I will check it out tomorrow.
Go to www.weinigusa.com and take a look at their tooling catalog and under cutterheads you'll see HSK adapter spindles that might give you a better idea what is available.
It was 29 seconds to change Dornfix spindles; that was at a relaxed pace and includes getting the wrench and replacing it. The machine will not start till the wrench goes back.
The 10K side mount table is probably the best tenoning table you will find on a shaper. As I explained earlier, to use it the fence has to come off and a tenon hood mounted. That�s fine if you�re using it for only tenoning, but going back and forth from tenoning to profiling with the fence I think it's too much setup, even with the fence supporting arm. The older Martin shapers, the fence swiveled on the opening rings so it was a simple setup to turn the fence and lift up the sliding table. The fences were lighter and simpler then. I don�t think the manual fence swivels either, but check with Carl. I have also heard of people mounting the big slider of the front of the machine. Maybe Carl knows about that.
29 seconds just to change the spindle. Now if the wench was just setting on the table probably 10 � 15 seconds.
I asked a friend who started with 3 people and a duplicator for making guitars why he switched to CNC. He said it was to make the perfect part. In so doing, attention could be placed on sales and product development as there was an absolute with little variation, less fiddling and product cost/times could be cut down. I think the Martin brings it to this level. More importantly is to commit to a production path and stick with it.
One of the things to focus on is tooling. The new variable is depth and height, therefore the Martin makes perfect sense. Certainly this can be done with setup blocks, but a push of a button seems like a no-brainer. Now the task of selling used equipment.