Solid Wood Curved Counter Edge
Extended discussion of fabricating a rounded-over inside radius solid-wood countertop edge. September 23, 2006
Question
I need to do an inside radius edge for the pictured countertop. Top is MDF and mahogany ply, and the edge is solid mahogany. The counter will be 1.5" thick. The edge will be made from 3/4" stock. Does anyone have any ideas on how to build the curved section of the edging? I'm thinking of building it up by laminating 1/8" strips, but I'm not crazy about doing it that way.
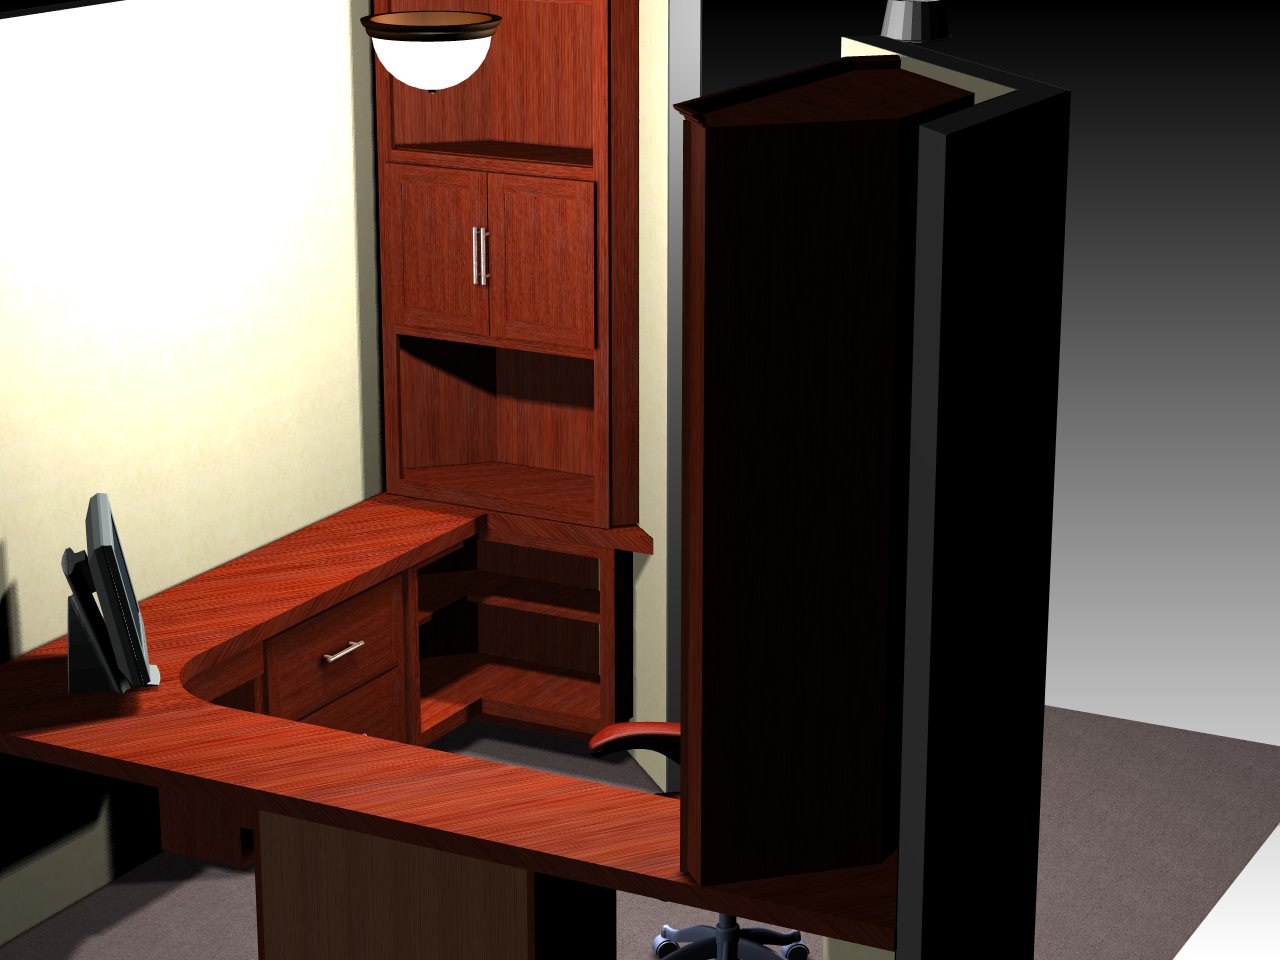
Click here for full size image
Forum Responses
(Cabinetmaking Forum)
From contributor A:
Cut your radius pieces from solid stock.
From contributor B:
If you have only one radius to do I would cut from solid stock. If you had a bunch of radiused noses, bend them over a form but don't mill the solid stock until the bent ones are formed. The thickness of your lamination may not be exactly 3/4". Make each radius out of one piece of resawn stock, and keep each flitch in the order it came off. This will make the grain and color match well.
From contributor C:
Go with Contributor A's method. The other will accentuate the glue line if you put a bull nose on it.
From the original questioner:
To cover the curve, my solid stock would need to be around 10" wide. I don't have any that wide laying around, and it's Sunday. If I glue up two or three pieces of wood, will the glue lines or grain transitions look bad?
From contributor C:
Put an extra joint in the middle. If you go the other route, clamp it up so it is tight at the joints. If you have a fire hose you can throw that in your form and it will come out really nice. Anyway this is not a big deal however you choose to deal with it.
From the original questioner:
An extra joint in the middle? I am not sure what you mean. I was planning to glue up three 3-1/2" wide boards, then cut out the 3/4" thick curve on the bandsaw.
From contributor D:
I think the extra joint method refers to joining three pieces end to end. You would miter the ends at 22-1/2 degrees which would result in two 45 degree angles. You can trace your radius out on paper that would tell you how long and wide each section would need to be. Instead of cutting the radius out of a wide board you can cut it from pieces that aren't much wider than the finished piece. You would have to have either a spline or tongue and groove to add gluing strength. It's a method that I have used some on round or oval picture frames. It is more labor, but less material waste.
From the original questioner:
Too late, I already wasted the wood. 13' of 1 x 4! I hope it turns out well. Getting a smooth cut and sanding will be the next challenges.
From contributor E:
Make a pattern of the front edge of the countertop out of 1/2" MDF or ply. Then use a pattern bit in your router to make the front edge smooth and continuous. Sanding will then be minimal. If our shop were to build this, I'd do a bent lamination, like you first suggested, with full-length strips of 1/8" solid material (or as thin as necessary), then make cauls and clamp the whole sucker on in one go. Then, no pin nails, no seams, and very little sanding. I'd use as few laminations as possible to get the edge detail desired. We're doing a similar countertop right now, larger and with bigger radiuses, and we'll use 1/8" solid wood, and a combination of clamps and blue tape to clamp it in place.
From the original questioner:
Making a smooth pattern would be almost as much work as smoothing out the final piece. How do you make your 1/8" strips? Re-saw on the band saw and run thru the planer? Don't know if mine goes down to 1/8�.
From contributor B:
I plane my strips after re-sawing to make them smooth (a helix head cutter does a good job of this) but my planer only goes down to 1/4" as well. Here is what you do - take a piece of 3/4" MCP particleboard, or leftover pre lam and cut it to your planer capacity width. The other dimension would be your planer table length plus a few inches. On the underside, screw two pieces of hardwood scrap on the ends (those few extra inches). Turn it back over, wax the mcp with carnauba wax like you would on all your other cast iron tables, and drop it over the table of your planer.
This jig will now be a reusable skin that will lie over your planer table. You now can go down as low as you dare with the planer. But beware - if you plane down too low, especially with wild grain the piece can kind of explode in your planer. Also, make sure you drop you table rollers all the way down before putting the jig in.
In regard to what someone else said about glue lines. There are many little tricks to avoid them, like a proper form, vacuum bag, the right glue, sizing the flitches correctly, properly prepared glue surfaces, etc. - the kind of stuff you learn in a proper apprenticeship and years of experience as a journeyman. But don't be discouraged. Keep trying and refining your technique, and keep asking the right questions. Whatever you do, don't let anyone tell you there is only one way to do something.
From contributor E:
Contributor B has it right about the planer jig and glue lines. We make our strips by ripping from a jointed edge, then go straight to the wide belt sander. With no widebelt, you could do the same with a planer, just add some length for snipe.
From the original questioner:
Thanks for all the ideas, guys. Here's a picture before finishing. I spent a lot of quality time with the oscillating spindle sander. I secured the edging to the 3/4" top with glue and pocket screws from underneath, then filled and sanded flush. It looks pretty good, but I'm not patting myself on the back until I put the finish on it. The obvious downside (bigger than the glue line issues, in my opinion) to the approach I used is that the grain direction looks a little crazy next to the straight runs of the edging, which is 3/4" stock with the face grain facing out. The curved section of course shows the glued-up mix of different edge grains facing out.
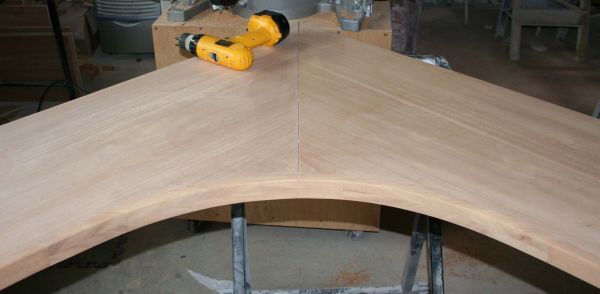
Click here for full size image
From contributor F:
First, why did you laminate 2 pieces for the edge? The corner could be segmented using pinch dogs to glue it up. Make a template out of MDF and rout the radius.
From the original questioner:
As I mentioned earlier, I used 2 pieces because I didn't have any 1-1/2" thick stock on hand and it was the weekend, so my hardwood suppliers were closed. I also felt that making a template would be as time consuming as actually making the cut in the final product. I'm curious why you'd recommend pinch dogs over clamps for this application. Anyway, it's done and it turned out fine. The customer is happy, and I got paid.
From contributor F:
In reference to pinch dogs, they are an excellent way to glue up segmented pieces, or any oddball assembly. They are often the only easy way to glue odd items. I had to make a flat molding with an 8' radius one time. I glued up segments, screwed it to the bench, and used a router as a compass to cut it out. The trick here is not to cut all the way through - clean it up with a flush trim. You had a nice top, but it would have been better to wait a day and get the correct lumber.