Question
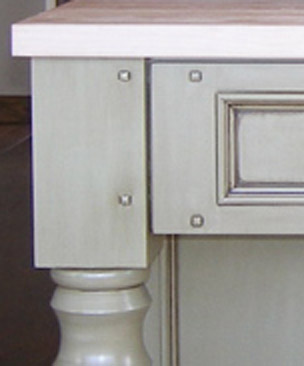
Many of you have probably seen custom cabinet doors with square pegs that protrude at the corners and are rounded off (see attached photo). What is the best strategy for doing this on a limited production basis - say, 100 doors? Should I make or buy the pegs? If I make them, what is the process? If I buy them, who would I buy them from? Also, is the hole itself round or square? Is the protrusion of the peg defined by the length of the peg and the depth of the hole, or is there a shoulder on the peg? Any advice will be much appreciated.
Forum Responses
(Cabinetmaking Forum)
From contributor A:
There's an article in the August 2006 Fine Woodworking magazine on making square pegs for round holes. I have no direct experience in doing it, so I can't say if their advice is any good, but it may help you out.
Comment from contributor D:
Be sure to use a softer wood for your pegs. Personally, I prefer to purchase square dowels in four foot increments. I take each end of my dowel and round them off just a bit using a large pencil sharpener (the sharpeners made for your shop pencil) which makes the peg a bit easier to get started in your round holes. I then cut off the ends in two inch increments which produces two pegs. I then repeat the process in order to make additional pegs.
Tap your pegs into your round hole. You can then cut the excess wood off the peg using a quality pull saw which will allow you to get a nice flush finish. Finish off your surface by sanding it. The end result should be a clean and smooth square peg. A tip, practice with some scrap wood prior to starting the actual project and take your time when using the pull saw. This will let you get a good handle on what you�re doing before you get started.