Staining the Medullary Rays in Oak
The grain figure in quartersawn Oak is striking, but it doesn't readily accept stain. Here's advice on working with it to gain a desired effect. January 25, 2013
Question
When working with quarter-sawn white oak we get medullary rays which add a great deal of character and visual interest. However, most of the stains and finishes we apply appear light and do not penetrate. Does anyone have any tricks for making them appear darker than the background color?
Forum Responses
(Finishing Forum)
From contributor R:
Maybe you could apply a glaze over the project to color them. The glaze sits on top of the rays and will obscure them. A toner would work too.
From the original questioner:
I don't think I want to go the glaze route. We need to keep things as transparent and dry looking as possible. Our target color is a light honey/amber - but the rays and mineral flakes need to go dark. When you mention toner, what are you referring to?
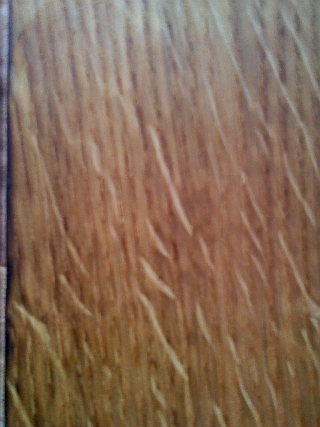
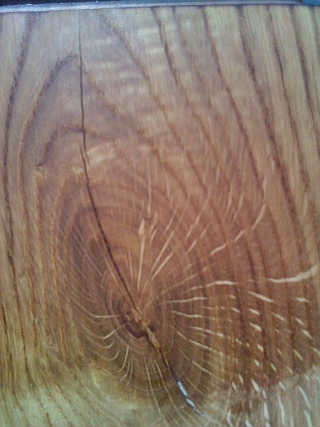
Here are some images to show what I am trying to achieve.
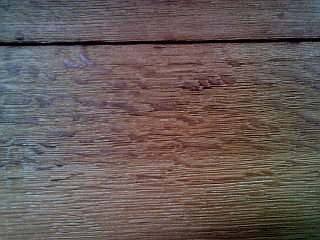
Click here for higher quality, full size image
Click here for higher quality, full size image
From contributor R:
A toner is usually a dye stain that�s mixed in a clear coating, it�s sprayed on. By spraying it you will be applying a color on top of the ray. If it�s carefully applied you might be able to get the color you�re after. Make sure you don�t flood the wood, approach it with thin light passes. If you applied a wiping stain your just wiping the stain off the rays when you wipe down the entire project. I suppose there is a chemical type of staining you could do but I haven't really fooled around with them enough to give you directions.
Most of my chemical staining has been done on mahogany and cherry, I don�t have much experience with oak however. I�ve used lye on oak in the past and it�s strong enough to alter the color of the rays but I�m not sure if it will work for the color you�re going after.
From contributor F:
It's the wood and not the stain that will dictate whether the ray patterns will go lighter or darker than the wood surrounding.
From the original questioner:
Sorry for the absence of descriptions. The top (first) photo is our target sample. You can see that the rays and mineral flecks are darker than the background. The middle and bottom (second and third) photos are our test boards. You can see that the rays are lacking the background color.
I apologize for the color problems - I didn't realize my shadow was a problem. The only time we can get the rays to go darker is when we chemically treat the board prior to fuming. Although we get darker rays, the background color is much too dark.
From contributor R:
The rays are very hard/dense and they don�t accept color. Maybe you could try sanding with the grain using a coarser grit paper. It might leave a scratch pattern on the rays that will allow you to stain them darker. Contributor F pretty much said it; it's the wood itself that dictates the color of the rays. Any way to change the wood species you�re using? How about a rift white oak? The rays are there, just not so pronounced.
From contributor C:
When trying to keep the rays light and pop them I do the following: I use a light color aniline dye over the entire piece. I then seal with shellac. I then use a dark gel stain to fall into the pores, a classic Mission look. Perhaps if you were to reverse this it may work. Use a dark colored aniline dye, seal with shellac, light colored gel stain to fill the pores, seal with shellac, and topcoat with lacquer. It�s worth a shot.
From contributor J:
I know when I work with curly maple, one way to get the curl to really pop is to dye the surface, then sand the surface back. The dye stays in the curly parts. I then dye again and the curly bits stay extra dark. Not sure if it will work on the oak but give it a try. So use a dark dye and sand back to almost bare wood. If the color stayed in the medullary rays, you are good to go. Try it � I�m not sure if it will work or not, but will only take a minute or two to find out.
From contributor L:
Here are some images from the 1980's, which illustrate the wonderful instruction I had just received from George Frank (himself). His book "Adventures in Wood Finishing" describes some of his mordant (chemical) stains. Note the quarter sawn white oak. Spot on, no? Try a very dilute solution of lye. You can follow with (preferably) dye stains to adjust the color, if needed.
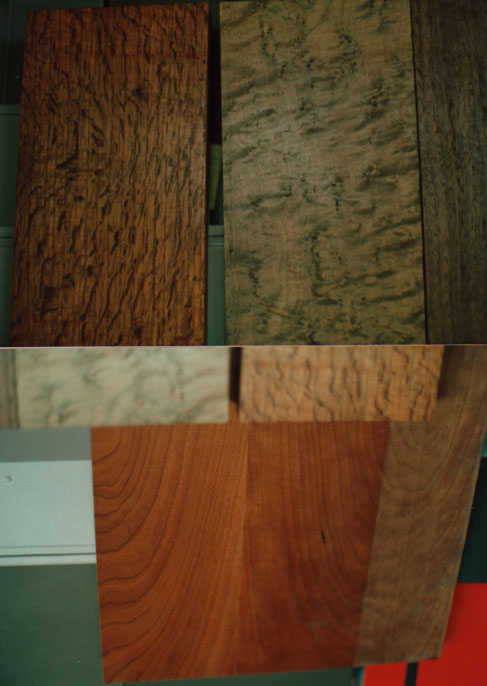
Click here for higher quality, full size image