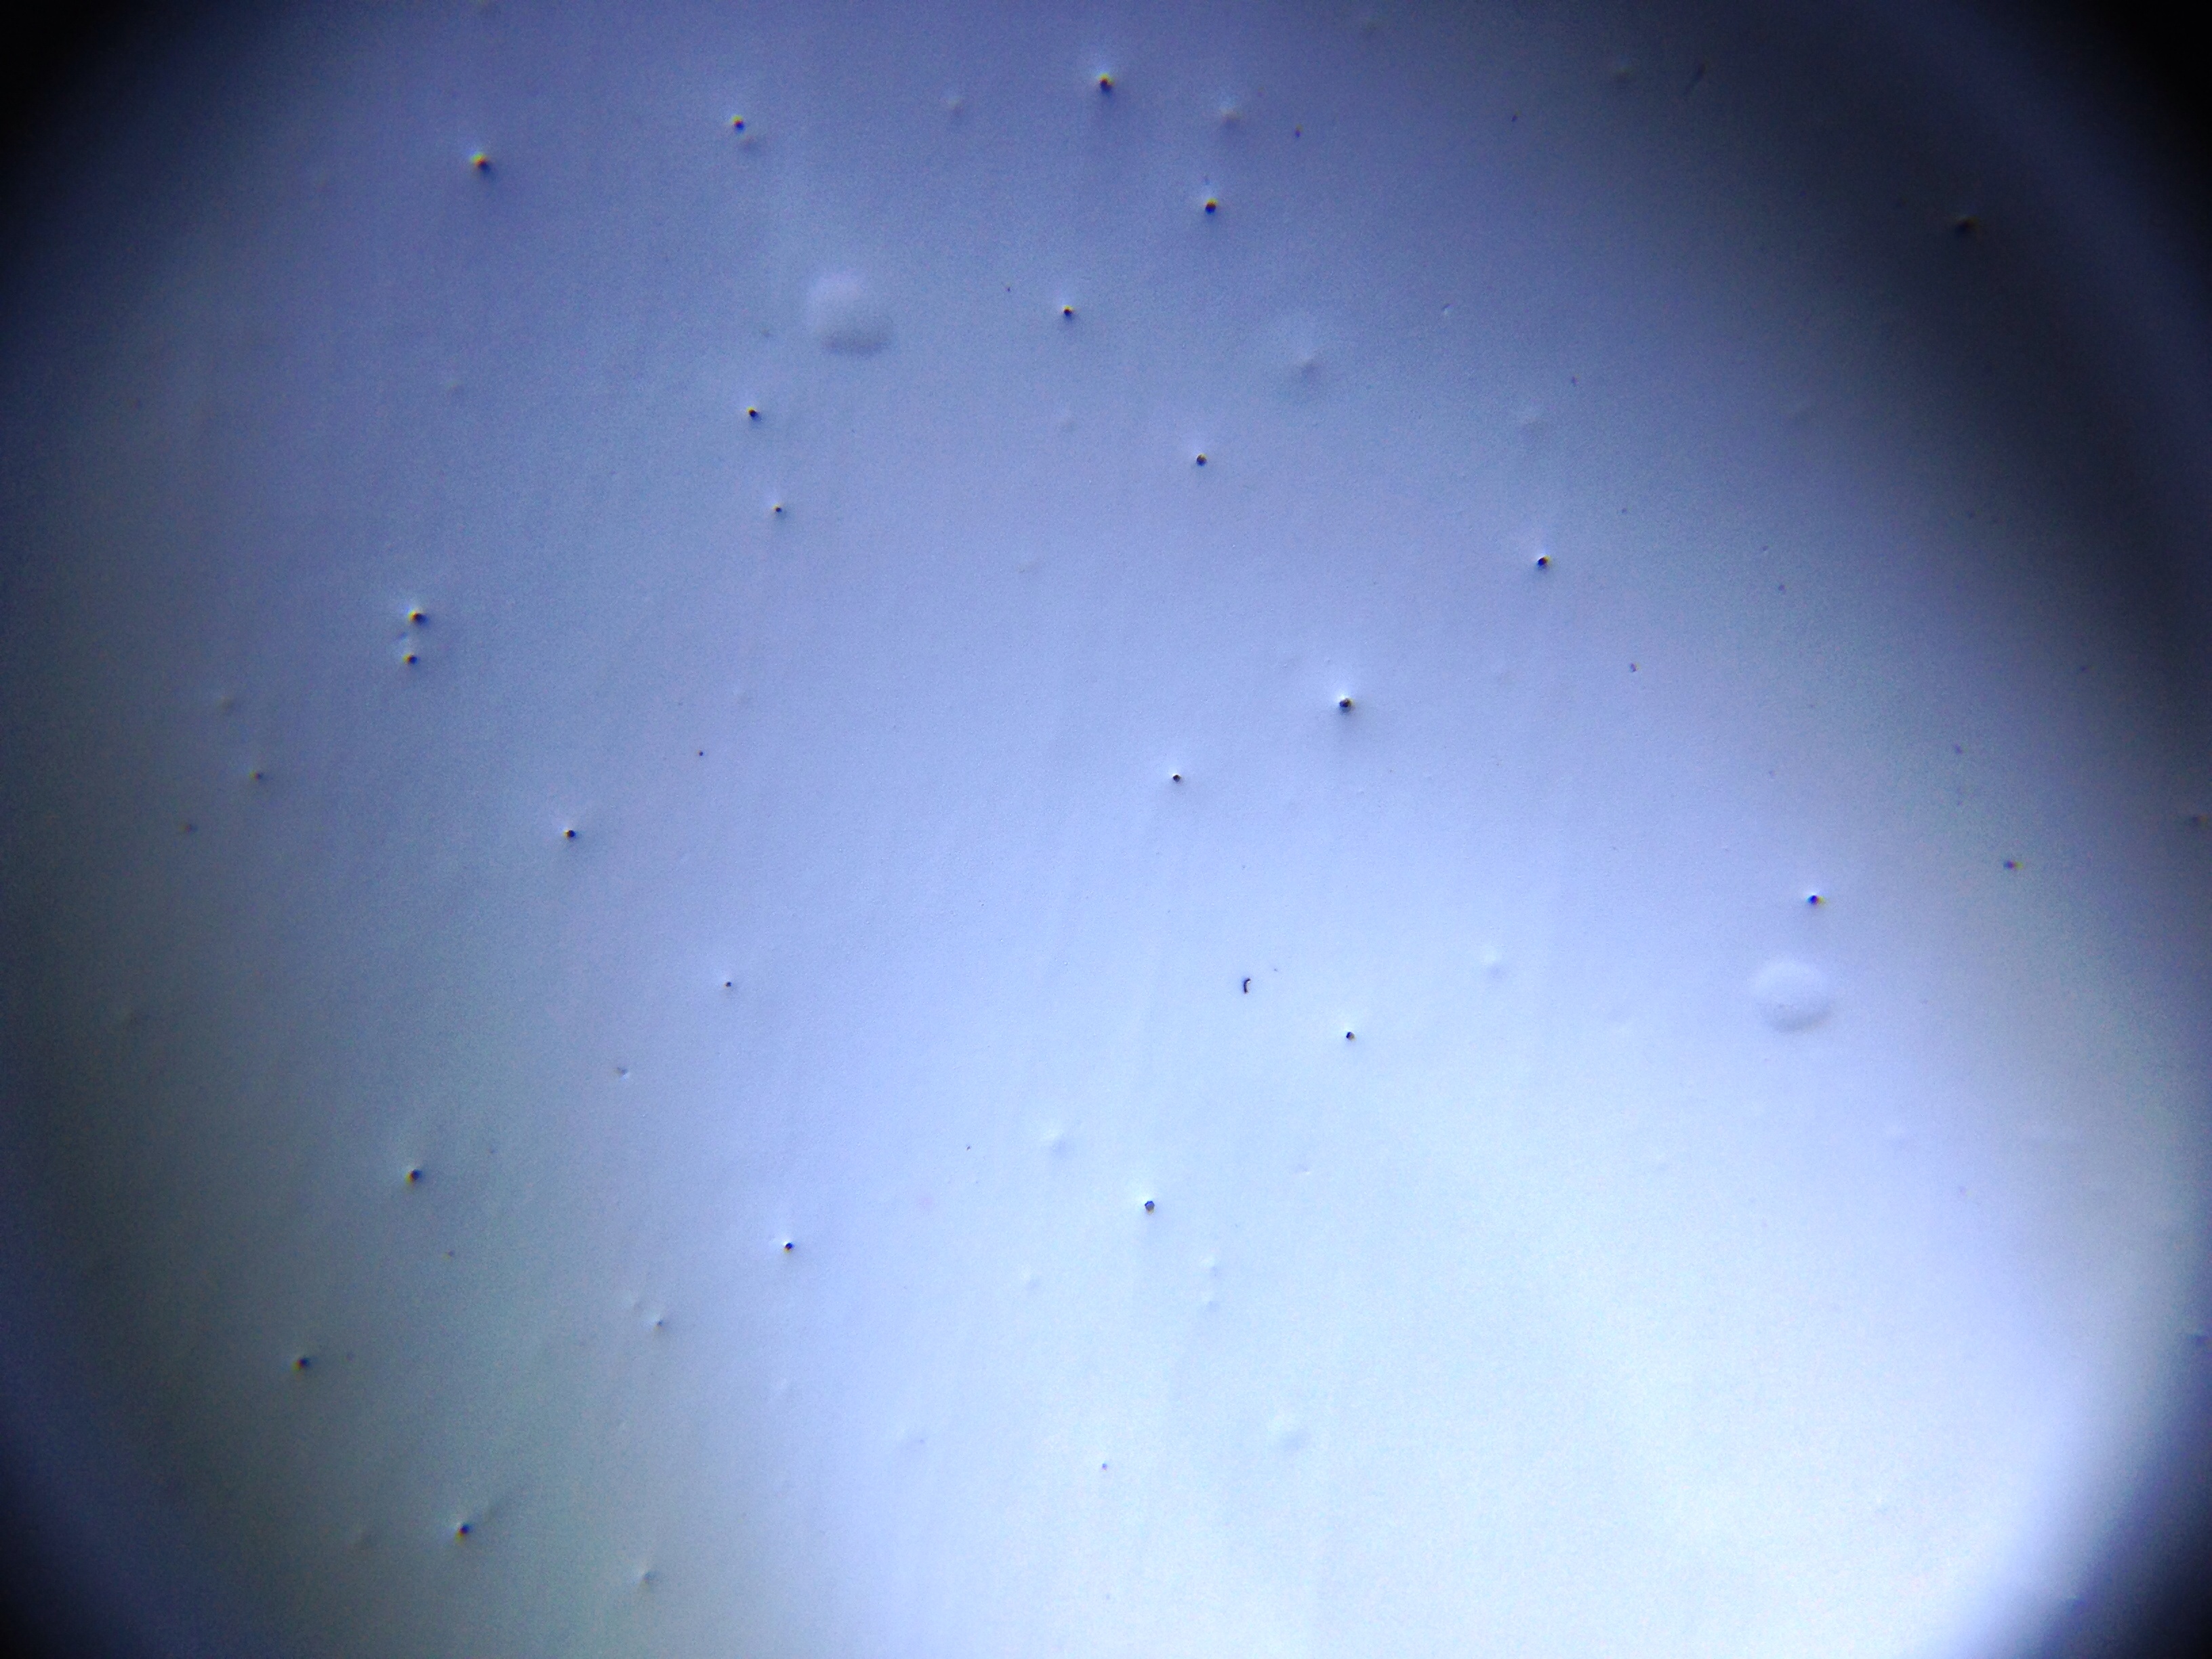
For a couple years I've noticed occasional pin holing happening. I'm using a waterbased kem aqua plus from Sherwin Williams. This time I took a couple of good photos for you guys. One photo is life dive and the other is under 15x magnification. Each coat only makes the problem more pronounced. There's 2 coats of surfacer, 2 coats colour lacquer, and 1 coat clear lacquer on this panel. Almost all the other panels never had this issue. I've tried everything I can think of to figure out the source of the problem. Spraying with a MPHV devilbiss transtech gun and I keep it clean.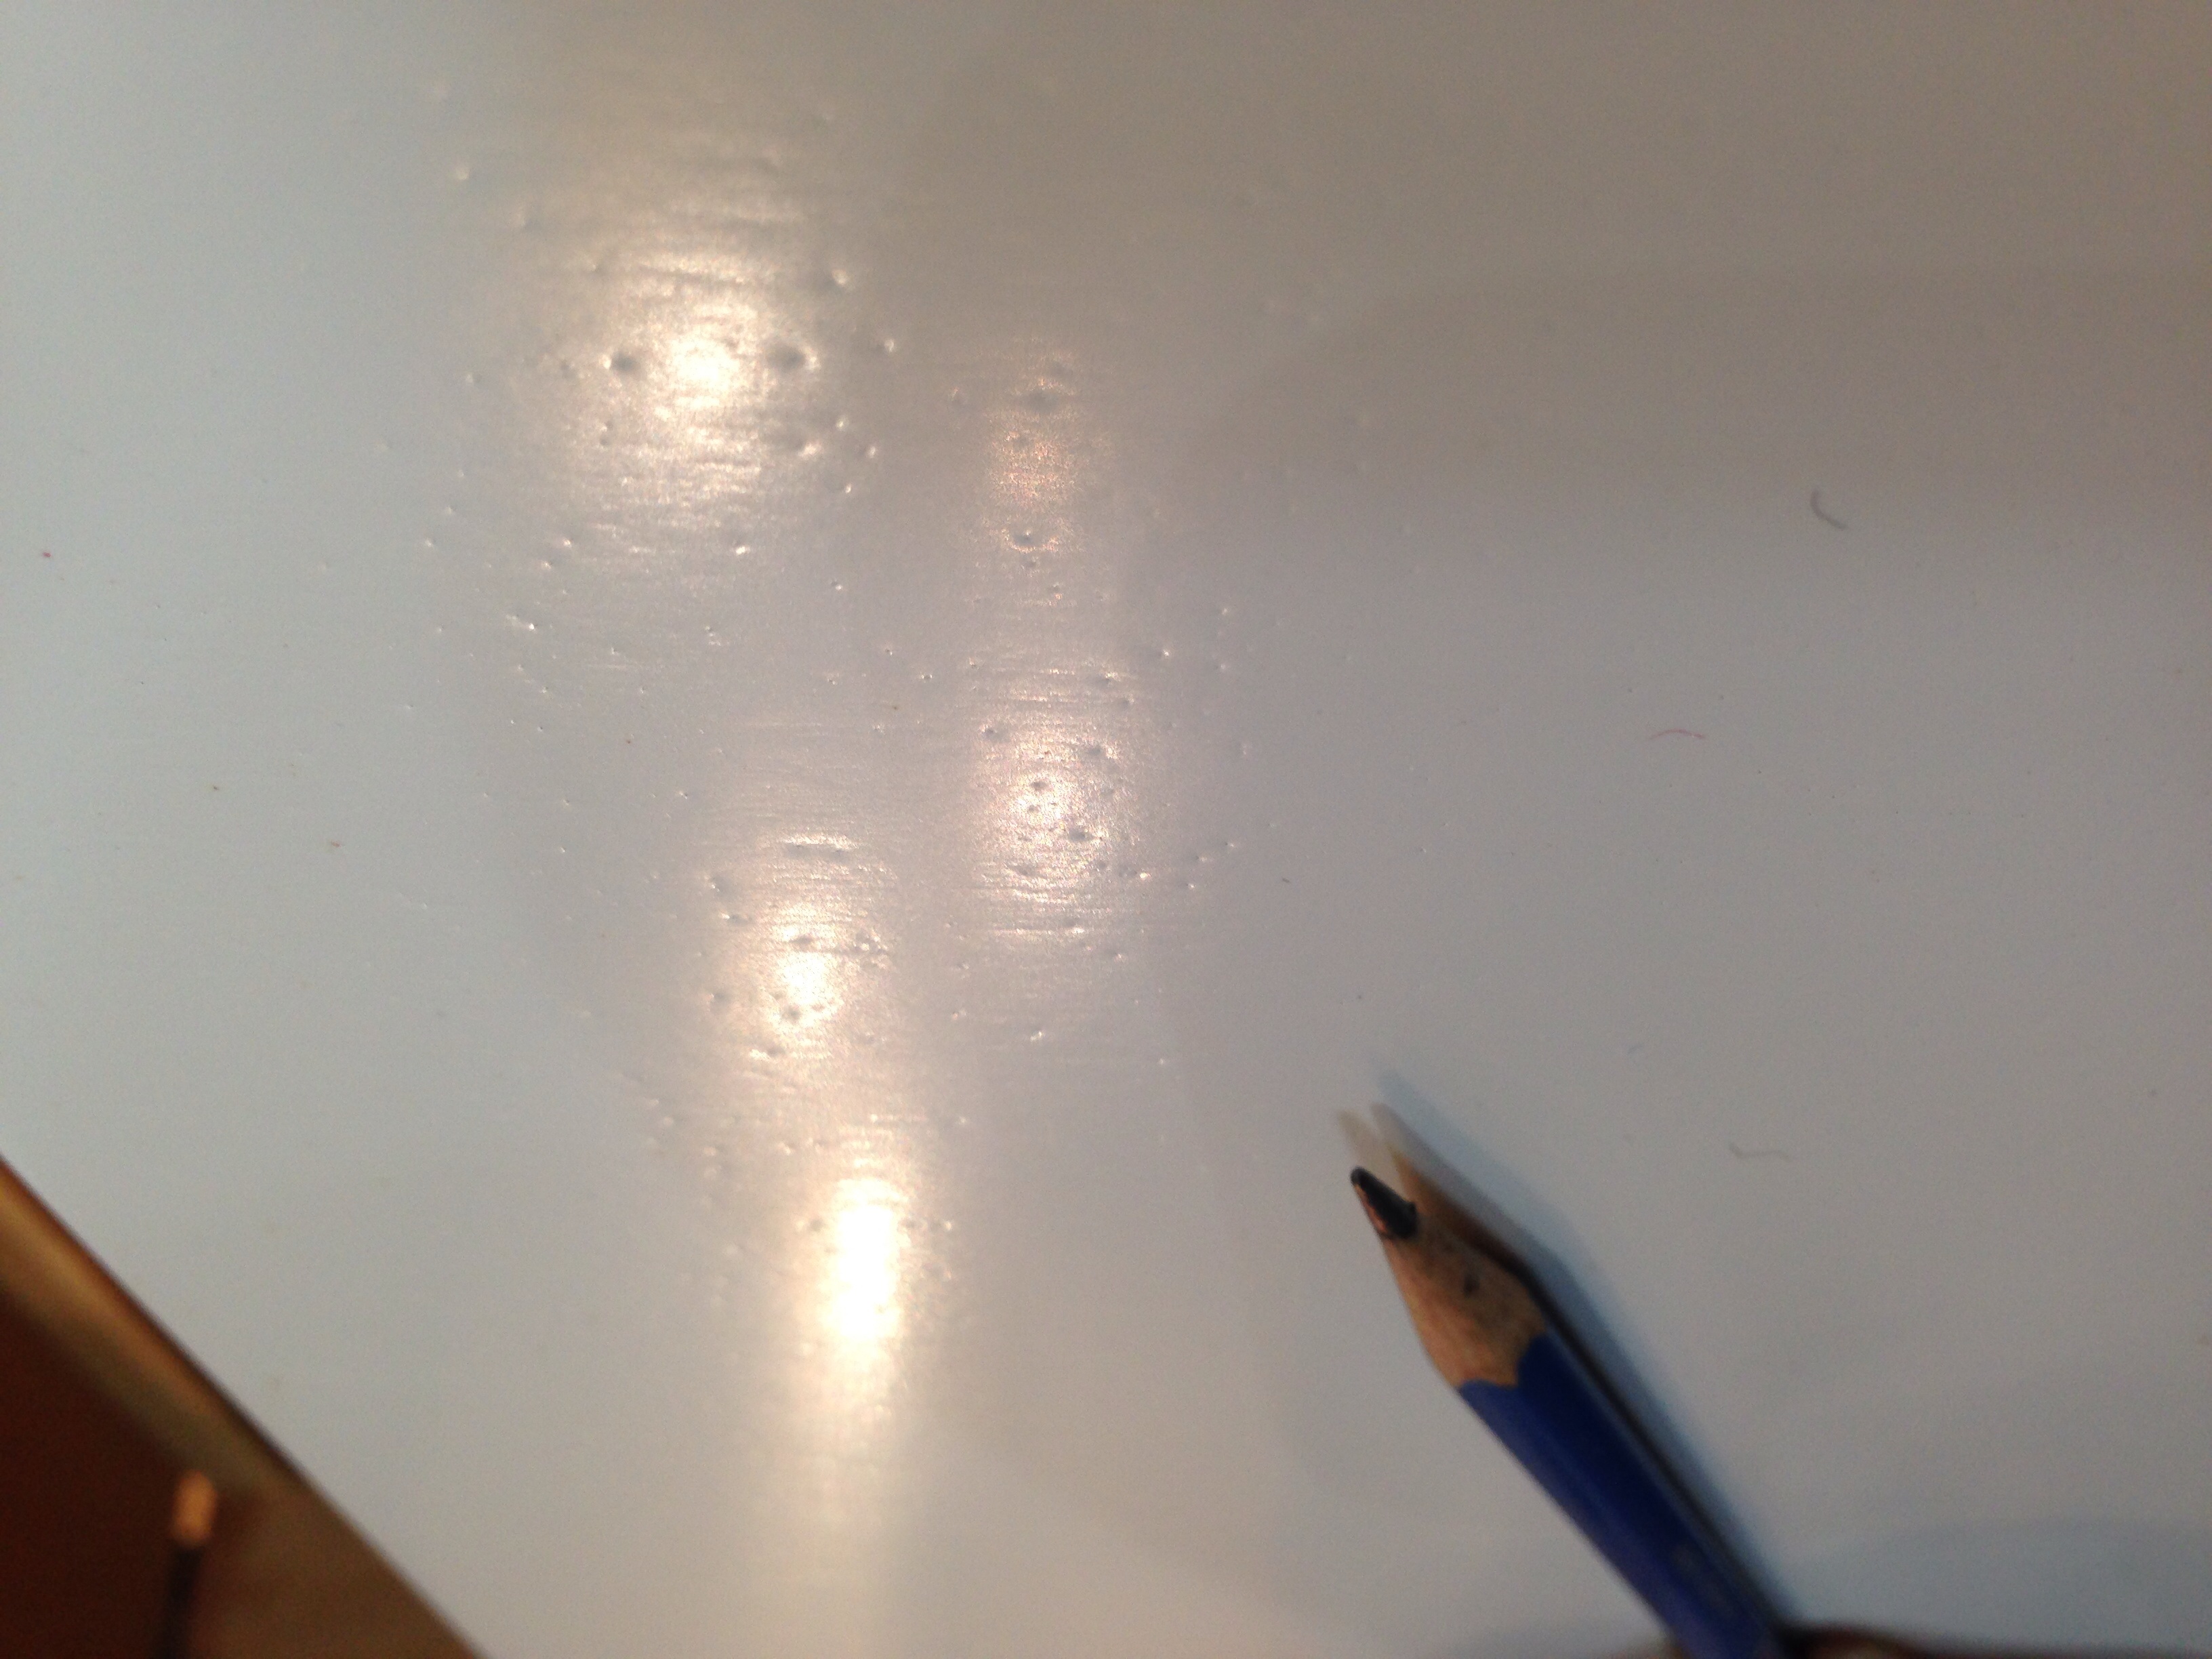
From contributor Ma
That looks more like fish eye to me. There is probably some contamination coming from somewhere. Water based finishes are alot more prone to that.
From contributor JM
The fish eye may be cratering. It is not caused by contamination, but it is caused by the surface tension of the product being sprayed. This is unique to waterborne coatings.
The pin holes could be caused by the surface skinning over too quickly.
Here are a few things to try.....on samples first....
1) Try thinning your product about 5% with alcohol. Methyl Hydrate works well for this and is available at most home centers. This will reduce the surface tension of the water and allow the product to flow out better.
2) Spray a lighter coat. This will help prevent the surface from skinning over too quickly.
From contributor jo
this happens most often when I don't do an even scuff before the last coat. I don't even try to get way with doubling up on the final coats without scuffing. it really helps the flow of the last coat
From contributor he
those look like a combination of fisheyes and solvent pops.
i would take a white rag and uncouple the air hose feed ing your gun, that will help tell you if you have contimination in your airline.
as far as the pin holes, do you have a fan trying to flash off the water or is your film build to thick, both will generate a pin hole
good luck
herb j.
From contributor jo
this is a problem that is unique to some high performance pigmented wb finishes. we can sit here and call it what we will I have had this happen several times with different brands. Its not Just as simple as "solvent pop" or "fisheye" his magnified photo shows no signs of contaminate at the center of the fish eye, nor are there halos present from bubbles popping. It is possible that the coat was too thick, but if the product were functioning properly and it was under 85 degrees it shouldnt have mattered. If I want to rule out contamination I spray it through my airless as I think doing a brush out is a waste of time with a product that was not formulated to be brushed. A new pail of finish seems to work for me every time. It seems like the pigmented formulations don't last too long once you start using it. Do test your air line, but I doubt that's it. If other wb finishes are working well through your gun the product you are using is just getting tired
From contributor Da
Slow down your flash off time as Herb Johnson suggested to eliminate the pinholes.
Check your airline.
Does anyone near you operate a diesel vehicle? Is your makeup air drawing in diesel-contaminated air?
Wipe down your surfaces prior to laying on any finish with an acetone soaked rag to eliminate/even out static on the surfaces.
From contributor Ad
Reminds me of the famous MLC Polystar craters.
I could spray that stuff all day, everyday for weeks and suddenly on the second coat I would get this consistent cratering.
It was a complete mystery for years. Eventually I changed products. MLC was of no help whatsoever. It was a shame because Polystar was a great product at a time when there were not many good tinted wb coatings available.
You may have an incurable case of bad luck.
From contributor St
Hi guys, just wanted to let you know that I am reading each response and am working through ideas. I've ruled out every source of physical contamination in my shop, and no diesel vehicles, interesting idea. Working now with the idea of surface tension as was suggested.
From contributor Le
Do you have an alternate compressor you could use temporarily?
From contributor St
I have a jobsite makita, I could plumb it into the 2nd (final) desiccant filter, but it would miss out on some of the primary filters and water traps. The problem I would be having with this is that I can't seem to make this issue happen consistently. When it does happen, I can never figure out why. Also, I should mention that I've never noticed any issues in the primer / surfacer stage that would indicate this type of pin holes once the pigmented lacquer was applied.
From contributor ni
Looks like WB solvent pop to me...but if you just sprayed a panel and got none but the next one you did...It sounds like it could be a contamination issue (it doesn't take much oil to screw up a WB finish, just one runaway drop of gun lube can cause a bit of havoc with WB's).
But if it is solvent pop it can be caused by a no. of things, either singular or in concert with another condition (meaning of course it can be hard to diagnose what's causing the trouble)...too heavy a coat, too much air flow over the work, re-coating too fast, cool substrate or finish product & warm/hot air in the shop,ect... The good thing is it's not always necessary to know specifically what's causing the problem to fix it. Like what's been already said thinning; retarding, applying lighter coats (what size nozzle/needle are you using?) and giving a little extra dry time before re-coating should fix or at least dramatically reduced the bubbling (if that's what it is).
From contributor St
Thanks Nick.
I'm using a top of the line devilbiss gravity gun with a 1.4 tip / needle set and 510 Trans-tech air cap. The pigmented lacquer's viscosity is borderline with a 1.4 and would probably be better at a 1.8, according to the charts, but the 1.4 sprays the clear amazingly well so I leave it set as is and use the same needle set. The gun has stainless steel fluid inlet / passage and I'm using the DeKups disposable cup system so no contamination from an aluminum gun cup. I have sent a request to speak to a rep from Sherwin Williams who is advanced in technical knowledge on this specific product.
Also, I tend to not leave pieces in the spray booth for too long immediately after spraying. Usually they are on a drying rack away from the booth's direct air flow within a minute.
I have some compatible reducer, but would like to not use it due its propensity to increase the likelihood of runs and measuring and mixing it in is another step. I do use it in areas where I am spraying out a complicated piece and can't maintain a single wet edge.
For gun lube I use Iwata Superlube, which claims to be safe to use with all water based coatings. It seems to mix very well when a drop of it is placed in a cup of water.
From contributor Ad
Ditch the 1.4 n/n set. Way too small. 1.6, 1.7, 1.8 are used for waterborne finishes.
Your Makita jobsite comp will not put out enough air for your gravity gun.
If you are spraying x/y style you may be having trouble by not putting down enough material on the first pass. It starts drying and then you hit again. This can cause solvent pop. The large needle set allows you to get more material down faster.
From contributor Ro
I have a C.A. Technologies 'Jaguar' gravity with a 1.4 nozzle set-up and it works fine with all the waterbornes I push through it.
Hence, I doubt that he needs an increase tip/nozzle combo. The DeKups system keeps the flow issue at 1.4 moot.
From contributor sa
I think your problem is as adam points out. Too small of tip on first past so you wet in the dry spray and next thing you know your over your wet mill thickness. I would try 1.8, thinning, adjusting fan size, hold gun 10" away product when spraying but you got to hurry.
From contributor Jo
I have been spraying WB for a long time now. Yes, it can be a pain sometimes. I have used both ML Campbell Agualente clear and pigmented. and Valspar Zenith clear and pigmented.
Both have issues to deal with.
Sam pretty much has it covered. 1.4 tip needs thinning/retarder to obtain the proper viscosity. If your not going to do that you need to increase the size of your tip. I use a CA Tech CPR gun with PPS. 1.3 works but only with thinning/retarder. 1.5 on clear no thinning.
From contributor St
Ok, I will order a 1.8 or 1.6 (I don't know if a 1.6 is available for this gun). Two things bug me about the tip theory though:
1. This problem is very intermittent. My tip and needle never change.
2. Of the three products that I spray in series, the surfacer is the thickest of viscosity, followed by the pigmented lacquer and then the clear being the thinnest. I can achieve a perfect uniform 4mil (as spec for this product) wet film thickness on a single pass with 50% overlap on my passes with the current DeKups / 1.4 setup.
I don't believe the surfacer coats to be instigating the problem, or, to say it another way, I don't think that the problem is starting in those primer coats but instead in the first lacquered coats. With this in mind, does it still seem probable that it is a tip issue? From what I'm seeing the 1.4 is spraying fine, although I could be missing something about the science of it all.
From contributor Da
I think that the solvent wipe of the substrate with a polar solvent has a lot of potential. My intuition is based on something I read about occasional defects one finds in toning leathers, that no one seemed to know why there are occasional circles of "no color".
The troubleshooting expert noted that the surfaces have occasional area pockets of charges that are different than the overall surrounding areas. These areas aren't contaminated, I don't know what you call it, electrostatic?
But the solution is simple and that's to solvent wipe with a strong polar solvent. I suggested to you to use acetone because if its availability and its quick evaporation rate and its not a VOC (as much as I don't like the idea of "thinking green").
It seems to me that it's a simple step in a process way to complicated for me to know enough to explain.
From contributor St
Daniel, now I get what you meant by the idea of some sort of electrostatic 'somethings' possibly playing a role. Last night I started a 3'x2' test panel where I am doing everything exactly by the book, and took your advice about the solvent wipe. I am using methyl hydrate as a wipe between every stage. I chose the MH over the Acetone as its a little less harsh of a chemical.
From contributor Pa
Adam's reference to Polystar reminded me that my distributor used to call it "Polymoon" because of all the craters.
I have had these problems over the years and haven't found one single precaution always works. I have found that thin coats/proper overlap definitely help, scuffing between coats and wiping down with DNA/water in a 50/50 mix also works, not getting the gun too close to the piece is a real plus, working with minimal atomising air is good and keeping air movement to a minimum over the wet coat is a bonus. Combining all these steps doesn't always totally eliminate the problem, but they sure reduce it. I also have had more problems with some brands than others.
From contributor sa
First off spraying is not rocket science. We all know that painting takes up the most time in our processes. I don`t know why anybody would want to slow down the paint coming out. If anything you want to move as fast as possible as long as it`s atomized. it looks like you pooled it up and the gases could not escape because of skin over. Thinner paint flows better and takes less paint.
1.8 tip
Thin more
Fast moving robot arm
If clear comes out faster, dial back paint a little bit, but just move faster.
Don`t watch the paint hit the substrate. watch what you hit in the last pass by too adjust speed. Like driving down the road. You don`t look 10' in front of the car, you look 50'-100'-200' ahead but when painting you watch behind.
From contributor Le
Thinning paint does not lead to using less, what it does is you end up with a thinner coating which may or may not be thick enough for the proper protection required.
Thinner paint leads to having to put another coat of the project to get the required mil thickness for proper protection.
You want to get as much paint on each coat without running into problems. The thicker the paint is the less time you will have in applying the coating.
From contributor ke
Are you shooting hardwood or ply type products? Depending on temp and humidity the wood itself may be trying to breathe. This would explain the hit and miss of when it happens also.
From contributor Pa
Switch to a product that's less finicky. I too lived through the ML Polystar/Ultrastar issues. Agualente is a far better product in every way. I have not experienced craters/fisheyes with it yet.
Cheers,
Pat
From contributor jo
Every one here is making a giant bunch of bs out of nothing. From the mans original post it can be assumed that he is a pro who knows how to spray. He had the forthwith to give us magnified images to look at, but you all assume that he doesn't know to check his equipment? That crap should spray awesome right out of the can under normal conditions as long as you are leaying a full wet coat that is not too thick. Again Im going to give him the benefit and assume that he knows how to lay down a wet coat. You all are giving the coatings manufacturer way too much credit. Bad cans of finish happen all the time. Get a new can, and if it happens again switch brands
From contributor Ma
Get a new can? I guess I just assumed he goes through more than 1 can every couple of years. Maybe you should read his post again.
From contributor Ad
After having some inconsistent sheen problems on a project, I started to spend more time stirring the cans. Depending on the product(oil based poly is notorious) the flattener can seperate. The finishes all start out as gloss and they add more or less flattener to make them semi, satin, flat.
Everyone knows that an older can of wb severely stratifies into resin and pigment and other stuff. Perhaps some of the unmixed stuff in coat 1 is a contaminate for coat 2 or the unmixed stuff in coat 2 has a localized surface tension problem.
Point being carefully stir the can the first time you open it(3-5 minutes)and every time afterwards for 2 minutes. I remember counting in my head for about 2 minutes with the Polystar each time I reopened the can the start of another run.
The solvent based finishes appear to be more stable. However, the catalyst must be mixed thoroughly.
From contributor jo
max a brand new can can be bad. has nothing to do with his volume of use
From contributor Ma
That's the point I was trying to make.He said he said he has been having this problem for a couple years, which tells me he has likely used several different cans and batches/lot #'s.That's why I would see if there is any way if he's getting contamination on the piece somewhere along the line.If he can verify there is no contamination, then I would try a different brand.
From contributor St
Thank you for all of the replies and help on this matter. After spraying over 40 samples, some in a full 5 coat process, looking for a cause, it appears I've found it. I can repeatably produce these little pinholes after cleaning my gun and then using Superlube, a lube often sold at professional paint supplies stores around here.
It claims,
"Super Lube contains no petroleum or silicone additives and can be used on all parts of the airbrush. It will not affect or react with any water-based, lacquer-based, or enamel-based paints."
I know it says airbrush, but the stores here are selling it as a gun lube. However, I have managed to rule out all other factors and now with success can repeatably produce clean passes or ones with pinholes depending on whether I use a drop of the lube after a gun cleaning. For now, I guess I will just forgo any gun lube and replace my seals more often, unless I come across a product that really works and isn't just marketed as waterbased compatible.
From contributor Da
Congratulations on finding the cause and the solution. Troubleshooting is more than the process of elimination, but it starts there. There are so many variables to contend with, intuition also helps. Again, congratulations.
From contributor St
Ok, looks like I'm still screwed, finishing a new order, shot 45 sheets of primer, color, and then clear, not a problem.
Now on to this next job, very tight deadline, first sheet same process, no issue, flip sheet to do 2nd side and all good until the clear went on. I have 20-30 pinholes per square foot, in some areas as many as a 100+ per square foot. The panel will have to be sanded down and tried again. The super lube could contribute to this issue, but it hasn't been used now for weeks, so obviously there is more at play here. Immediately after shooting that clear coat I saw the pinholes all over the place, so I grabbed two sample boards that are already finished with the same product and process and shoot two clear samples, one at the recommended 3-4 mil and one at 10 mil (the thought being that maybe I put it on too heavy), both boards have not developed a single pinhole! At what point do I just put a bullet in my head as the solution to this problem.
From contributor Da
What I'm going to suggest won't be of much help, but the issues written about in this thread tend to illustrate that going waterborne just isn't worth the trouble and the hype of "green".
What's waterborne, brown, and sounds like a bell?
Dung!
Sorry, I felt a need to opine.
I feel your angst.
Add some dish soap that you know has a surfactant in it. Don't add too much.
From contributor St
Thanks Dan,
Unfortunately with my proximity to a residential area I want to stick with the water based products. Its true that there are a new set of issues with these waterbornes, but 90% of the time everything goes well. I think I need to just figure out where some of these additional issues are stemming from.
It also makes my insurance coverage more affordable by using the water based stuff.
Was the soap a serious suggestion? I hadn't heard of that before.
From contributor Da
The soap suggestion was serious because it's one way to try to deal with surface tension issues. That's why it has to contain a surfactant.
But my strong intuition is that the culprit are pockets of static electricity on the surfaces.
From contributor St
Well, at this point I'm open to any idea as to what might be the cause. I'll see if I can find out more about the static electricity issue. Thanks for reminding me about that.
From contributor St
Well I've looked into the static electricity issue, and have found it can affect powder-coaters, but haven't found anything about it on wood finishing with water based products. This stuff looks just like solvent pop, but I'm within all my proper re-spray windows, and its water based, so how much solvent is there to even pop? I just lost two completed 4x8 panels to whatever this problem is this afternoon. Every panel that this happens to, if it can be resanded and recleared, its completely without these holes.
From contributor St
I'm waiting on another panel to dry, its two color coats, before a coat of clear. This time I'll try an intercoat sanding before the clear as suggested above.
One thing I wonder, these issues tend to only happen on the large panels, not the smaller stuff like doors, drawer fronts etc. In line with this, I can minimize the amount of pinholes by running my gun at max, which is above the book's settings, with my lacquer being warmed, and moving as fast as I can without getting into dry spray. Maybe my gun, even with the 1.8 tip and larger 510 air cap just can't move enough product fast enough to do these larger panels?
This has me wondering if this idea is somehow related to this issue.
From contributor Le
Is 1.8mm the biggest size they have? Went to the site and didn't see anything larger for that gun. But I didn't do a hard search.
From contributor St
Yes, the 1.8 is the largest option. The pressure feed gun setup has a max size of 2.2, but its about $1,600, which I think I'd be better to buy a used air assisted system. The obvious solution I guess is to no longer accept the finishing jobs of any more full 4x8 sheets.
From contributor St
I've been going after this problem pretty aggressively now. Since I've been having so many re-sprays, I've just scrapped some sheets to the cause and have discovered that the pinholes are the result of small, apparently singular bubbles that form immediately or almost immediately during the spray process. Up until yesterday I didn't realize that these bubbles are in fact present in the primer and pigmented coats as well as the clear / topcoats, but because the primer and color coats are of a thicker viscosity, the bubbles do not seem to be making it up to the surface and popping, causing pinholes. However, cutting down through the layers with sandpaper will expose them entrapped in the cured finish. In the clear you can watch them pop up about 2-3 seconds after the sprayed pass was made.
So my question is what creates great abundances of singular bubbles in waterbased finishes being sprayed on plywood (haven't noticed it yet on solid wood). One thought rumbling around in the back of my mind is maybe I'm pushing the gravity feed gun I'm using too hard to get too much product down at once and in the process, it's introducing air into the atomizing lacquer. Also, I know that contamination from that above mentioned gun lube aggravates the situation. Does anyone have any educated guesses on how all of this plays together?
From contributor Le
To much atomizing air gets into the finish and has to come out.
Sounds like solvent pop. Waterborne is usually sprayed on at 2mil wet which is pretty thin.
From contributor St
These products are asking for a 4 - 5 mil wet thickness, usually I go a little thinner, about 3-4 mil, but have found no difference in the pinholes whether it be a 2, 3, or 5 mil wet coat.
Tonight I was spraying some dark lacquered panels, so everything shows up in that finish. With two coats of primer and two coats of dark lacquer done, there weren't any visible pinholes. When putting on the clear I could see the pinhole (or dip / bubble? whatever it is) instantly formed as the gun passed by, almost as if it was being thrown on the surface by the gun. The spot would be a mere pinprick at this point, only visible in light glare, but dries to a hole or indent 5 - 10 times its original size. Tonight I did everything I could to help the product flow out, had it warmed, thinned it as much as maximum stated allowable, softened the gun settings up to push less air and fluid. Other than taking longer to spray a panel, I didn't notice any difference. One thing I noticed though, it seems like these pinholes are forming on the edges of the spray pattern. I haven't for sure confirmed this, but watching those little dots form right behind the gun tonight, it seemed like they were showing up on the fringe of the pattern and not in the main body of it. I use a 50% overlap spray pattern, and so that makes sense as to why I am seeing the pinholes everywhere throughout a panel, but, often you can see them arranged loosely in lines that run the same direction as the spray pattern.
If I'm going to keep refinishing panels due to these things, I'll have to start sending my finishing out of house until I can get this figured out. That's last resort.
From contributor Ji
Sorry that you are going through all of.this expensive night&daymare !
I don't know if this will help, but try making a step board out of a sheet of glass. It might reveal something? You could hold it up to a bright light, view either side......
Thanks for sharing, we all might learn something.
From contributor Ji
I know you are using sw products. But try target or other brands that only have waterbase. Their focus may supply your answer? Some of these companies are small enough that you can speak to the owner.
From contributor St
Jim, excellent ideas. I have a fellow cabinetmaker who is neighboring my shop who is going to give me a bit of his product (different than SW, not sure what it is though), so I can try that.
Is a step board where first section has all 5 coats, next has first 4, next has first 3, etc?
Using glass is a great idea, I never thought of that. I'm going to give it a try.
From contributor Da
1. Wear tyvek.
2. Don't use any deodorant (seriously, no kidding).
3. Use no creams or ointments on your skin or your hair.
4. Lay down Zinsser Sealcoat (2-lb cut shellac) as your first coat to seal your substrate.
5. Try other wb coatings when you get a chance.
6. Try another gun when you get a chance.
Yes, that's a stepboard.
From contributor Br
You said the pin holing does not appear on solid wood. How large are the solid wood pcs you have recently finished? Have you tried spraying any MDF or any other substrates for that matter.
I recently ran into an issue with some oak ply. We were using a pickled white finish that I make up out of a water based finish quite frequently. The problem we had was the glue was coming up through a certain flitch of oak leaving horrible yellow stripes on all of the table tops. No pin holing but the glue below the veneer was in my opinion undoubtedly the problem. The mill agreed and sent me a new lift of material as well as new sheets of wood backed veneer to redo the tops we already had built. We resolved the issue with the striping by simply switching to solvent products. We were even able to use up 10 other sheets out of the original batch. Which adds up fast with 1'' ply.
I know that's not your issue but it still makes me think you may want to investigate further. Try 4 or 5 samples on different substrates. Ply, Solid , MDF, MDO, Glass and anything else you can get your hands on. Make all of the pcs the same size. That is very important for the possibility of static as well.
I would also get a second gun and spray the other side of these sheets with that.
Is there any chance you could get a AAA demo unit form a local rep. It would be nice to add in one more variable for applying the coatings.
We recently installed a static eliminator on our top coat booth. Not for pin holes but for dust. We use it on the line for blowing down all of the products. It works. The dust issues were resolves by about 75%.
If it is static that would help.
From contributor Ji
Brian
Great post !
Where can I find out about those static/dust devices?
From contributor Br
I believe this is the model we use. I'll check tomorrow to make sure.
http://www.takk.com/takk-ionix-inline-static-eliminator.html
From contributor St
Thanks Daniel.
Today I'm following steps 1-3. I would never have thought deodorant would be a possible issue, but I'm in the "try anything" stage now.
I'll work on the others.
Brian, great ideas.
I`m going to give MDF a try, and also glass as mentioned above. The size of the panels is something I have considered, but I think I can rule that out. This summer I had a job spraying out many 4x8 sheets of domestic alder ply, all in a natural clear coat, 3 coats, 1 to act as a sealer, one to build, and a finish. I just examined some of my crops from that job and found no evidence of pinholes.
I have done 25`` x number of feet long of hard solid maple bar tops and just checked our display piece, also found it free from pinholes. In checking some of our stained and clear pieces they are also free of pinholes. So although the clear seems to be having the largest issue with these pinholes at the moment, it in itself doesn`t seem to be the problem. I would also like to learn more about the anti-static devices. I have done a little looking online and found that you can get guns that induce a static charge but didn`t see anything about removing one. Humidity in the shop is very low right now for these parts at 23%, normally we are at 50-55%. I have not noticed any difference though in severity of the pinholes despite the humidity shifts. Also, one last thought, our smaller pieces like the colored lacquered cabinet doors which also follow the same finishing schedule are completely pinhole free.
From contributor Br
If the problem did have something to do with static discharge and build up the smaller pcs would have the least amount of charge and therefore few to no pinholes. I do not however think this is due to static charge. As I said I would take a more scientific approach to the problem. Spray multiple substrates of the same size and see which one has the problem. Switch guns and see if the problem remains. If the problem remains and is only on ply then you know what the culprit is.
I sprayed water based for over 10 years for primarily the same reasons you do. I switched to solvent 3-4 years ago when I moved and finally started making a profit with finishing. Water has come a long way in the last 15 years but can still be quite problematic at times.
We do however use many water based products in the shop now including chem craft primer and sayerlack af products. If these types of products were around 15 years ago life would have been easier for all of us.
Also if you frequently spray large sheets like you have mentioned you should really look into a AAA pump or even a pressure pot. It will make your life much easier and will improve spray times and quality.
From contributor Je
My question is when you spray 2 sided parts, do you finish out one side all the way to clear topcoat and then do the second side or do you spray both sides with surfacer, then spray both sides with colored lacquer, then finish both with clear?
From contributor St
Brian, thanks for your thoughts on the static theory, it's not an area I have any knowledge of. I have literally sprayed out a pickup truck load of sheet crops trying to figure this out over the months. Yesterday I was up against a delivery deadline for today and was spraying the clear out on many 4x8 panels. I was getting pinhole city at manufacturers spec of 4 mil, and the only thing I could do to get through it for the moment was spray each panel to 15 mil, at which point the pinholes all melt in. I will continue to try different combos like a different product and a different gun. I have a lot invested in the line of guns I have now, but they're the same guns. I'll dig out an old conventional solvent based gun I have around here and see if it can get that to give it a shot. One thing I can say is that the pinholes become a big problem when clear is applied over a colored lacquer. I don't know if this is a chemical / physical interaction or just that the clear is highlighting the pinholes that much more.
Jeff, I spray 2 coats of primer on both sides and then take one side to finish and the other. I have had exactly the same sheets go through one after another, one sheet is double sided and the other is an unfinished back and both experienced the same symptomsin all regards of the pinholes.
Daniel, I tried changing spray suits, even tried no suit, used no deodorant, etc. no difference noticed, but thanks for the ideas that I wouldn't have thought to check.
From contributor Le
Almost sounds like a flow issue. Is there a retarder for your finish?
If not you may just have to thin it out more so it flows properly.
From contributor St
There is a retarder, and I've given that a shot too. I even went up to 250% of manufactures recommended ratio but didn't see much difference on way or another.
From contributor Le
It keeps reminding my of fisheyes, but it doesn't look exactly like them.
From contributor jo
well doesn't sound like you can change brands on this project. I didn't catch that you were spraying with a cup gun. that's why you are seeing this. Wbs are not a hot enough coating that errant particles of finish landing where they may don't burn back in properly. and the inverse can happen. say you box the edges, overspray landing to the center of the panel, if you are not fast enough the more dry overspray can create this effect when you spray over it to coat the face of the panel. The only way I can avoid this is by using an airless. I use a 308 or 410 double orifice tip, and I can get the whole panel coated before I have any dry spray issues. I have not been able to afford an aaa unit but I hear they are the beez neez. Its not your guns fault wbs are just very pickey
From contributor Jo
I have sprayed Waterborne for years. ML Campbell and Valspar. Always used CA Tech CPR with 3M PPS (Not Gravity Feed).
Waterborne was always a pain and the larger pieces were very prone to to dry over spray, resulting in many problems.
Just bought a CA Tech Waterborne AAA with Bobcat gun. What a difference. It is worth every penny. Solved a lot of issues that I have always fought with waterborne.
From contributor Le
I rarely do waterborne, but I will agree that a AAA is really a game changer. The speed you can go at is 4x what you can do with a gravity feed. If you can't do a AAA at least try a pressure pot.
From contributor Pa
Stephan, I have to agree that a AAA or pressure pot would likely alleviate problem, but in the meantime can you reduce fan width on current gun? Sounds like you have tried almost everything else.
From contributor St
Ok, so the dry spray or something related to that drying edge is the result of the pinholes? Systematically that fits, as the smaller samples never have these issues unless except for the gun lube contamination. Its always on the big sheets I've had problems. Also, I've widened out my spray pattern and have been running as much fluid as it can properly spray to try and minimize these pinholes, but I had never thought to try a narrower fan.
I will also start looking into AAA systems.
From contributor Da
The big the in AAA are:
Kremlin Airmix
CA Technologies
Graco Falcon
I suggest you investigate price, service, tech support. I suggest you try to at least hold each gun because that Falcon gun is silky smooth like driving a Bentley.
I also suggest one lesser known brand, Asturo-AOM.
All that said, the first place you might look is to see what your coatings supplier sells. There is nothing like having the tech support for your finish also take on responsibility for your spray equipment to spray that finish that they're eager to sell you more of.
The advantage of AAA in addition to the speed of your pass is the even distribution if atomized spray from the left to the right of your fan.
From contributor St
Ok, thanks for the info guys. This morning I bought a Graco Falcon with a Sata Jet K3 Spray Mix gun on it. I don't know much about AAA, but I guess I'm going to learn pretty quick. My coatings supplier is a Graco supplier as well, so that works out well, although I may have trouble finding parts up here for the Sata.
From contributor ji
We are going to assume that you are not using a paint shaker on any wated base .
From contributor an
Stephan,, i have been through something almost EXACTLY like this before using a WB finish. Even though i found a solution to my problem i can only speculate on what the source of the problem was, but i am 99.9% sure the problem was coming from the color pigment itself. Ok, here is the solution,,, contact your finish supplier and get yourself a CLEAR WATER BASED SEALER. Thats it. This clear sealer will go on just before you start applying your finish coats. Basically you are creating a barrier between any pigments and the finish. I am almost 100% certain this will solve your problem.
From contributor St
Antonio, thank you so much for chiming in. My supplier does have a clear sealer compatible with what I'm using. Just to be clear, my new finishing schedule would be:
Primer
Primer
Color
Color
Clearcoat sealer
Clear topcoat
From contributor an
Yup, thats exactly the order i do it. My only question is, why are you applying a clear coat over your colored finish?
From contributor Pa
Stephan, if you have to have clear over colour, then you could tint your primer to the desired colour then clear sealer then clear topcoat.
Paul
From contributor St
The color over the clear does three things for me:
increases finish durability in areas exposed to wear,
prevents coining, especially on the lighter colors,
provides an even way to get the same sheen index among all pieces, even from color to color.
Paul, interesting idea, I should give that a try. We use a surfacer so it is a coarser finish than a typical millwork primer, but that might be worth experimenting on. I'm all for reducing labour if it doesn't affect the quality of the product.
From contributor an
Stephan, one time ago i thought the same thing, we would clear coat over every pigmented finish that came out of our shop. Since then i have learnt a few things, mind you, these are just our opinions : If you want a more durable coat then just add another coat of the colored stuff. clear coat and pigmented finishes are the same just that one has pigment and the other does not. To me it wastes time and money,, unless of course you are doing a black piano type finish. To me all those extra finishes are just gambling with adhesion issues down the road and on top of that in many cases that last clear coat does slightly change the color of the pigment underneath so touching up could be a problem later down. It also causes the color to underneath to change when exposed to light at a different rate than if the paint was exposed to light without the clear on it. Which wouldnt be a problem unless say a year later your client wants to add to the job and you find that same paint code no longer works and does not match.. Just my 2 cents,,, however i do like how clear coat looks over some finishes especially the dark paints :)
From contributor St
Ok, update time. As I mentioned before I bought a wall mounted Graco AAA and all is running well. I'm really feeling like I'm getting dialed into it now. Amazing machines these things are. However, I'm disheartened to say that the pinholes are still here. The next thing to try is running a different compressor, also cutting out the first set of filters and the cooler.
I've also been given some primer, colour and clear from a neighbouring shop and that will be my next move after the air compressor test.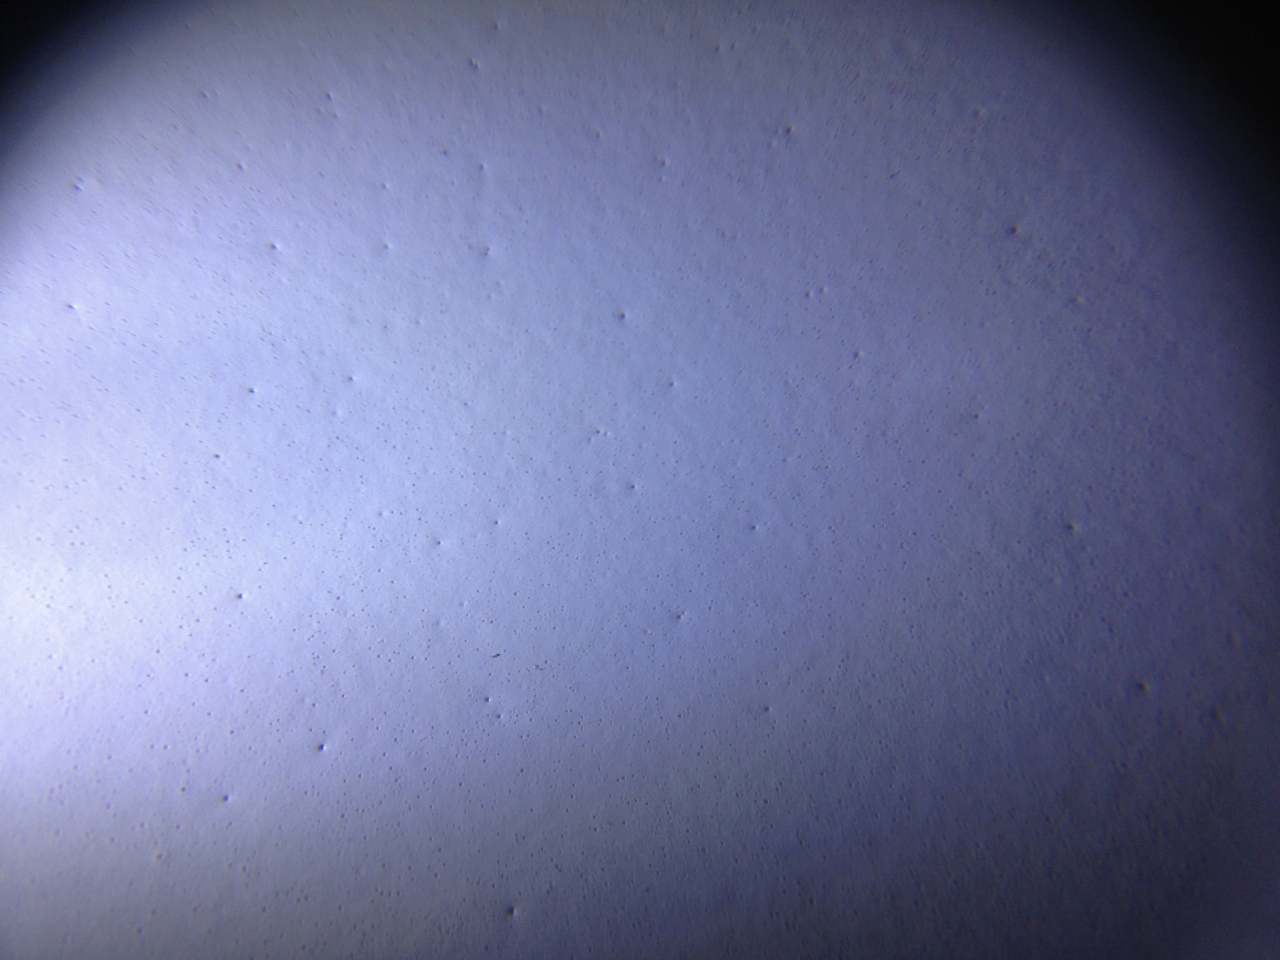
From contributor Br
Sw clear is not compatible over pigmented there is a clearplus I believe but cant remember
From contributor Je
Really terrific thread!
A few thoughts;
The suggestion to use a shellac based primer? Awesome! It's always worked well for me between ANY finish types (it's the 'universal' inter-coat, after all) and performs consistently. It's even 'green'... De-waxed shellac (same thing, no pigment) works really well for clear coats if you want a bit of that warm amber look you get with solvent (orange alcohol based dye in the clear coat is even more dramatic over dark stains.). If you want a 'water white' finish, a WB sealer might be better, but might not solve and keep solved your pinhole issue. If you are using a waterborne sealer, use the sealer that's designed for your finish! Also, use the retarder/extender/thinner/surfactant specifically designed for your finish, it matters! Extend to the point that your wet mil is what you want it to be, at the speed that you move at, then watch it for adjustments needed due to weather, increased/decreased speed, etc.
The suggestion to not spray clear over color-YES! I learned EXACTLY what you mentioned about color matching for touch up the (really) hard way. I spray only pigment on pigment now and get my supplier to adjust sheen to where the client specs. I also box all my pigments AND clears (for sheen) before and during spray runs. Up to you, but there's hard won wisdom in that comment!
A word on the products;
I've tested and done a bit of technical advising on waterborne wood finish off and on for about a decade when they were still pretty new (in the good old days). Although I'm a big fan of SW for house paint and commercial coatings (seriously, they are amazing, especially their water based alkyds), their WB wood finishing products leave a lot to be desired. I just shot a bunch on plybam a few weeks ago and struggled to make it work. Small parts, too. Conversely, if you're rubbing out your finish, it's performs quite well, go figure...
Target Coatings is my go to WB system. Jeff Weiss is the chemist/owner and he's quietly knowledgeable and has an exceptional product. Some of the best burn-in on his lacquer I've ever seen, almost as good as solvent based. His urethanes cross link AND can be post-catalyzed for even more durability. Look him up and give him a call, ask him for a sample of what you spray a lot of, then give it a test. If you do pigment and you match BM or SW colors, he's got either down pretty good. Ask him for the recommended sealer as well for the product you choose.
Best of luck and happy spraying!
From contributor St
Jeff,
Thanks for your experiences. I still think that a better end product involves a clear, (in terms of durability and sheen consistency) but I do agree with you with regards to the repair work. I've found it the most reliable way to match a designer's specs.
The final solution for the pinhole problems turned out to be operator error as is usually the case. I was over agitating the primer, color, and clear. My powered stirring was turning at too high of an RPM and was entraining air. Seems so simple but it goes to show that when there are 50 variables and an inconsistent problem, it can become baffling. A big shoutout to Kremlin of Western Canada for putting me in touch with a WB finishes guru.
From contributor An
Interesting thread and final solution. I've had similar problem with fisheyes using KA White Tinted Lacquer over KA+ Surfacer. I was told by the SW Rep that KA+ Surfacer is a universal primer and there were no compatibility issues.
I first did a couple samples. 2 Coats of Surfacer and 2 KA Topcoats using a brand new Fuji Semi Pro HVLP. I did no thinning at all and just sprayed water through the gun to clean. It looked absolutely perfect, so I went into spraying a kitchen of raw maple face frames laid out horizontally in my garage. Here is how it went with conditions for each coat at pretty much the exact same 75 degrees/50% Humidity:
Coats 1 and 2 of Surfacer: Everything looked perfectly fine, sanded to 220 between coats, vacuumed and wiped down with microfiber tack cloth.
Coat 3 KA: Everything laid flat, though I got some runs on the inside of the face frames around the corners which I found tough to do well. Easily sanded off though and the highly visible surfaces were looking good but needed more build.
Coat 4 KA: I had planned for this to be the final coat. Because of the runs in the previous coat I turned the volume down a bit and moved quicker than I had in any previous coat. When it dried I wasn't in love with it, it just didn't seem like it flowed out well enough because I went too light and there was a slight texture to the dried finish. Still no pinholes or fisheyes or anything like that, but I decided to sand to 320, vacuum, wipe with microfiber tack cloth and apply another coat.
Coat 5 KA: This time I decided to increase volume and lay it on thicker to get better flow out and a smooth surface. This was on a different day with same temp/humidity but significantly more breeze I would say. This coat I started to see the fisheyes/pinholes that look very similar to those posted above. It seemed like the most impacted face frames were the first ones I sprayed that were closest to garage entrance and breeze also received the thickest coat. I sped up a bit as I went along and the other face frames had fewer of these issues.
So I only suspect that the combination of increased airflow and thicker coat was causing surface to skin over too fast, causing my issue. In reality though, I am a beginner and have no idea. Things went so well during my testing and samples that I went into this feeling a bit bulletproof and probably didn't have a good enough feel for thickness of coats, proper volume out of my gun, speed of my passes, or distance of gun from work piece. I did feel I was pretty careful to get all the sanding dust off the frames before spraying, but something could have easily blown on there as I was working in an open garage surrounded by nature, dirt, and wind. Or maybe my gun wasn't cleaned out well enough? As far as stirring, I was the opposite and did not stir frequently or aggressively, mostly due to forgetting and having good results previously without worrying too much about it. Just thought I'd post as there definitely seem to be a number of ways to end up in this conundrum. As I had relatively few pinholes that can only be seen in certain light I am hesitant to even try and fix without understanding the cause. I will continue testing and if I regain any sort of confidence in my application of this product, I might sand and have another go.