Sunburst Veneer Layup Methods
Follow along as a craftsman works his way through a difficult first-time veneering project. November 3, 2010
Question
I'm building a 4' octagon edge banded with 5/4 maple cut into a radius. The octagon will be 1'' MDF and the maple will be splined to it. The MDF will be veneered in a sunburst pattern with maple. I�ve heard that this will warp if I do not veneer the top and bottom. Is this true? Hard to believe, but I'm asking. Also, what is the best way to cut/joint the veneer into the triangles? I want three triangles per side of the octagon.
Forum Responses
(Veneer Forum)
From contributor Y:
Yes this is true you must balance out your sub straight. In a cold press it does not have to be the species but for a hot press in my experience its best to use the same. Weird I know but that�s how it worked out for us. I have twelve years veneering experience.
From contributor J:
Veneer the bottom too or you'll be wasting a lot of time making a potato chip. To cut/joint the triangular segments (if you want three pieces per side), start by making a 15 degree triangular wedge out of MDF. Lay that on top of your flitch (I hope you have 24 consecutive pieces or its going to look silly) and cut through all 24 with your veneer saw. Then you need to clean up the edges. You can make a shooting board and hand plane them, use a straight edge and a router, edge sander, sandpaper glued to a straight edge. After your edges are prepared, tape it up except for the last piece. Trim the last to fit with the same method you used to trim the other edges. Press as soon as possible, and have a second set of hands to help. You can't do it by yourself.
From the original questioner:
During a practice run, I've only had minor success jointing my triangles. I've tried my veneer saw and a razor knife. I was surprised when I got better results from the knife, but still not satisfied. I guess I'll try a router. It is really important to me to get it just right. Someone suggested I send my veneer to a company that laser cuts. Does anybody know who or where? Or better yet, what am I doing wrong?
From contributor C:
Laser cutting is a waste of time. Find a veneer company and let them do it. It's not that big of a deal when you make thousands of these a year. What area are you in?
From the original questioner:
I'm an hour north of Denver.
From contributor C:
I know there is (or was) a couple of custom veneer houses in Denver. You should try to someone that can guillotine you material for you or maybe make the complete face. I don't recall the names of the companies.
From the original questioner:
I've been practicing jointing triangles and I'm happier with my results. I'm going to go for it.
One more thing. I will be veneering both sides to make a balanced panel. Does the grain orientation matter? Do I have to make the same sunburst for the bottom?
From contributor J:
You can just do a straight layup on the bottom without any problems.
From the original questioner:
I have all my parts cut quite nicely. I am however, having trouble taping the sharp points of the triangles. I have a hunch that these points will tighten up once all the parts are taped up and in the press, assuming they are all the correct size. Any ideas? Can I tape across numerous joints, perpendicular to them, to tighten them up? Also, I understand I have to make a balanced panel, but does that mean I have to glue both sides at once or can I get away with pressing one side at a time.
From contributor J:
I�m glad to hear its working out well for you. They are kind of fun. It�s interesting to see the different patterns that emerge in the swirl depending on how you match your leaves. I always tape these up starting on the backside in the center. I put a white sheet of paper under the intersection of the points as it makes them much easier to see. Tape up a few on the back and then flip it over and tape the front. I stop a couple inches short of the point. After the whole front is taped, put a few pieces across the points. Oh, make sure your core is ready to press before you do all that. When you�re done taping up, press it ASAP. You can do one side at a time, but I'd do the back in short order if not immediately after the top. What kind of glue are you using?
From the original questioner:
I am using better bond cold press glue that is formulated for light veneer. I may just glue both sides to be safe. I thought of making my substrate big so I could tape a few points of the veneer, to keep it from shifting, but I worry about the glue. I'm waiting for my breather fabric to arrive, guess I better not tape yet.
From contributor E:
Before you try to press your lay-up with the glue you have. I would take some of your scrap pieces and tape them up. Put them in your press the way you have plan in your post. I think it best to try something for the first time with scrap then with a time consuming lay-up. Let us know how it comes out.
From the original questioner:
I agree with a practice run. I'm new to veneering and vacuum pressing. I also have to make the same sunburst pattern on a 30 by 18 panel for the back of a tea hutch. I plan on considering this smaller panel my practice run.
From the original questioner:
I taped the sunburst up with blue tape on the backside. It was perfect. I had to make two triangles 1/16 larger than the rest, which I was happy with. I flipped it over and started taping the front with three hole tape. It was going good for a while, then the center started to buckle. Is there a secret that I don't know about? I think I've heard of tape that doesn't require water. Maybe that would be my best option. Hopefully I can save my parts, but luckily I have 24 more in sequence. Any ideas would be greatly appreciated.
From contributor U:
Secret: tape and press.
From the original questioner:
I was planning to tape and press. My problem is I could not finish taping before the center buckled. I think I may be better off taping up into four parts and then taping these together. Taping up with the blue as a whole is not going to work, at least from my experience. I need help, big time.
From contributor J:
I never use veneer tape. Clear packing tape works great. You have to be careful removing it on some woods. I pull it back flat and at an angle-if it lifts any grain, I pull out the iron set on low and remove the tape with that. Are you sure it wasn't slightly puckered in the center when only the back was taped? What exactly do you mean by buckled?
From contributor V:
Most fancy face work I have seen done is done with plain veneer tape not perforated. The beauty of the gum tape is as it dries it shrinks keeping your joints tight. You might want to consider purchasing the video Decorative Veneering which shows you how to do it all.
From the original questioner:
I like the clear packing tape idea. My joints were great. I don't need the veneer tape to draw them together anyway. By buckled, I mean the points started out tight and flat and after the veneer tape the center lifted bending at each joint. I could not push the center down keeping all the points together, they were too tight. Thanks for some good tips.
From contributor E:
This is a good start. You have learned an important lesson when working with most close-grain veneer. When applying veneer tape to the seam and it starts to buckle which is causing your lay-up to grow and not lay flat. Veneer tape has been around for a very long time and for good reasons; (1) very thin and strong (2) easy to apply and remove (3) when it dries it can pull a seam very tight. The last being the most important when doing this kind of lay-up.
All is not lost. I have found that most lay-ups can be saved as long as you started with longer pieces than needed. I, as you, have read in past posts to tape and press as fast as you can. As you have found out the veneer buckle before you can get to the press. I found that you have to let the seam dry or the whole point for using veneer tape is lost. Having said that this is how I would go about fixing your lay-up.
1. Take a knife and cut open all the seams this will take the stress off the leafs.
2. Lightly sand the veneer tape back (you do not have to remove it all).
3. Take the leafs in the order that you had them and lay them in two half circles.
4. Start in the middle and make pairs.
5. Check the joints as you may have to go over them, now realign the points and tape the pairs. I stop the tape about �� to the points. Put then between two pieces of pb as this helps them stay flat while the joint dries.
6. If you are making 24 seg. Lay-up you should have five pairs and two end pieces per half. Start to tape the five pairs at one time following the above steps you can start to do this after you tape the last pair.
7. Now you have to fit the two ends leafs to make a full half. One way is to cut 1/8� off the tips of the two leafs and move then in to match the other points. The half should be a little over size now that is ok. Tape to the two ends on to the halves at this point take appease of tape and go across all the points. Oh you should take a long straightedge and make sure you have enough stock to cut a full half before you tape them up.
8. Take the two halves and lay them between two pieces of pb let them dry. I have stored them in this state for as long as six month.
9. Take them out to match the two halves cut; tape let the joint dry you are ready to press.
How much water you put on the tape will determine how long it will take to dry. I like to get the glue wet without soaking the paper part. This comes by doing.
From the original questioner:
I decided to use the veneer tape after reading Tom�s post. It is completely taped and ready to press, I think. It is slightly puckered in the middle, but seems to lay flat with a piece of PB on it. It did not buckle this time. Is it OK to put it in the press? Or will this puckered center cause a problem? Oh, I ended up cutting new parts, bummer.
From contributor J:
If it is just slightly puckered and lays flat with your caul on top you should be fine. Save those old parts and you can make a slightly smaller one.
From contributor E:
I agree that if the points are lying flat and not over lapping them self it will be ok. I would add some words of causation you said you were waiting for some breather fabric that you have ordered. If you are planning to use it on top of your top caulk that is ok. Never lay it on top of your lay-up as it will make small dents (hard to remove). Breather fabric is used mostly for curve work that a flat caulk will not work. Also the better bond cold press glue I think is PVA glue which is made up of mostly water and you found out what water does to maple. You need glue like unbond type of glue that has a ridged glue line and not so much water in it.
From the original questioner:
I pressed both sides, at different times. I could not fit two platens and my substrate, so I used breather fabric and did one side at a time. It came out good. I have some gaps at the center point, but not too bad. I have one leaf that overlays another by 1/32, but only for 3/4" on the outside edge. I understand why the center partially separated. When the leaves are taped and they bend up, the press flattens the whole unit, and stretches outward because that is the only place it can go. I have to figure out how to fix the one overlaying leaf. Thanks all.
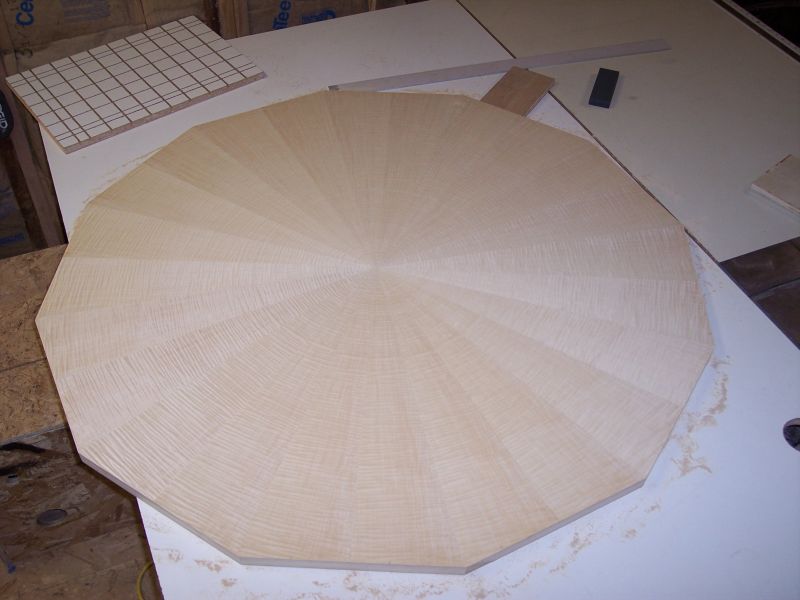
For the image below, what would you guys use to fill the center?
Click here for higher quality, full size image
From the original questioner:
How can I fill the partial separation in the middle of the sunburst? I'm not sure what will hold up/ look the best. The finish will be light, if not clear. I am also struggling with the frame - six legs or four? I have six legs scheduled, but feel that four may look better.
From contributor D:
Can't really see the separation you are talking about. Is it just a couple joints that aren't quite as tight? If that is the case, I would use some lacquer stick, or tape off the area to the side of the seams and dribble in some west epoxy. About the base - six legs? Where will you sit? I'd go for a pedestal base. Maybe two frames half lapped to form an "X"
From the original questioner:
Tape and epoxy seems like a good idea. It is just one joint that separated, hard to see in the picture. Believe it or not, this is going to be a coffee table. I think it is a little big, but the designer really wanted it to be this wide.
From the original questioner:
This monster has been in my shop, in my way, for a long time now. The designer finally chose a finish. I used analine dyes to preserve the curl. The dye lifted the veneer along the seams. I was able to glue these down but then sanded to deep as it was already finish sanded the first time around. I have already committed to rebuilding the top. I believe the dye broke down the glue. Or the veneer may have expanded with the introduction to moisture (denatured alcohol). I've also heard of cross banding when using figured wood, but thought that was mostly for burls. I'm going to use an epoxy or urea glue and pray for the best. Any thoughts are of course greatly appreciated, as I am pretty deep.
From contributor E:
How did you remove the veneer tape and the residue after you lay it up by sanding?
From the original questioner:
I used a damp sponge and a scraper, waited till it dried then sanded.