Toekick Drawers
Other Versions
Spanish
Construction details and images for toekick drawers. January 14, 2004
Question
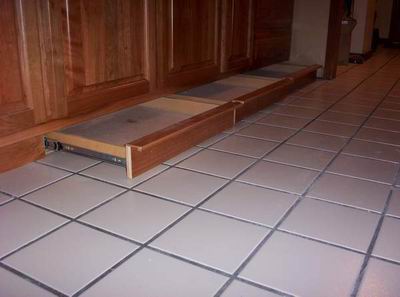
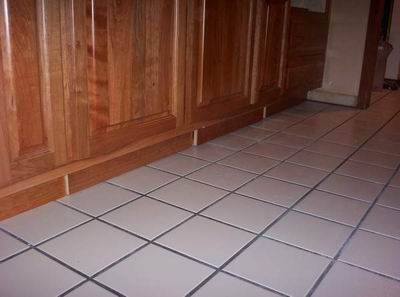
I just finished the toe kick drawers I asked about several weeks back. The client is delighted. The hardware is full extension, and isn't pulled out fully. You can't even tell there are drawers there by just looking at the cabinets with the drawers closed.
Forum Responses
(Cabinetmaking Forum)
From contributor A:
What would someone store down there with the mud, the blood and the beer, as Johnny Cash might ask? That's a pretty dusty area, usually.
From the original questioner:
She's got all of the owner's manuals for her $13k worth of kitchen appliances in one of them. In another one, she's got all kinds of kitchen gadgets she never uses. There are six of these drawers in the kitchen. Actually, the drawers are pretty well sealed up. The dust is what accumulated in my shop prior to installation. The cabinets have a full bottom under these drawers, and the back is sealed too. The drawer fronts pretty well seal the drawers off when they are shut, so dust may not be as bad as you might imagine. She heard about toe kick drawers and just had to have them. Here's a picture of them closed.
From contributor B:
I think they look good, but what's holding up the floor of the cabinet if someone stores heavy pots and pans in it, or even heavy canned goods? Are the drawers small? Is the floor notched into the face frame? Is the middle stile helping to hold up the floor? Will it sag over time?
From the original questioner:
There is a 5/8" plywood floor at the bottom of the cabinet. Then there are 5/8" plywood spacers between this plywood floor and the cabinet bottom shelf, which is flush with the bottom rail of the face frame. The back is 1/4" ply which goes all the way to the floor and is glued and stapled to both the normal bottom shelf and the added cabinet floor. Each toe kick drawer goes into a separate compartment. The cabinets have 3cm granite tops, and they aren't going anywhere. I've never installed any boxes that were this heavy, cause they've got a lot of plywood in them!
From contributor B:
Are these made and then the cabinet set on top of them, or are they made with the cabinet as a whole?
From the original questioner:
Everything is made as one unit.
From contributor C:
It's an idea I'll have to try sometime. I would assume that you built the floor of the cabinet sitting higher and used the actual side of the cabinet below to mount your drawer sides to, which also acts as support for the cabinet. Almost like building a kitchen cabinet, but leaving the toe kick separate and then attaching the drawer face which also becomes a finished toe kick. Nice job!
From the original questioner:
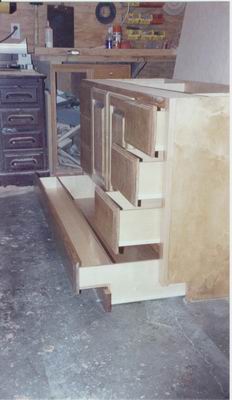
Here's how I did it. Built the cabinet as usual, except I added another bottom right at the floor level. There is a 5/8" plywood divider between each drawer, which gives support to the bottom shelf of the cabinet. The back goes all the way to the floor instead of just to the bottom shelf. I built the drawers and put the hardware on the drawers, and also on a piece of 1/2" Baltic birch about 2" wide. Put the hardware with Baltic birch runners all together, squirted some Liquid Nails on the Baltic birch pieces, and slid the whole thing in the hole. I knew that the area was too narrow to be able to screw the hardware in, and adjustment was out of the question. By putting the hardware/drawer assembly into the hole together, there wouldn't be any need for adjustment. Because the floor is very uneven, I put a 1/4" spacer under the drawer front to make sure the front wouldn't drag the floor anywhere, put a couple of 1" brads in from the front to keep it in alignment, then opened the drawer and screwed from the drawer. Door fronts have to be applied after the cabinets are installed. The drawers can actually be pulled open with the toe.
From contributor B:
The only negative thing that I can think of would be the crud buildup under the drawer front, unless the owner takes out the drawers to clean under the fronts all the time.
I would give it two thumbs up!
From contributor D:
We do these drawers on occasion also. We do them in bathrooms as well as kitchens, but our construction method is a little different.
When asked to do these in bathrooms, we make the drawer notched and use the notch as a small shelf for smaller items.
We designed ours as shown below for a few reasons, one of which is you can't see any potential crud buildup on the toe as easily. The cut list is easier to do by hand, and the customers like them. Cost was the major factor for this vanity, so we didn't have to dovetail or anything like that (suits me just fine).
From contributor E:
Hafele (or
Blum?), makes the hardware to do just this. The slides attach to the leveler, so if you're frameless, you can buy the hardware for your kick space drawer without reinventing the wheel... but I think it requires a 15 cm minimum kick height.
From contributor F:
Good looking stuff.
We just finished a kitchen with similar features. Construction wise, the toekicks were 221mm tall, separate cabinets with stainless fronts and Grass zargen boxes. We added heavy duty touch latches to them so that when you kick them (part of the reason we went with stainless) they open up. The touch latch (Hafele) is strong enough to push the drawer open past the self closing feature on these drawers; in fact, it almost opens the drawers fully. No complaints of inadvertent openings yet.
The tall toekick was initially designed into the cabinets for a "true" European look. I thought it was a waste of space, so I suggested that we make them drawers to utilize the space better.
One thing to watch out for is flooring material. An uneven floor will really screw with you. An unplanned for advantage of the zargen and other guides like it is that when they open up they raise up 3mm (the self-closing feature), giving you extra clearance to the floor when you need it, and closing back up when you close the drawer.
From contributor G:
I've always liked these drawers, as I have always lived in very small places in both New York and San Francisco - every cubic inch counts. These look very well done! I also like to substitute a pull out stepstool for one of the drawers.
From contributor H:
How much cost do you guys add for toe kick drawers? Looks like a lot of extra time, as this is custom stuff versus standard. I have one builder who hints at this idea of toe kick drawers, but he's also cheap.
From contributor D:
We charge $75.00 per standard kitchen drawer, 110.00 for oversized drawers, and for a basic toekick drawer we charge about $150.00-175.00 (factors are style, species, dividers, size and finishes). The one shown above was only charged 135.00 I believe, because of no dovetails, Baltic birch ply and the bottom was planted on. Everybody does it different.
From contributor I:
How do you guys deal with out-of-level floors when doing drawers in the toe-kick? You can shim/trim toe kicks.
From the original questioner:
I put a full plywood bottom in at the very bottom. I can shim all I want/need to. The drawer front is applied after the cabinets are installed. After the drawer fronts are installed, I apply pre-finished 1/4" ply between the toe kick drawers and push it all the way down to the finished floor so we don't need shoe moulding.
From contributor I:
I've had many a kitchen with 1 1/2" difference from high to low points on the floor. Do you make the drawer faces extra long and scribe the bottom of the drawer face? What size of finish reveal between the drawer face and the floor do you like to use? Does your scribe moulding apply to the face of the cabinet bottom in order to close the gap with the floor (I am assuming the case is frameless - I guess)?
From the original questioner:
Wow! I'm in Louisiana, and everything is on a slab. It is hard to mess up a slab by more than about 1/4", so I never have to shim too much. The cabinets are face frame cabinets. I allow 1/4" between the floor and drawer front. This was the first time I'd ever done the toe kick drawers, and maybe I got lucky on this one. I don't plan to try to push them, cause you can't charge enough to make good money, and they really work best when going down over a finished floor. Trying to guess how thick the floor would be could be difficult.
The comments below were added after this Forum discussion was archived as a Knowledge Base article (add your comment).
Comment from contributor W:
I did the same thing except I put my fold down flat ladder in there for the client when I make the cabinets full height. A lot of people love this feature and opt for the full height, knowing that a ladder is handy. I was introduced to this method when I was 14 and working in a wood shop as an apprentice. One of the guys there was making these for a certain popular bike gang. They would grow a certain popular plant in them as seedlings. Clever, eh? Just like the pantry that opened up and had stairs down to a hidden basement. I asked the apprenticeshop board if I could get a new employer pretty fast.