Question
I did a nice set of furniture grade cabinets for a client. I also ground a bunch of Victorian era molding knives and trimmed out their place with cap molding and parting bead style treatment, plinth blocks and 6" tall base, curved and laminated window casings, etc. All in Oregon ash.
Now they want me to give them a price to install "beam wraps" on some really ugly and crooked posts and beams that run the length of their living room with hanger bolts showing, etc. I have told them I would rather do this sort of thing on a time and material basis, but they keep going back to "how much will this cost?".
Does anyone have a good system for wrapping beams and posts with 4/4 solid stock that they could share with me? I, of course, need a method that will allow seasonal movement of the beams (can't just nail the stuff with zero clearance four sides of a post). The "beam" needs show wood on 3 sides, the posts, 4 sides. The beam is longer than any Oregon ash wood available to me. I am set to make molding knives and run any moldings that may be necessary.
Forum Responses
(Cabinet and Millwork Installation Forum)
From contributor L:
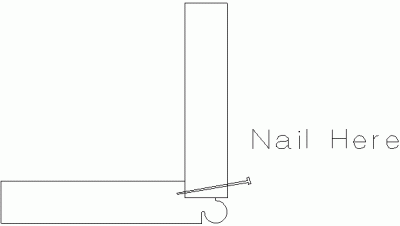
In a situation like this, I would usually use a beaded casing. This is accomplished by running a beading (5/16" or 3/8" would be good) bit twice on an edge. First pass, the router base is run on the 3/4" edge. Second pass, it is run on the face of the stock. Then you remove a rabbet the thickness of the stock from the outside edge. This makes a place for the intersecting piece of wood to sit. I would make two pieces with the bead/rabbet on one edge and a third piece which would be flat stock with square edges. Find the widest part of the beam and start from there. Shim out to keep the two beaded boards parallel, then nail up the flat stock into the rabbets. When you nail it correctly, it will have some give, the board will move and not crack, and it will not move back unless it is nailed to the beam properly. Here is a drawing of the bead and intersecting board.
I am still curious how anyone would deal with the joints (beams are longer than available stock length). If you did the beam with quirked bead, what type of treatment would you give the posts? Also, what about the intersection where the post wrap meets the beam wrap?
Yes, this is a drawing I did a while back - I should have flipped it 90� to make the orientation correct for you.
I've never done any treatments to the posts (besides shimming). If you feel it is necessary, you could coat them with shellac which should seal them pretty well, and it will dry pretty fast. Won't smell that great, but you will be able to do the work the same day.