Wood Wainscot Wall Paneling Ideas
Suggestions on wainscot fabrication, installation, and finishing. May 20, 2009
Question
I just finished up a job for a long time client and they have now asked me to bid on a job entailing some bookcases and wall paneling. This would be stain grade work and I'm responsible for presenting the designs and options. So far I've gotten some info from the archives but am still left with many questions.
First, someone mentioned for raised wood panels to cover the backs with canvas and hide glue. Would this be done even if the finish would not be applied until after installation? Second, is it the norm to pre-finish this type of work, or to install and then finish? Third, the doors into this study (one interior and four exterior) are painted white. I think this could be problematic with what will likely be lightly stained white oak paneling.
Has anyone had this situation come up, and if so how did you deal with it? One possibility I've thought of is to only panel two walls (without doors) and leave the rest painted. Of course this would be up to the owners but I'm looking for other suggestions I may not have thought of.
Lastly (for now), does anyone have any good sources, books or otherwise I could look into? This is a step up for me from basic trim molding so I'd like to read up as much as possible before I attempt the quote.
Forum Responses
(Architectural Woodworking Forum)
From contributor G:
I do paneling all the time. I have never heard of the canvas/hide glue trick before so I can't say no to it. I always seal the backs of my panels with a good thick coat of lacquer (no sanding and before you insert them into the styles and rails so everything gets covered, remember to account for the space the lacquer takes up so your panels aren't too tight in the groove). It is always best to try to seal the endgrain of the panels since this is where it is easiest for the humidity to wick into the panels.
I always try to pre-finish everything I put out. It does make it a more difficult install though as there is very little room for errors. Plus it keeps the smell and down time in the room to a minimum. I can always get a better finish in the shop than I could in someone’s home, plus the fact that you can charge for it instead of subbing it out to someone else. What style of paneling are they interested in? The book “Early Domestic Architecture of Connecticut” was my bible when I was doing reproductions in my state.
From the original questioner:
I just ordered that book, along with several others, from Amazon. What they've asked me to do is create the feel of an old library, in a lighter wood finish. So it's really up to me to come up with the ideas. I'm thinking most likely raised panels vs. flat, and probably will suggest rift sawn white oak with a very light stain. That's the easy part, the designing and figuring out how to build it properly is where I need work. I'm torn between finishing in-house which is what I'm used to, or finishing on site which I would guess might be more accurate for the type of work. But then I'd have to worry about endgrain, and staining the edges of raised panels and probably dozens of other things I haven't thought of yet. I've done several projects for this client and although cost is always a consideration, they don't mind spending on good work. I just had to throw that out before someone brought it up.
From contributor R:
I'm currently installing a stain grade panel system throughout a study in a new construction. Everything is prefinished, but the panels are being installed separately. I built the frames, and added 1/4" gussets in most of the interior corners. I made all the panels and the trim, but they will be installed after the frames are in place. The 1/4" gussets and open frames make it really easy to set the frames and plane them out square and plumb across the entire wall. The doors will have the same panels as the walls, so I can't help you with that.
From Gary Katz, forum technical advisor:
To contributor R: it sounds like you're just getting into frame and panel work. You might try the easy way, which is building your frames from s4s stock and pocket screwing the joinery, then installing the frames. You can install the panels and panel molding after the frames are in, unfinished or pre-finished won't really matter if you pre-assemble the panel molding.
We use a rabbeted panel molding so it's easy to pre-assemble the molding, attach it to the panels, then install both molding and panels at once - that way the joint between the molding and the panel is tight, the molding is tight against the frames, and the miters are perfect. You can see some of that on Prog. 7 and 8 of my dvd series, and some of it in the book I wrote with JLC called Finish Carpentry: “Efficient Techniques for Custom Interiors”. I don't pretend to be a super craftsman or fine woodworker. I just have done this stuff for a living for over 30 years.
From contributor R:
Perhaps I was unclear in my post. That is exactly what I am doing. S4S frame stock, glued and pocket screwed together, mounted to the walls, with the panels added afterwards, and molding to hold the panels.
From Gary Katz, forum technical advisor:
No, I'm sure it was me just reading too much too fast! Good about your approach - that's the easiest and fastest way to panel a room. If you're using rabbeted molding, try that method I mentioned. All you need is a set of miter clamps and a pin nailer, even an 18 gauge brad nailer will work for fastening the miters. You can use a stapler to attach the panel to the molding. I use a staple with a 1/2 inch crown, about 1/2 inch to 5/8 inch long - just a few though. Then squirt some liquid nails or PL 400 on the back of the panel before installing it - that will absorb any bow or belly in the wall.
If you're using recessed panel molding, you can install that after sticking the panel on the wall, but be sure to pre-assemble the miters first. If the pieces are cut a hair long, a couple licks with a sharp low-angle block planer is all it should take to squeeze them in.
From the original questioner:
I originally thought of making the stiles and rails the same way I would a multi-panel door. Which is one of the reasons I thought finishing after the install would be better since I'd have to glue them together onsite. Now I have at least one alternative anyway.
Gary, you’re pre-assembling your panel molding into essentially a picture frame and then securing the panels to that correct? If so are you just securing the top and bottom of the panel at the middle to allow for movement? Won't the glue on the back of the panel also prevent it from moving? The most important thing for me on this job is to get it right, even if it means having to do it the more difficult way. That's why I appreciate the advice from you guys. Hopefully you'll keep me out of trouble.
From Gary Katz, forum technical advisor:
To the original questioner: right - if the panels are solid stained, then don't staple them to the panel molding too much, just towards the middle of each piece so the ends can move. That's for rabbeted panel molding. But you can still put panel adhesive on the back of the panels, in the center. For recessed molding, you have to apply that after anyway, and I'd pin it to the frame, mostly.
From contributor S:
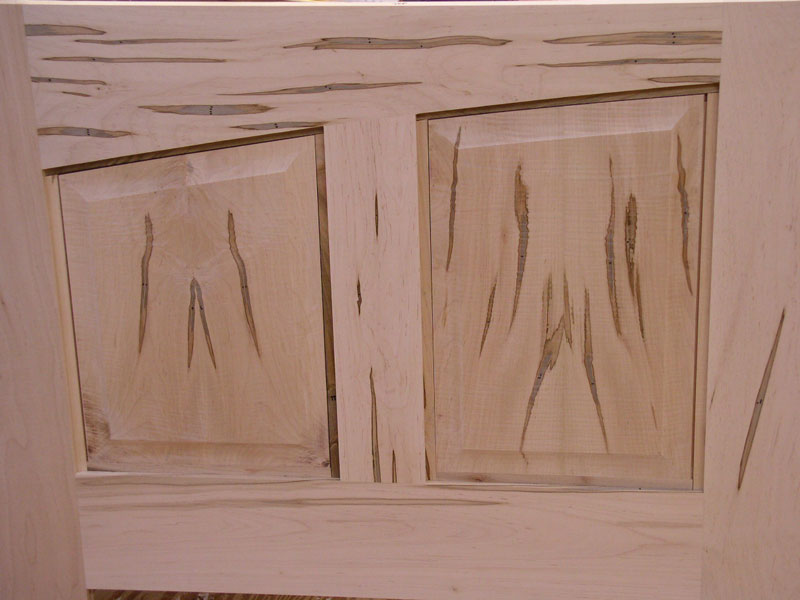
Just to add to the excellent advice you have received, the following are a couple pictures of wainscot paneling I did a while ago. The frames are M&T, installed separately from the panels, with rabbited applied molding as Gary has suggested. As you can see in the one photo there are inserted splines in the frame which the panels sit within, now the applied molding is nailed to the splines allowing the panel complete freedom of movement.
As far transitioning to other rooms, hopefully you can see in the photo, the painted jamb with the first piece of beaded trim painted, with the following two pieces of trim being natural wood, the same as the wall panels. This allowed a nice transition for me, and maybe will give you ideas even if not exactly what you desired.
Click here for higher quality, full size image
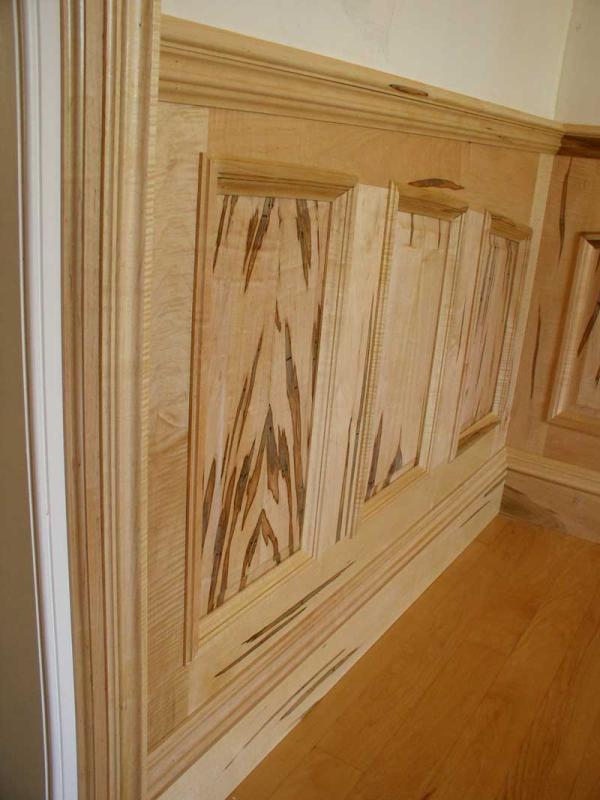
Here's the second image I mentioned. I hope this project goes well for you! By the way, all this was spalted curly soft maple with a clear finish.
Click here for higher quality, full size image
From contributor Q:
Gary - thank you for all the videos and books, I use them as an "intro course" for all new hires and more often than not those guys end up showing the "experienced" guys new tricks, good stuff. I would suggest selling the customers on paint grade so that you can use lightweight MDF to experiment, especially if this is the first time. My experience was always very expensive. Then go for the real wood when you have refined the techniques.
From contributor Y:
Your maple frames and panels look like ambrosia maple to me. Spalt is caused by decay and usually looks like thin black lines. Ambrosia stains are caused by the ambrosia insect and the fungi it introduces to the tree. The ambrosia stains are exactly like the ones in your photo. Note the small holes; another tell tale sign of the ambrosia beetle.
From contributor S:
Thank you so much for clarifying. I purchased this lot "as ambrosia" but just assumed spalted and ambrosia were the same. I was not aware that an "ambrosia beetle" existed. At any rate it was fun to work with and discover the bookmatches for the panels.