Question
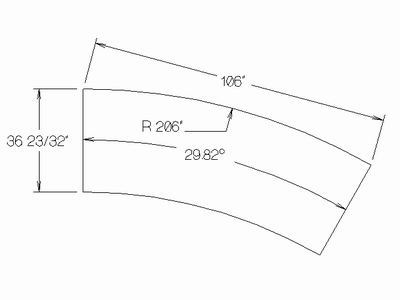
I hope someone can help me out here. I remember seeing the formula to cut a piece of laminate, bending plywood, etc to the correct size and angle to cover a cone and get the seams correct. Next week I am going to be starting a curved wall that slopes outward at the top and could use the formula I saw and thought I would never use. The radius is 206" at the top, 202" at the bottom, 36.5" high and chord length is 106". I'm sure with the right formulas I can rout my plywood to wrap around the wall and not have a lot of hand fitting.
Forum Responses
(From WOODWEB's CNC Forum)
I think for that radius you just want an oversized piece that you trim off for the cores/bender board and then seam the laminate in. I do the math when it matters for veneer matching of tapered pieces.
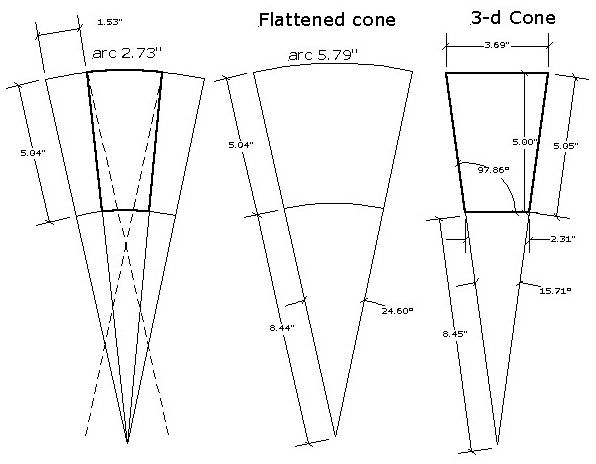
To make a cone you obviously need to wrap up a Pac-man shaped sheet of whatever you are using. The unknowns are the radius and the size of the wedge that's missing. Picture a paper cup.
First the radius of the sheet is the length of the cone along the seam.
Next the circumference around the base (big end) of your cone is the distance around the sheet. What's left (this distance will be less than the circumference of the circle you've just drawn) is the wedge shape.
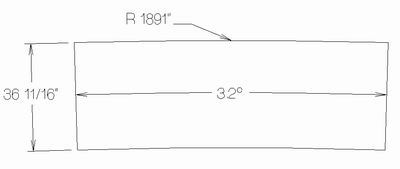
So for your model, it's a bit more complicated, but not much. Draw your cone and project the taper till the ends meet. That line becomes your radius for your circle. On CAD that means your cone has a radius of... (flipping to AlphaCAM here, hehe) 1891.004". I hope you have a CNC machine!
A 206" circle has a base circumference of 1294.3" so wrap that around the radius of your new circle and it takes up 39.2 degrees of the circle. So draw a wedge 39.2 degrees and that's the bit of the circle you need to use. (Since your wall is short with very little taper, the 'Pac-man wedge' part is actually bigger than the part itself - his mouth is *really* open.)
Of course since you are not making the whole cone, you can offset this outside line your wall height of 36.5 to get the proper "band" that you need.
We are a small custom kitchen manufacturer, with about 66 employees. We have a separate division, Keener Architectural Millwork, that is growing rapidly and we are doing more and more out of the ordinary things. We started out doing a lot of medical facilities and banks and now entire schools and new car showrooms.
Slant height s =
sqrt([206-202]�+36.5�)=36-23/32"
Now draw an arc offset from the original arc by 36-23/32". Connect the ends of the strips through the center of the arcs. Erase the triangle. Is that your cone? I may have reversed the radii with the chord. Please recheck!
Here's what I came up with:
P.S. Confirm the angle mathematically with
2*arcsin(chord/dia) =
2 arcsin(106/412) = 29.81764�
The chord length isn't particularly relevant here, as I don't think it is mathematically easy to figure out joints other than ones that are straight along the cone surface (perpendicular to the base "tangent" if that makes sense). I could be wrong but I've never figured out a way to get these "end panels" and they must be hand fitted. The chord length will tell you how much of the cone you will have to skin and thus approximately the number of skins you will need, cut both end skins oversize.
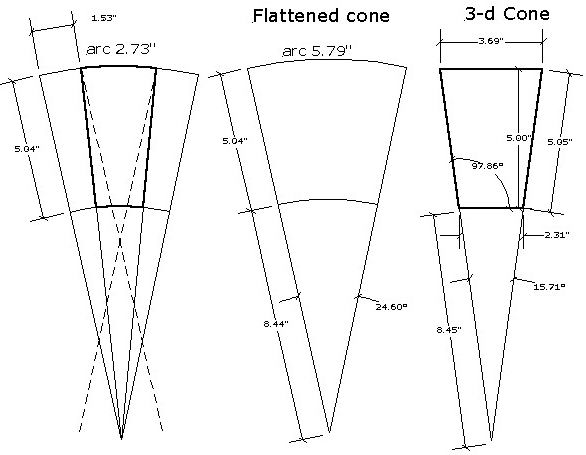
I *think* this is the correct development of your cone. Maybe someone else will post theirs. I don't have my sci calculator and equations here, so the numbers aren't exact. I just drew it quickly on my home CAD.
First find the overall height of the *full* cone using CAD or similar triangles:
206"/cone height=(206-202)/36.5
(similar triangles)
cone height= 1879.75"
using a^2 + b^2 = c^2 we can get the length 'along' the cone
206^2 + 1879.75^2 = length^2
length = 1891.0 "
Draw a circle with radius of 1891"
The top of your wall has a radius of 206", thus a circumference of:
206 x pi x 2 = 1294.3"
the circle you just created has a circumference of:
1891 x pi x 2 = 11881.5"
your skin needs to have 'angled' ends (the pie shape):
angle/360=1294.3/11881.3
angle=39.2 degrees
Use a 39.2 degree 'pie' out of your circle and that is your skin. You may offset your circle for a wall that is not the full cone. In your case:
36.5^2 + 4^2 = offset^2
offset = 36.7"
I don't think that the chord length is useful in making skins other than to estimate joints or number of panels. Both ends will need to be hand fit unless the wall ends in a true cut 'along' the cone (i.e same as a panel joint, which is unlikely).
So by looking at the relationship between a 3-d cup, and a 2-d flattened cup, I can see that the angle of the slope changes. The length of the chord would change the angle of the piece needed to laminate an object that is less than half of a flattened cone. I don't see an immediate relationship between the radius of a cone and the radius of a flattened cone.
With some investigation, I shall find some formulas to make an Excel file to solve this.
?
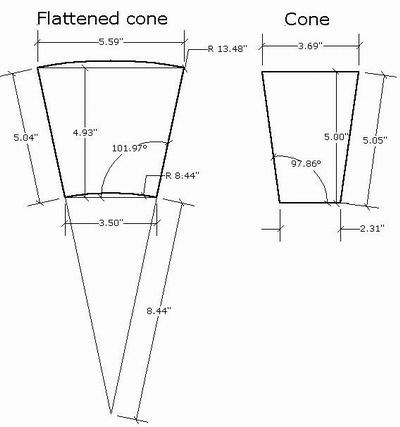
If you have a chord length and the radius of a cone, you need to find the length of the arc for that.
Calculate radius times pi, divide by 2. This is half the circumference. Now subtract the length of the arc of your partial cone from the half circumference number. Use half of the answer to offset the lines of the flattened cone drawing. (The dashed lines in the drawing represent this.) This should be the piece of material that will wrap a partial cone.
From contributor A:
Contributor M is correct - 3.2 degree side length is 36.7185. To lay out without CAD, do this:
1) Draw a rect. 107.1913" x 37.4634"
2) Measure .7597" down from each corner on long side on top.
3) Make an arc connecting these 2 points to center. This will be your top arc.
4) From bottom, measure in on long side 1.0407" on both ends.
5) Measure up from center of bottom long side .7449".
6) Draw an arc through these 3 points. This will give you your 102 radius for the bottom of the cone.